Font Awesome Icon Issues
In this article we're going to discuss problems related to rendering the FontAwesome font icons and troubleshooting steps that you need to follow to fix the issue.
CORS and Font Awesome
X/Pro themes and the standalone Cornerstone plugin use the Font Awesome library to visualize icons. FontAwesome is a library of font icons which you can use on your website. The font icons use text-based fonts to show icons instead of images, this ensures that you can use all the font related CSS codes to make the icon bigger or smaller or change the colors without the need of changing an image.
A common problem related to Font Awesome icons missing is due to the domain being requested outside the domain of which the resource originated. To fix the problem you need to enable a server configuration called CORS. Click here for more information about the CORS.
Enabling CORS is a relatively simple and straightforward. Below, we'll cover how to enable CORS on Apache, Nginx & Microsoft IIS, first though, we'll cover how to find out what technology your site is running on if you don't already know.
Finding Server Software
There are many tools to find out which web server your hosting service provider use. You can use the Netcraft website to find out about your server. Follow the steps below:
- Go to Netcraft website by clicking here.
- Add the URL or domain of your website to the tool to show the details of the website. In our case, we added WordPress.org.
- Search for the Web Server under the Hosting History to find out the web server that the website uses. In our case it uses Nginx.
Now that you know which web server you use, follow the steps below depending on the web server suitable for your case:
Enabling CORS on Apache
In this section, we'll cover enabling CORS on apache, this article will cover the .htaccess method, rather than the httpd.conf method, both work perfectly fine and neither one is better than the other.
Open up your .htaccess file. You can access your .htaccess file either via FTP or your cPanel's file manager. Once you've got it open, it should look like this:
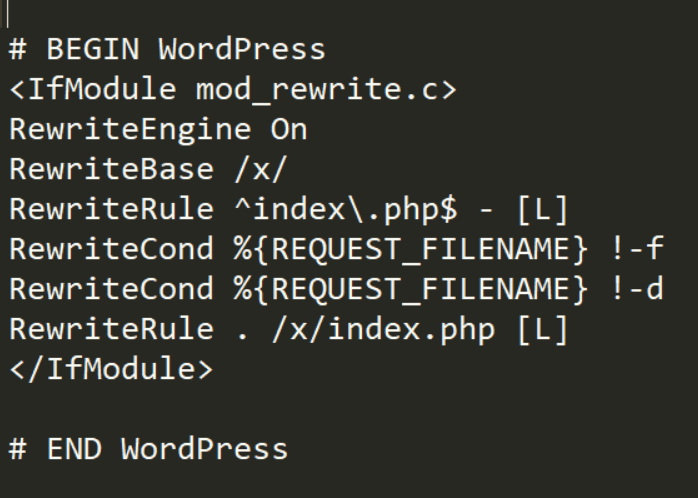
The above image is the default WordPress .htaccess for a single site install, installed in the root of a domain. Your one may look different depending on a few factors, which are.
- If you're using a single site or multisite install
- Which version of WordPress you originally started with, i.e, if you started your site on WordPress 3.4 or below with a multisite install, you'd have a different . htaccess than the current multisite install.
- If you've installed WordPress in a directory other than the root path, for example,
/public_html/mycoolsiterather than just/public_html. - You can find examples of most types of "default" WordPress .htaccess files here.
- Now above your current WordPress rules, add the following:
Header add Access-Control-Allow-Origin "*"
Header add Access-Control-Allow-Headers "origin, x-requested-with, content-type"
Header add Access-Control-Allow-Methods "PUT, GET, POST, DELETE, OPTIONS"
Save the file and the CORS will be activated on the server.
Enabling CORS on IIS 7.0 and Up
Before we get started, you should note that there are many different IIS setups and configuration possibilities, because of this we can't possibly cover every situation, but hopefully, the below should help you get started. Open up your web.config, which should look similar to this:
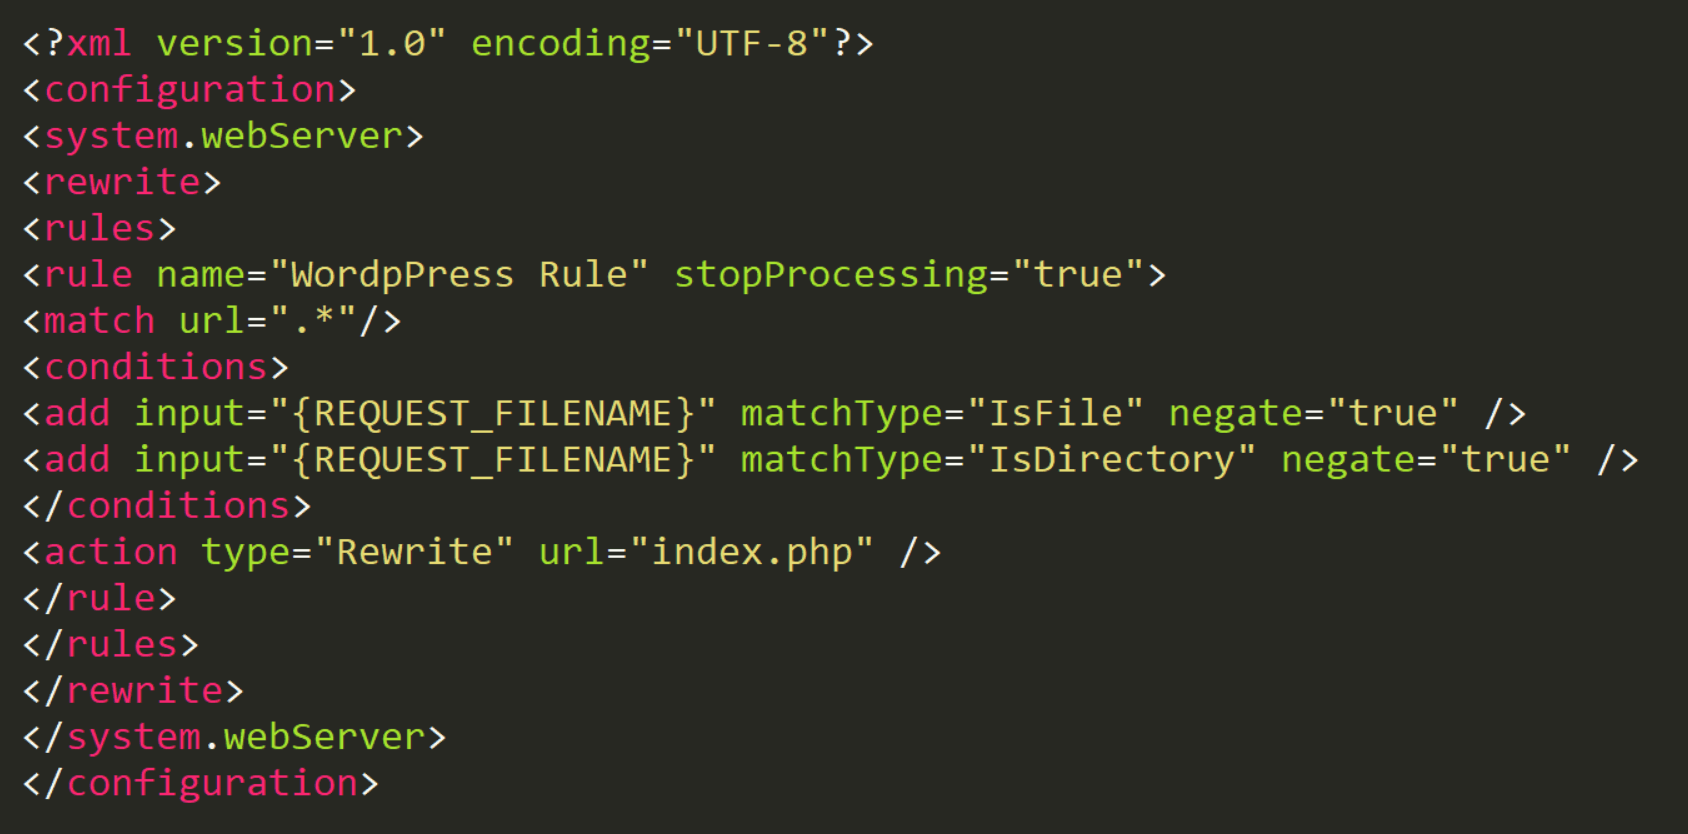
The above image is for an IIS 7.0 web.config using a WordPress single site install and pretty permalinks.
Add the following to your web.config file:
<httpProtocol>
  <customHeaders>
    <add name="Access-Control-Allow-Origin" value="*" />
  </customHeaders>
</httpProtocol>
Save the file and the CORS will be activated on the server.
Enabling CORS on Nginx
Before we continue, you should have a basic understanding of Nginx configuration and server blocks. If you have any issues adding the code or don't know where to add the code, we recommend contacting your hosting provider for assistance. If you don't have direct access to your server you may also need assistance from them.
There's a couple of ways to include the code, we're about to add, you can either include it in your server block (include it multiple times, if you have multiple server blocks), or you can include it under a directory like /etc/nginx/cors and save it as cors_support. Then in your server block, just add:
include cors_support;So open up the file where you want to add cors support or create the file as explained above and enter the following code.
#
# CORS config for nginx
#

location / {
     if ($request_method = 'OPTIONS') {
        add_header 'Access-Control-Allow-Origin' '*';
        #
        #
        #
        add_header 'Access-Control-Allow-Credentials' 'true';
        add_header 'Access-Control-Allow-Methods' 'GET, POST, OPTIONS';
        #
        # Custom headers and headers various browsers *should* be OK with but aren't
        #
        add_header 'Access-Control-Allow-Headers' 'DNT,X-CustomHeader,Keep-Alive,User-Agent,X-Requested-With,If-Modified-Since,Cache-Control,Content-Type';
        #
        # Tell client that this pre-flight info is valid for 20 days
        #
        add_header 'Access-Control-Max-Age' 1728000;
        add_header 'Content-Type' 'text/plain charset=UTF-8';
        add_header 'Content-Length' 0;
        return 204;
     }
     if ($request_method = 'POST') {
        add_header 'Access-Control-Allow-Origin' '*';
        add_header 'Access-Control-Allow-Credentials' 'true';
        add_header 'Access-Control-Allow-Methods' 'GET, POST, OPTIONS';
        add_header 'Access-Control-Allow-Headers' 'DNT,X-CustomHeader,Keep-Alive,User-Agent,X-Requested-With,If-Modified-Since,Cache-Control,Content-Type';
     }
     if ($request_method = 'GET') {
        add_header 'Access-Control-Allow-Origin' '*';
        add_header 'Access-Control-Allow-Credentials' 'true';
        add_header 'Access-Control-Allow-Methods' 'GET, POST, OPTIONS';
        add_header 'Access-Control-Allow-Headers' 'DNT,X-CustomHeader,Keep-Alive,User-Agent,X-Requested-With,If-Modified-Since,Cache-Control,Content-Type';
     }
}
Depending on your exact configuration and setup, you may get a warning such as:
"add_header" directive is not allowed hereIf you get such an error, connect to your server running nginx using SSH and enter:
sudo apt-get install nginx-extrasThis will then enable the more_set_headers config.
Error 404 not found
The most common cause of receiving a 404 for Font Awesome is on a Microsoft IIS web server, IIS doesn't enable the .woff or .woff2 mime type by default, so we'll need to add some additional rules to the web.config for this.
Open up your web.config file (this is for IIS 7 or later) and add the following:
<remove fileExtension=".woff"/>
<mimeMap fileExtension=".woff" mimeType="application/x-font-woff" />
<remove fileExtension=".woff2"/>
<mimeMap fileExtension=".woff2" mimeType="application/x-font-woff" />
So now if you used the default web.config for WordPress, you'd have something that looks like this:
<?xml version="1.0" encoding="UTF-8"?>
<configuration>
<system.webServer>
<rewrite>
<rules>
<rule name="WordPress Rule" stopProcessing="true">
<match url=".*" />
<conditions>
<add input="{REQUEST_FILENAME}" matchType="IsFile" negate="true" />
<add input="{REQUEST_FILENAME}" matchType="IsDirectory" negate="true" />
</conditions>
<action type="Rewrite" url="index.php" />
</rule>
</rules>
</rewrite>
<staticContent>
<remove fileExtension=".woff"/>
<mimeMap fileExtension=".woff" mimeType="application/x-font-woff" />
<remove fileExtension=".woff2"/>
<mimeMap fileExtension=".woff2" mimeType="application/x-font-woff" />
</staticContent>
</system.webServer>
</configuration>
Save that and the Font Awesome should be working now.
Icon Attributes and Font Awesome Versions
Our products currently bundle Font Awesome 7. This has no impact on the way you add font icons using the builders, but it matters if you hand-wrote icon markup in an older version of X/Pro, or if you are writing custom markup or CSS now.
Font Awesome 5 split the icons into multiple fonts, and each style gets its own data attribute. If you have old markup using the bare data-x-icon attribute, change it to the attribute matching the style you want:
data-x-icon-s | Solid | FontAwesome | 900 |
data-x-icon-o | Regular | FontAwesomeRegular | 400 |
data-x-icon-l | Light | FontAwesomeLight | 300 |
data-x-icon-b | Brands and social icons | FontAwesomeBrands | normal |
data-x-icon-d | Duotone | FontAwesomeDuotone | 900 |
data-x-icon-ss | Sharp Solid | FontAwesome SharpSolid | 900 |
data-x-icon-sr | Sharp Regular | FontAwesome SharpRegular | 400 |
data-x-icon-sl | Sharp Light | FontAwesome SharpLight | 300 |
| Attribute | Style | Font family | Weight |
|---|
The bare data-x-icon attribute still works and maps to Solid, so legacy markup will not break, but new markup should use data-x-icon-s.
If you are referencing a glyph from custom CSS rather than markup, the font family and the weight both have to match the style in the table above. Setting only font-family makes the browser synthesize the wrong face, and the icon will render as a blank box or the wrong shape.
.my-element:before {
  content: "\f058";
  font-family: "FontAwesomeLight";
  font-weight: 300;
}
For the full reference — icon key prefixes, Duotone color properties, and the PHP helper functions — see Font Awesome Pro.
An Icon Renders as a Blank Box or the Wrong Shape
When an icon is missing but other icons on the page render fine, the cause is usually one of these rather than a server issue:
- The style is disabled. Each style has its own toggle under X/Pro > Theme Options > Font Awesome, and a disabled style never loads its font file. A
d-prefixed icon with Duotone turned off, for example, falls back to Solid. - The weight does not match the family in custom CSS. See the table above.
- The icon name does not exist. An unrecognized icon key renders as
xmark, so a strayxmarkin place of your icon usually means a typo or an old icon name.
Renamed Icons
Font Awesome renamed many icons between v5 and v6, and those names carry through to v7. We ship a compatibility shim that maps the old names and codepoints onto their current equivalents, so icon keys saved in older versions of your site keep working. It is enabled by default and generally should be left on. New markup should use the current Font Awesome 7 names — xmark rather than times, martini-glass-empty rather than glass, and so on.
Contacting Hosting Service Provider
The font related issues are most of the times related to the server configuration. That is why it is important that you contact your hosting service provider and ask them to follow up the case for you, especially if you do not have the technical capability to enable the CORS directly yourself.
Make Sure Font Awesome is Enabled
The final point to be considered regarding the Font Awesome troubleshooting is that you need to make sure it is enabled. You can check that by going to X/Pro > Theme Options > Miscellaneous > Font Awesome.
You will be able to enable or disable each icon style individually: Solid, Regular, Light, Sharp Regular, Sharp Light, Sharp Solid, Duotone, and Brands.
SVG Directory Issues
SVGs come packaged to you in a zip file. When SVGs are being used this zip file will be unzipped. If your host has limits on the numbers of files you are recommended to not use this or switch hosting providers.
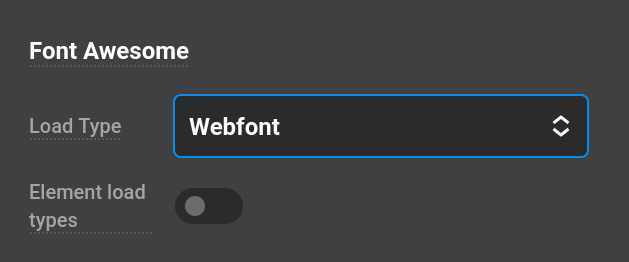
To fix a site with this issue. Turn icon Load Type to Webfont and turn off Element load types in the Theme Options
Summary
We've talked about the possible causes of the font icons rendering issues and specifically the Font Awesome library which our products use to show the font icons. We discussed the web server detection and enabling the CORS feature on your server depending on the web server technology that you use. We also covered the per-style icon attributes used by the current Font Awesome 7 integration and the most common reasons an individual icon fails to render. Finally, if you still have problems and the font icons of your website are not showing, contact our support team and we will be happy to help.
See something inaccurate? Let us know