Twig
In this article, we're going to discuss the Twig integration and all of the incredible new features for Cornerstone's Dynamic Content System.
Overview
What we are affectionately calling Dynamic Content 2.0 is powered by Twig and available in Pro 6.5+, X 10.5+, and Cornerstone 7.5+. Twig is a fast, secure, and flexible templating engine for PHP that adds to our Dynamic Content System in numerous ways not previously available including math, looping content, filtering, advanced templating and more. This feature is currently in beta, and we would love to hear your feedback!
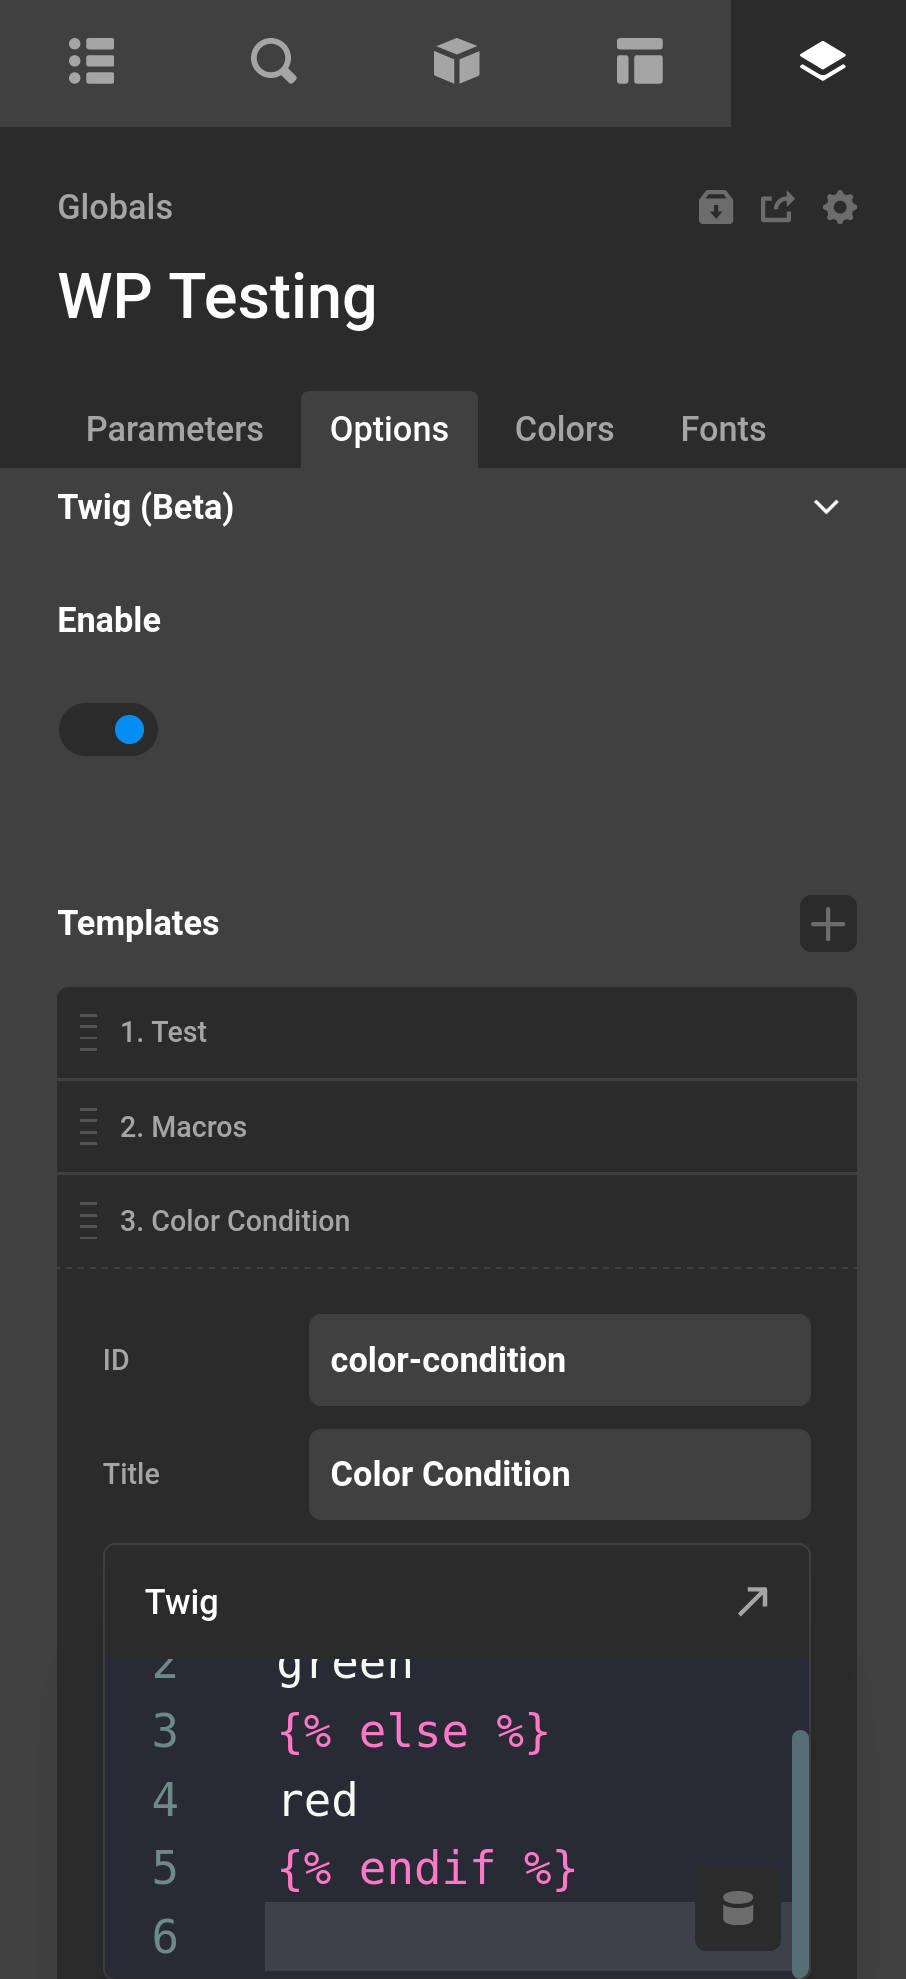
How to Enable
In the theme options, scroll down to "Twig." Pressing the enable button will show all of the options available. Saving after this step will then enable Twig, and you are good to go. Please note that PHP 8.1 is required.
Dynamic Content vs Twig
The Dynamic Content System is still available while Twig is enabled (Twig is actually an extension of this system) and the main technical difference is that Dynamic Content uses colons (:) as the separator for the group and action you are doing. Dynamic Content runs first meaning if you start using Twig, none of your previous sites usages of Dynamic Content will change. Any point of data that is registered through the Dynamic Content System is usable in the Twig System (difference being that Twig uses dot syntax to grab these points of data). dc can prefix any of these points of data, but it is also not needed as we will see below. Here are some examples.
// In Dynamic Content
{{dc:post:title}}


{# In Twig #}
{{dc.post.title}}

{# In Twig without dc prefix #}
{{post.title}}
Grabbing data from a Parameter whose value is an object.
// In Dynamic Content
{{dc:param:object type="object" key="key"}}


// In Twig
{{dc.param.object.key}}

{# In Twig without dc prefix #}
{{param.object.key}}
Grabbing data with a fallback. This uses the default filter in Twig. More info on filters later.
// In Dynamic Content
{{dc:looper:field key="mykey" fallback="my fallback"}}

{# In Twig you can access the keys of the item directly #}
{{ looper.item.mykey | default("my fallback") }}
Arguments are passed through as an object. Using the same example from before, it would look like this. Utilizing the Dynamic Content UI will do this for you.
// In Dynamic Content
{{dc:looper:field key="mykey"}}

{# In Twig using arguments #}
{{ looper.field({ key: "mykey"}) }}
Inner Dynamic Content
Inner Dynamic Content does not exist in Twig. How it works instead is that when you have started a block you can use any number of Dynamic Content data points.
Here is an example where we use Parameters to grab a Global Color based on an ID.
The Parameters
{
  "color": {
    "initial": "dc87e8df-77ac-4229-a6d5-6c9b5e84196a"
  },
  "fallback": {
    "initial": "red"
  }
}
The Dynamic Content
// How it would work with Inner Dynamic Content
{{dc:global:color id="{{dc:p:color}}" fallback="{{dc:p:fallback}}"}}

{# In Twig #}
{{ global.color({ id: p.color }) | default(p.fallback) }}
Other Differences
Other differences include the following.
- Dynamic Content uniquely can return arrays of data as the return value. That is why the Dynamic Content looper does not use Twig. All Twig returns are strings as it is used for templating.
- Invalid Twig templates will return errors in the App. These do not show up in the frontend unless you enable the
Debugextension.
Caveats
- Parameters using
isVarstill need to use the regular{{dc:p:myParam}}system. - The Twig localization extension is not sent in the theme files. This extension uses over 20k files and we have had issues in the past sending a large amount of files. In the future we may release a plugin that includes this extension.
- The Twig Markdown extension is not sent in the theme files. In the future we may release a plugin that includes this extension.
- Custom dynamic content cannot use a
-or any of the math symbols. For instance you should renamecustom-dctocustom_dc.
Twig Primer
This doc will get you started with Twig and Dynamic Content, however reading the Twig docs will also help out your understanding here.
Blocks
A Block is anything that happens the {{ }}, {% %}, and {# #} tags.
{{ }} are Print Blocks. They are used to print to the page and whenever you see them you can know that the return of this Block will show up on the page.
{% %} are Execute Block. These are used for actions and will not actually output anything to the page. Using these in conjunction with regular HTML can output to the page, as we'll see with flow control and set statements.
{# #} are Comment Blocks. They are the equivalent of the <!-- --!> tag in HTML. However these comments do not show up on your page. They can be helpful to help describe what you are doing in advanced templates.
Set Statements
{% set varName = 'value' %} is the set statement. This can be used to create dynamic variables which can be reused, or be used to split up logic and make your template more readable. Here are some basic examples.
{# Create a variable which has an uppercased post title #}
{% set uppercaseTitle = post.title | uppercase %}

{# Outputting this title in an h2 tag #}
<h2>{{uppercaseTitle}}</h2>
Math
Math can happen within all blocks. Using a parenthesis (()) you can manage the Order of Operations. You can use variables or Dynamic Content statements in place of the numbers you will see here.
{# +: Adds two numbers together (the operands are casted to numbers). {{ 1 + 1 }} is 2. #}
{{ 1 + 1 }}

{# -: Subtracts the second number from the first one. {{ 3 - 2 }} is 1. #}
{{ 3 - 2 }}

{# /: Divides two numbers. The returned value will be a floating point number. {{ 1 / 2 }} is {{ 0.5 }}. #}
{{ 1 / 2 }}

{# %: Calculates the remainder of an integer division. {{ 11 % 7 }} is 4. #}
{{ 11 % 7 }}

{# //: Divides two numbers and returns the floored integer result. {{ 20 // 7 }} is 2, {{ -20  // 7 }} is -3 (this is just syntactic sugar for the round filter). #}
{{ 20 // 7 }}

{# *: Multiplies the left operand with the right one. {{ 2 * 2 }} would return 4. #}
{{ 2 * 2 }}

{# **: Raises the left operand to the power of the right operand. {{ 2 ** 3 }} would return 8. #}
{{ 2 ** 3 }}

{# Putting it all together with Dynamic Content, based on the looper index multiply by 2, plus 15 #}
{{ ( looper.index * 2 ) + 15 }}
Flow Control
{% if %} blocks can help manage conditional content, CSS, or JS. They can also be used with an {% else %} statement. All if blocks end with an {% endif %} block.
The following comparison operators are supported in any expression: ==, !=, <, >, >=, and <=.
Here are some examples.
{# The looper index is greater than 2 #}
{% if looper.index > 2 %}
  <h2>Greater than 2</h2>
{% endif %}

{# The post is published #}
{% if post.status == 'publish' %}
  Post is published
{% else %}
  Post is not published
{% endif %}

{# The Post publish date was less then 30 days ago #}
{% if date(post.publish_date) > date("-30 days") %}
    <p>Less than 30 days old</p>
{% endif %}
Ternary and Shorthand Flow Control
Ternary operators are a shorthand way to write an if-else statement in Twig. They provide a concise method for checking the truth of a condition and performing different actions based on whether that condition is true or false. This can be particularly helpful when you need to perform multiple tasks depending on some conditional logic, as it allows you to reduce the amount of code needed to accomplish this task.
{# Checking post is published like in the Flow control example #}
{{ post.status == 'publish' ? 'Published' : 'Not Published' }}

{{ foo ?: 'no' }} is the same as {{ foo ? foo : 'no' }}
{{ foo ? 'yes' }} is the same as {{ foo ? 'yes' : '' }}
Looping
{% for %} blocks can be used to loop content in a template. Looping can be helpful if you have a simple output that you don't feel the need to setup a looper for, or can't. Ranges of numbers can be created through 1..5 statements. All for loops end with a {% endfor %} statement.
{# Loop through numbers 1 to 5 #}
{% for i in 1..5 %}
  {{ i }}
{% endfor %}

{# Loop through a list of users #}
{# See the WordPress extension later for a list of built in functions #}
<ul>
  {% set usersToLoop = get_users() %}
  {% for user in usersToLoop %}
    {# output the ID and the display name of the user #}
    <li>{{ user.ID }} : {{ user.display_name }}</li>
  {% endfor %}
</ul>
String Interpolation
You might think that you can use + to add string content together, however this is not allowed in Twig. Instead you have either the #{expression} statement in a template or you can also use ~ to add string content together.
{{ "content #{looper.index}" }}

{{ "content " ~ looper.index }}

{# or forgo blocks entirely #}
content {{ looper.index }}
Filters
Variables and content can be modified by filters. Filters are separated from the variable by a pipe symbol (|). Multiple filters can be chained. The output of one filter is applied to the next.
Examples
{# using the time_ago filter, to a human time difference #}
{{ post.publish_date | time_ago }}


{# uppercase the post title and then split each character creating an array #}
{# we could then loop over #}
{% set splitTitle = post.title | upper | split('') %}

{# using the argument as a space, every character is now joined together by a space #}
{{ splitTitle | join(' ') }}
In the Dynamic Content UI, using Twig > Filter you can get a list of all available filters. See the list of built in Twig filters here

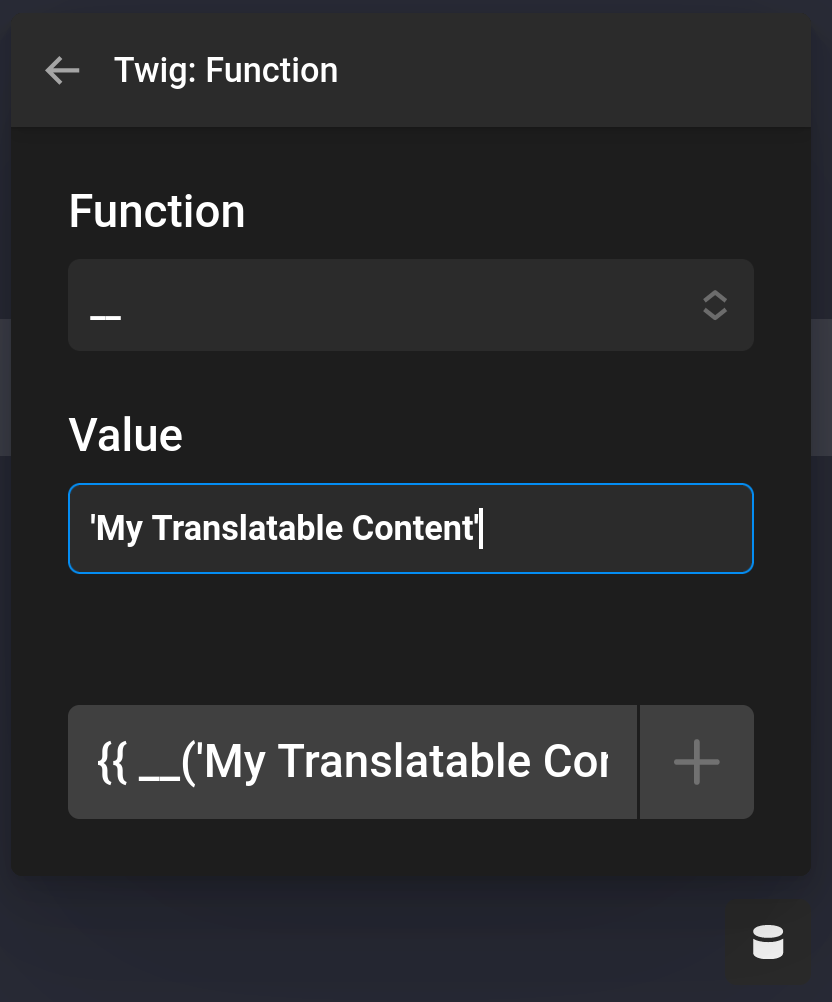
Functions
Functions can be called to generate content as a standalone feature. Functions are called by their name followed by parentheses (()) and may have arguments.
{# Grab a constants value, in this case the heavily used WP_DEBUG constant #}
{% if constant('WP_DEBUG') %}
You are running in Debug mode!
{% endif %}

{# Translate a string through the WordPress function __ #}
{# See the WordPress Extension for more goodies #}
{{ __('My Content', 'my_localize_domain') }}
In the Dynamic Content UI, using Twig > Function you can get a list of all available functions. See the list of built in Twig functions here
Dates
Dates can be created and modified via Twig.
You can convert a dynamic date via the date filter.
{{ "+30 days" | date("m/d/Y") }}You can also modify dates via the date_modify filter. Just pass in the modifier like +1 day or +1 year.
{{ post.publish_date | date_modify("+1 day") | date("m/d/Y") }}Custom Templates
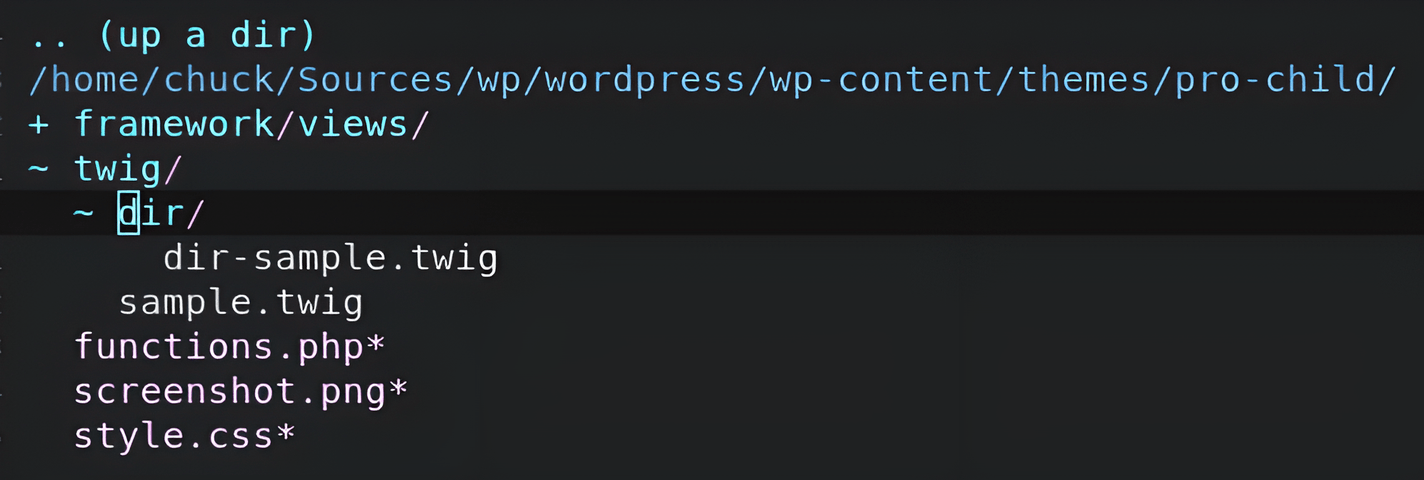
We offer two ways to include custom templates. The first one being in the Theme Options Templates list editor. You can create a custom ID, name, and then your actual Twig template. To include you will prefix with cs-templates: and then your ID of the template.
The second method is through the Directory Loader. When a child theme is detected by default the twig folder and all files found in this folder will be enabled to be loaded through the include statement.
Including Templates
Including templates is best done through the UI. This will give you a list of all templates you have created and will setup all the tags for you.
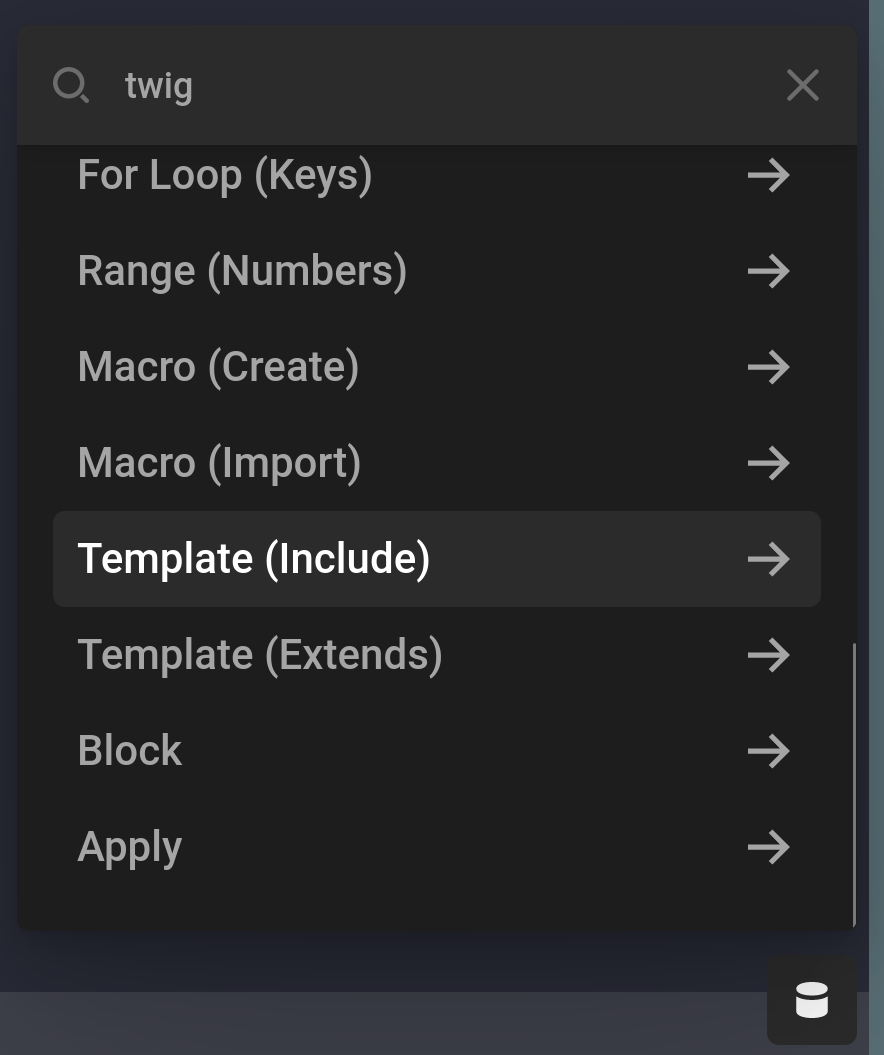
Twig offers 3 main ways to include a template. include, extends, and through macro. You are most likely only going to be using Template (Include) in the UI. This will output your template as it is.
Include
Labeled Templates (Include) in the UI. This will output your template exactly as it is. Any variables you are using will be used from the point you have included the template.
All Theme Option are referenced with cs-template:YOUR_ID. Where YOUR_ID is the ID you have given the template in the Theme Options UI.
{% include 'cs-template:chart-gradient' %}Extends
Extends is similar to include, however it offers the ability to change certain content when placed inside a block tag. We'll breakout this example to two sections.
This is our template. By default if no block is set with the name header this template will output My h2. See more info on the block tag here.
<h2>{% block header %}My h2{% endblock %}</h2>This is where we extend the template. We first use extends to import the template. Then optionally we use the block header to insert our own content in the h2 tag we setup earlier.
{% extends 'cs-template:my-h2' %}

{% block header %}
I love my h2
{% endblock %}
Macros
Although more advanced, macros can offer a way to generate reusable content multiple times. They are kind of like creating your own function directly in a template.
This is our template. We are going to be creating an input tag. First we setup the macro block. input is the name of our macro and inside the parentheses we can create any number of arguments. If we use the = sign we can setup default values, which mean they do not need to be passed into the macro to have a value.
{% macro input(name, value, type = "text", size = 20) %}
    <input type="{{ type }}" name="{{ name }}" value="{{ value|e }}" size="{{ size }}"/>
{% endmacro %}
This is where we use the macro. We use the import statement, however we also name it with as macro similar to creating a variable.
{% import 'cs-template:macros' as macro %}

{# Output text input with value "Themeco" #}
{{ macro.input("name", "Themeco") }}

{# Output date input  #}
{{ macro.input("favoriteday", '2024-01-23', "date") }}
Conditions
Believe it or not, Twig can be used with our Conditions and Assignments system. The expression conditions like number, string, and date are what you are going to be using the most.
With Dates
See our sections on Dates. The Date expression can be used to check two dates. With either one or both using Dynamic Content.
With Arrays
When working with arrays, the in statement can be used to check whether a specific value exists within the array or not. For example, if you have an ACF (Advanced Custom Fields) multi-select field with values red, blue, green as your options and blue is selected, you can use the following code in Twig:
{{ 'blue' in acf.post_field({"field":"multi_select"}) }}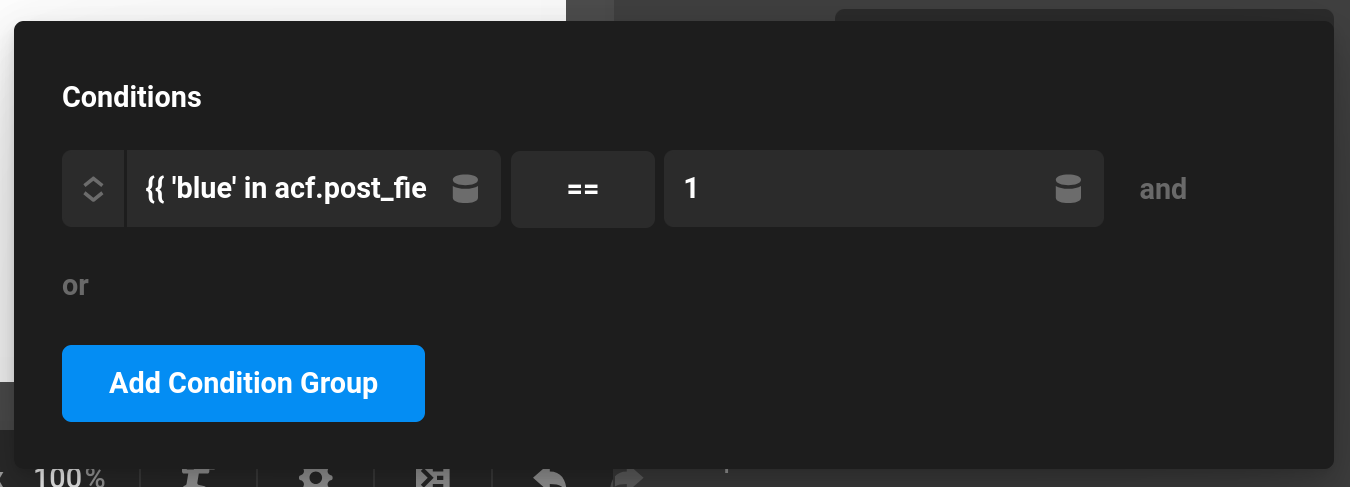
This will return 1 if blue is selected or any other value if it isn't. You can also modify this statement to check for multiple values by using the logical OR operator (||). For example, if you want to check whether red or green.
{{ 'blue' in acf.post_field({"field":"multi_select"}) || 'green' in acf.post_field({"field":"multi_select"}) }}Extensions
None of these are required, but offer helpful filters and functions to extend your experience. These are controlled in the Theme Options.
Builtin Extension
This extension gives helpful filters and functions not built into Twig.
Filters
arrayconvert to an array or if it's already an array just let it bepushadd an item to an array and return the resultsbase64_encodebase64_decodeceilingRound a number to an integer to the highest possible resultfloorRound a number to an integer to the lowest possible resultfile_basenamegiven a full file path (EX:/tmp/file.mp3) return the basename or the direct filename (EX:file.mp3)file_dirnamegiven a full file path (EX:/tmp/file.mp3) return the directory that file is in (EX:/tmp)shufflerandomize an arraymd5hashes a value to MD5phoneformat a phone number from a raw number to the standard-format. (EX:1234567890to(123) 456-7890)readtimebased on the value passed calculate the average read time based on the number of words. Assumes 200 words a minute.json_decodeDecode JSON and make it's properties usable in Twigtime_agoUses human_time_diff to calculate a time difference. Second argument is the to date, third argument is the format for the past and fourth is the format for the future date. Arguments 2-4 are not requiredpretagsfilters pretags in content into HTML entitieslistConverts an array to common oxford comma sentence. First argument is the first delimiter (defaults to,) and second delimiter is the final delimiter (defaults toand)relativeFilters a URL to the relative path based on the site. If the URL does not use the same domain it will use the URL passed into this filter
WordPress Extension
The WordPress extension gives helpful filters and functions related to WordPress. This is heavily based on Timber.
Functions
- get_post
- get_attachment
- wp_get_attachment_url
- get_posts
- get_attachment_by
- get_term
- get_terms
- get_users
- get_user_by
- wp_get_current_user
- get_comment
- get_comments
- get_the_excerpt
- do_shortcode
shortcodealias ofdo_shortcode- bloginfo
- __
- translate
- _e
- _n
- _x
- _ex
- _nx
- _n_noop
- _nx_noop
- translate_nooped_plural
- admin_url
- date_i18n
Filters
Escapers
HTML Extra Extension
This is a Twig / Symfony created extension. It creates the following features.
String Extra Extension
This is a Twig / Symfony created extension. It creates the following features.
Advanced Extension
This extension gives the ability to call WordPress actions and call any arbitrary PHP function. Under no circumstance should it be enabled when you expect users to be able to add their own content that could be Dynamic Content. With great power comes great responsibility.
{# fn / function call #}
{{ function('phpinfo') }}
{{ fn('wc_get_attribute_taxonomies') }}


{# action #}
{{ action('some_useful_action') }}
State Extension
The state extension is currently always enabled. The functions it adds allow you to add data across multiple Elements. Examples could include adding looper values together, or setting flags to do different things based on if a state key is true or false.
get_stateGrabs entire state set through the functionsget_state_keyGrabs a key in the state object with the first argument being the keyset_stateSet the entire state objectset_state_keySet a key in the state object, the first argument being the name of the key and the second argument being the value
Example: We loop through a number of different items in a looper. We want to add the values of a looper field together for usage in another element later down the line.
Note this will sometimes not work in the Cornerstone Preview as elements can be individually rendered.
{{ set_state_key( 'total', get_state_key('total') + looper.item.value ) }}In another element later down the line, we now have a total we can use.
{{ get_state_key( 'total' ) }}Autoescape
When the Autoescape option is enabled anything Twig outputs is going to be escaped. This is useful to make outputs safe by default so malicious HTML is not outputted to the page. If this is enabled and you do want to output the HTML unescaped for something like an ACF WSYIWYG field. You can use the raw filter which you can see below.
{{ acf.post_field({"field":"wysiwyg"}) | raw }}If Autoescape is not enabled, you can escape any Dynamic Content output via the escape filter or it's alias e. The WordPress Extension provides additional escapers as well which are used throughout WordPress itself.
{{ acf.post_field({"field":"user_field"}) | escape }}
or
{{ acf.post_field({"field":"user_field"}) | e }}

{# With custom escaper like in the WordPress Extension #}
{{ acf.post_field({"field":"user_field"}) | e('wp_kses_post') }}
{{ acf.post_field({"field":"user_field"}) | e('esc_url') }}
{{ acf.post_field({"field":"user_field"}) | e('esc_js') }}
{{ acf.post_field({"field":"user_field"}) | e('esc_html') }}
{{ acf.post_field({"field":"user_field"}) | e('esc_attr') }}
Debug Extension
This is a Twig / Symfony created extension. When this option is enabled is also runs Twig Debug mode even in the frontend of your site which can be useful for debugging an issue that only happens on the frontend. While in Cornerstone Debug mode will be enabled to help you out.
Troubleshooting
Unable to create the cache directory
This is caused when WordPress and thus Twig cannot write to the default WordPress temporary directory. See this guide on fixing the temporary directory.
You can also change the Twig Cache directory through the filter cs_twig_cache_directory. More notes on this filter here.
add_filter('cs_twig_cache_directory', function() {
  return '/home/user/cache_directory/twig/';
});
See Also
See something inaccurate? Let us know