Configure User Permissions
Annoyed that Editors accidentally change the stylings of an element in the pages you've designed? Is that new Editor prone to 'accidentally' moving or deleting headlines? In this article, we'll show you how to control what certain user roles are allowed to do with Cornerstone in X and the Content Builder in Pro.
If you design and develop websites for clients, the last thing you want to happen is to get a call in the middle of the night for an "emergency" because the red call-to-action button turned yellow. Then the guilty party is your client. He "accidentally" changed the button background color and doesn't know how to bring it back.
Most clients are non-technical. You need a way to protect their websites from themselves. That's where Permission Settings come in. Both X and Pro starting at Pro v2.1.0,X v6.1.0, and Cornerstone v3.1.0 have Permission Settings available. To access it, simply go to Pro > Settings or X > Settings in X.

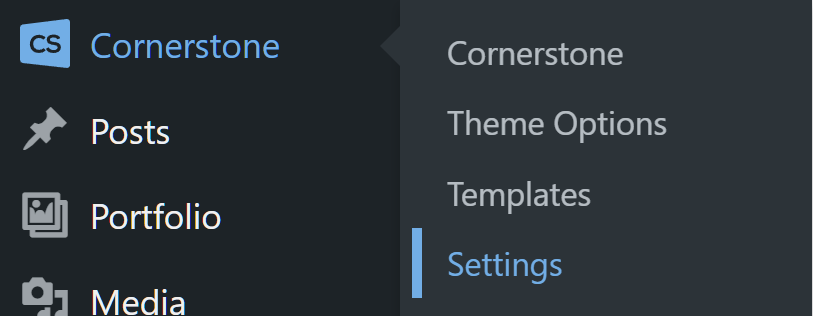
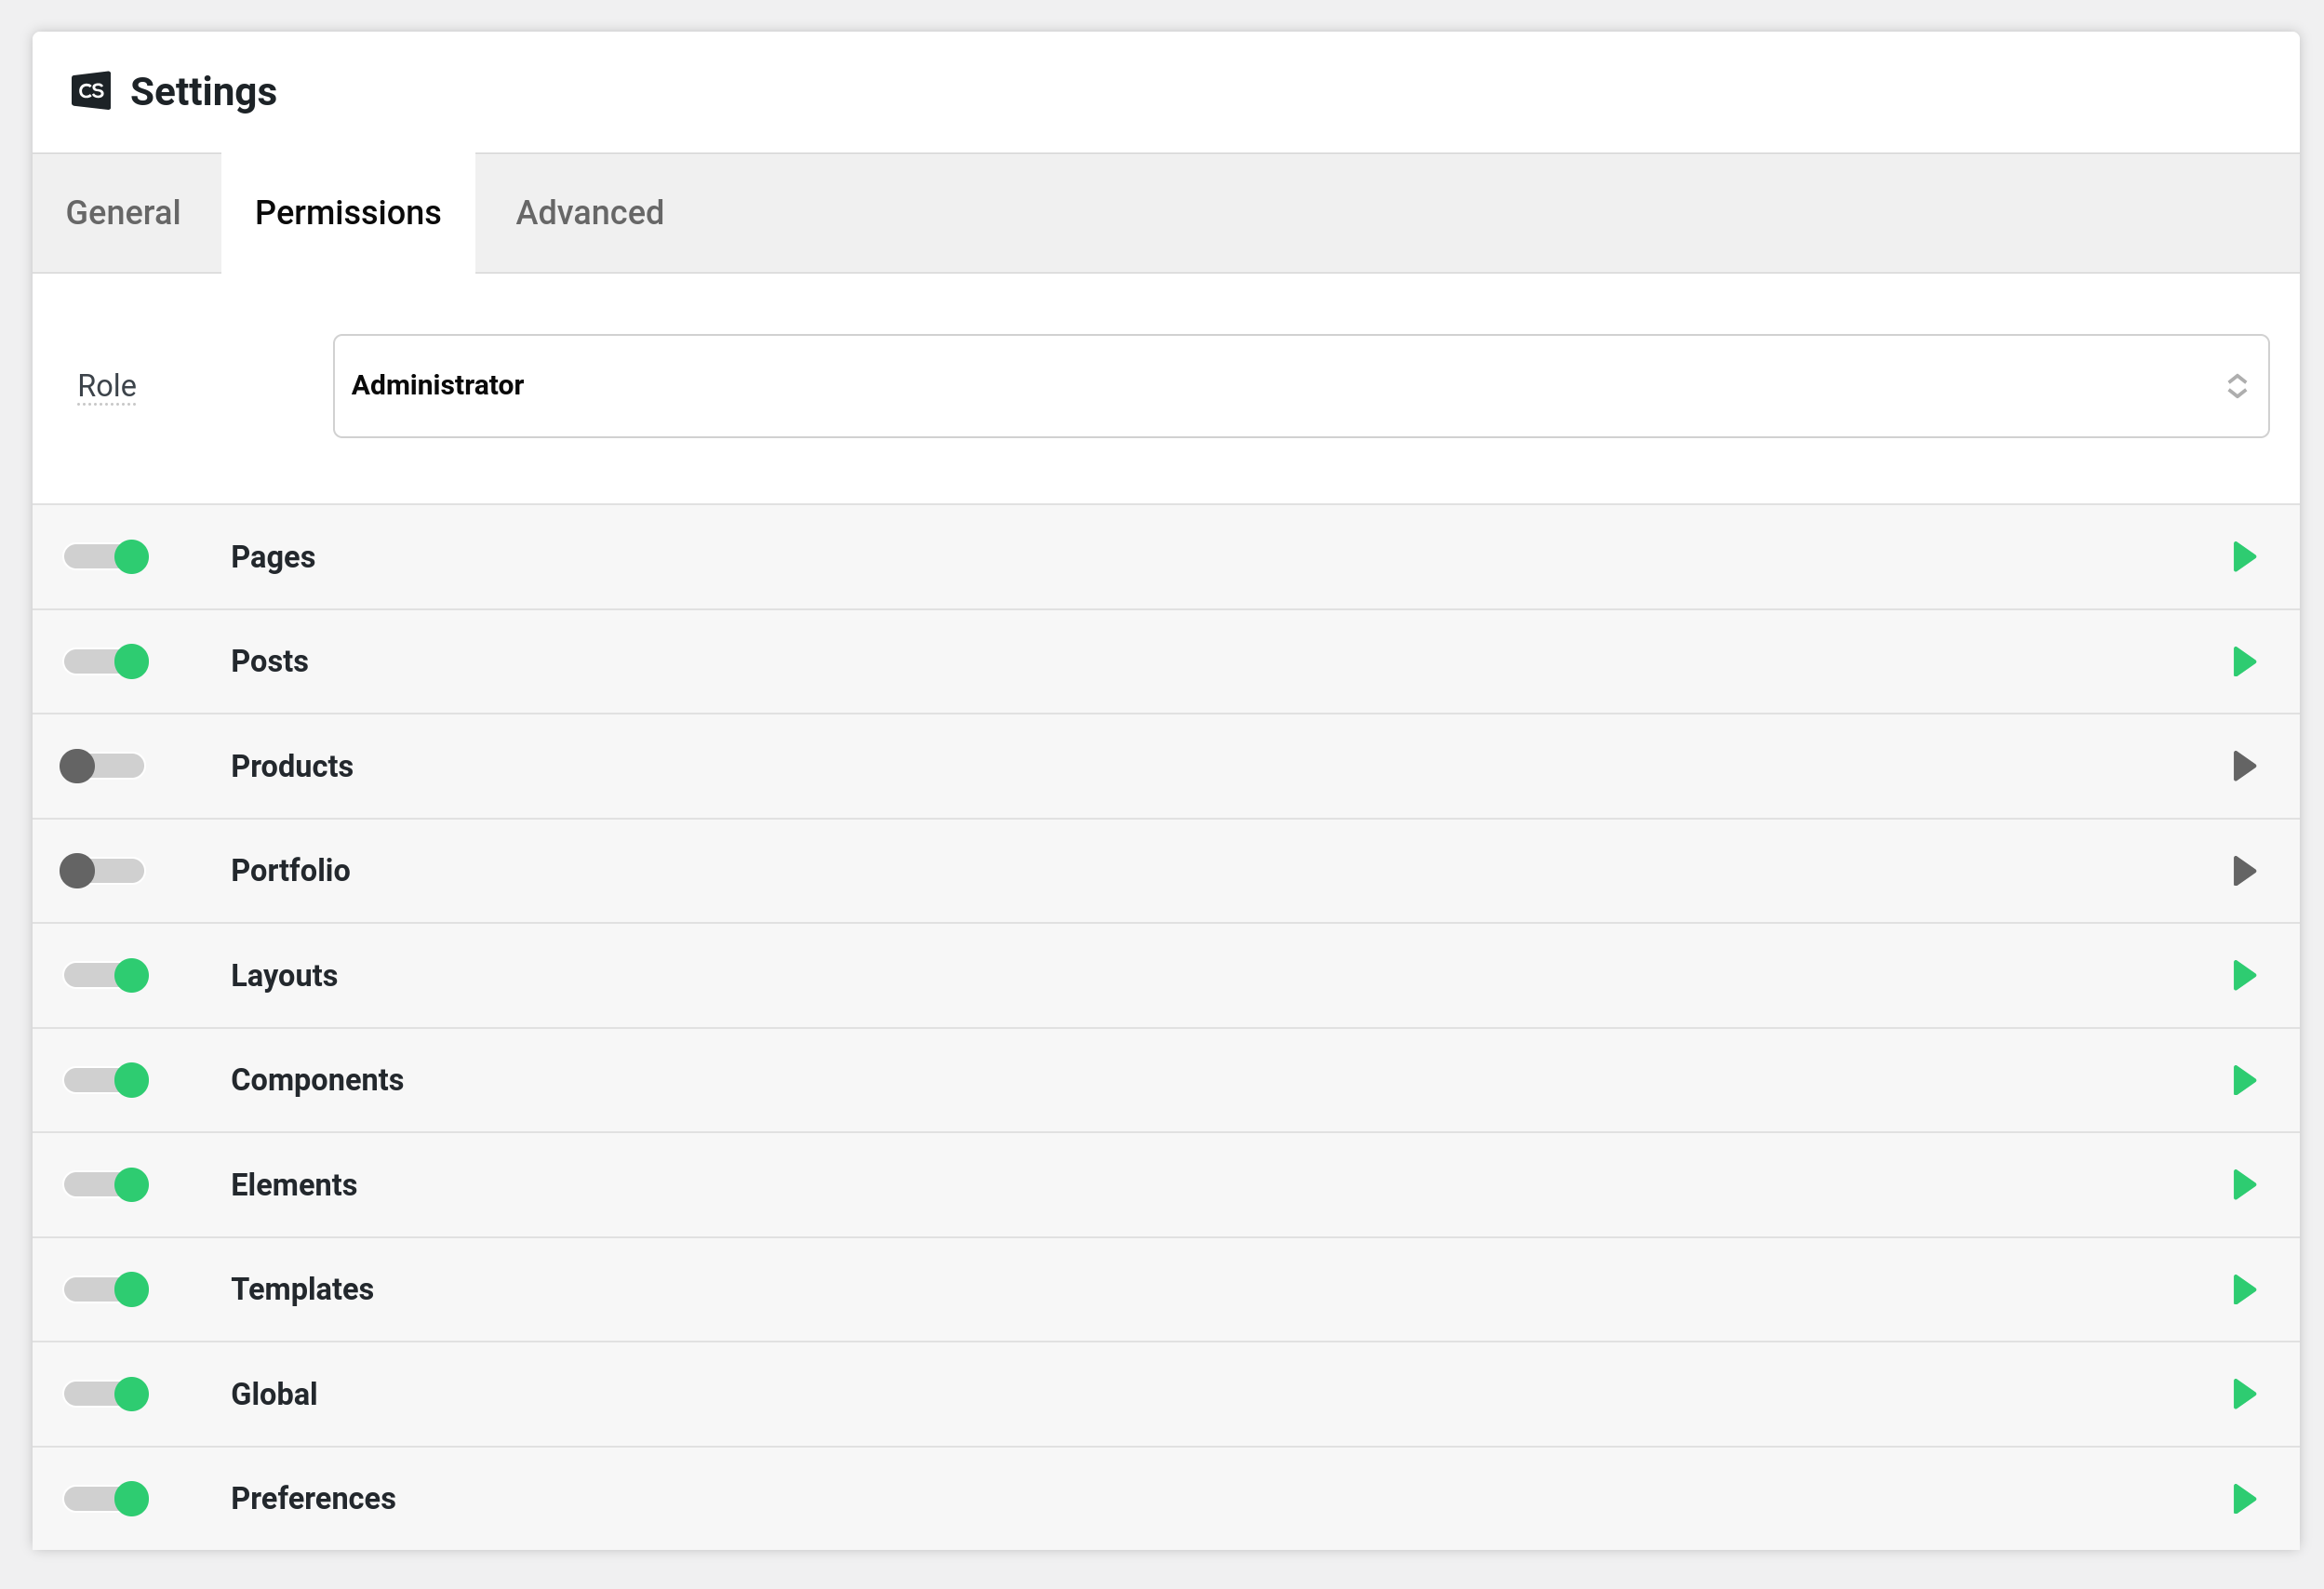
Then direct your attention to the "Permissions" box.

The Difference Between Simple and Advanced Mode
In the Permissions Settings, there is a setting under "User Preferences" named "Advanced Mode." Advanced Mode has three options:
- User Preference
- Always On
- Always Off

Now, Advanced Mode is applicable to Elements mostly. To demonstrate the different between a Simple Mode (which is the mode when "Always Off" is selected) and Advanced Mode (when "Always On" is selected), let's take a look at the settings available to us on two common Elements - the Headline and Button.
SIMPLE MODE - Headline

ADVANCED MODE - Headline

SIMPLE MODE - Button

ADVANCED MODE - Button

Put simply, as the name suggests, you have more options if Advanced Mode is on.
Note: Disabling "Design Controls" or "Customize Controls" at either the Element or Builder level will only take effect when Advanced Mode is not in use. This is a quick way to restrict users to only editing content, but you'll want to use the option to force their "Advanced Mode" preference to "Always Off".
What Are the WordPress User Roles
- Administrator - This role is the "Grand master" of them all. Users that have this role can do virtually everything in WordPress. They can add, edit and delete pages/posts/users, etc.
- Editor - Editors can access all of the content (posts, pages, media) but not plugins, themes, widgets and users. Editors can publish, edit, or delete any page or post, including those labeled “private”.
- Author - Authors can add and view their posts but they cannot edit nor delete them.
- Contributor - They can add posts but it has to be approved by an Admin or an Editor. They can view their own posts but they cannot edit them. They can't add, edit and delete pages. They also cannot add, edit, delete Media items.
- Subscriber - They can't add, edit and delete posts and pages. They can only post comments.
Why We Need a Permission Manager for the Builders
The simple answer here is to keep the website intact. Users, especially non-technical ones, no matter how well-intended, are prone to errors. Because the builders are so easy to use to create beautiful designs, in the wrong hands, they can also "easily" break designs due to unintentional dragging, element deletion, etc. In order to prevent well-meaning users from breaking the site's design, Permission Settings should be in place. And X and Pro makes it easy to set them.
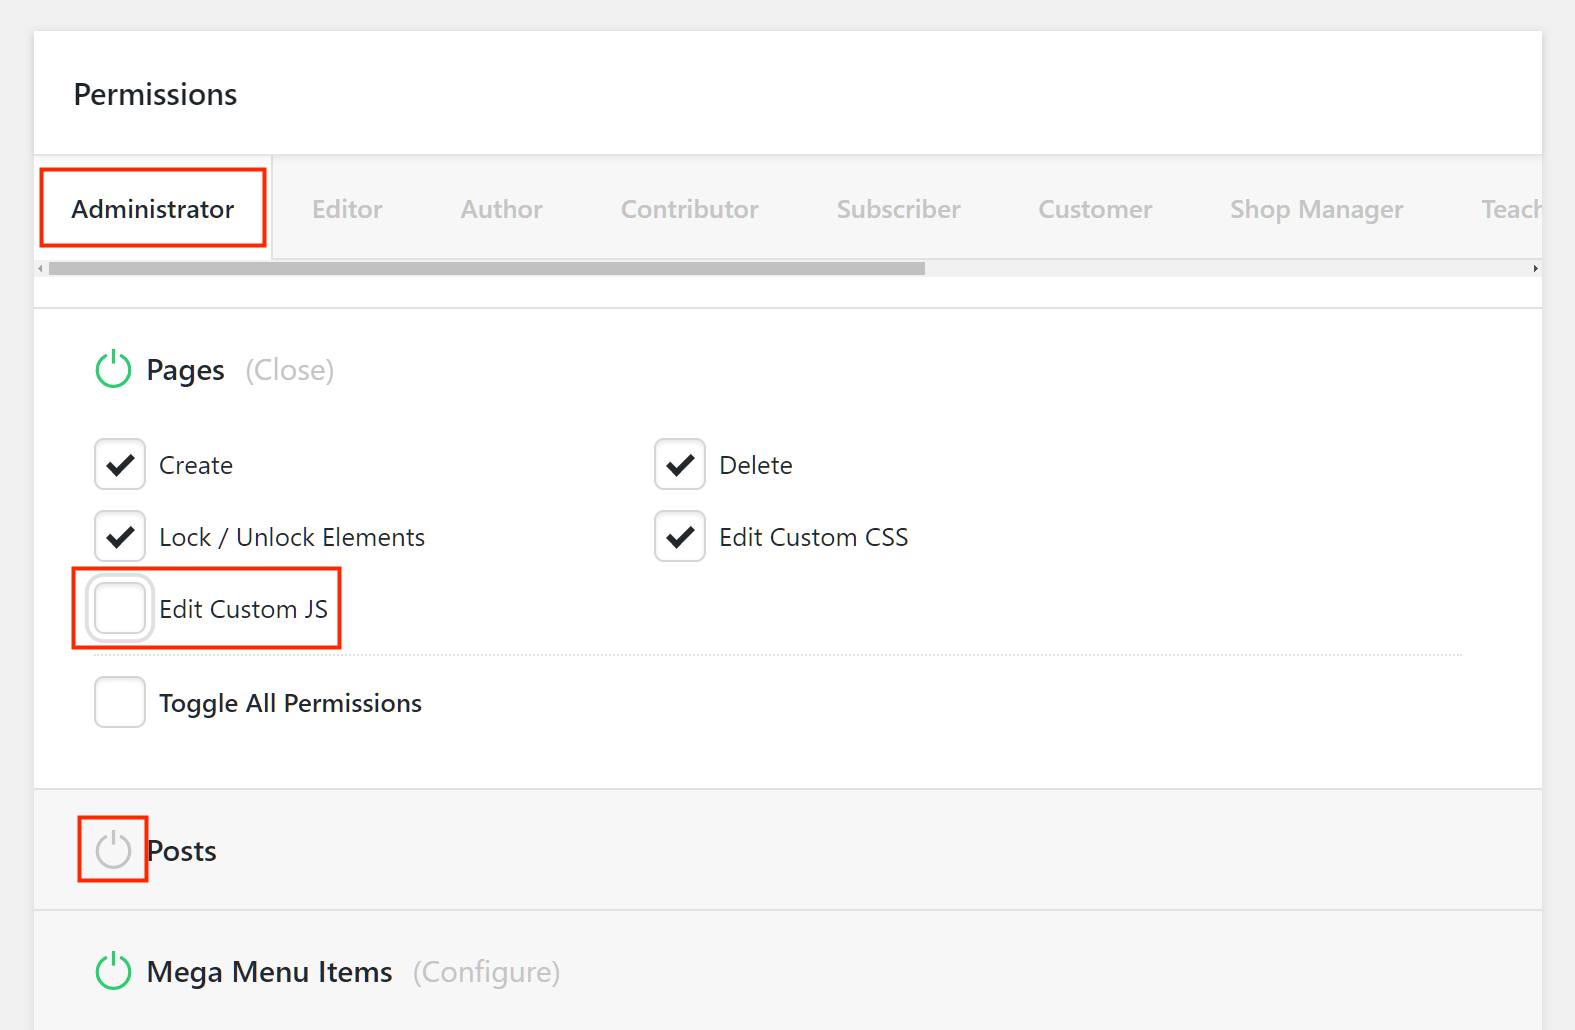
Permission Details
The Permissions box is broken up into a role navigation up top, and each role's corresponding permission settings found below.

The role navigation will reflect any available WordPress roles currently found within your installation. For instance, if you have WooCommerce installed, you will see a few additional roles included such as "Shop Manager", "Customer", et cetera, in addition to the standard five roles that WordPress provides out of the box. Once you've selected the role you want to work on, you can begin editing it below. The permission settings section is broken up into five different sub-sections:
Macros
Contains a select control with multiple common configuration options such as turning off certain groupings of elements, enforcing a "text only" mode for certain users, et cetera. This effectively allows you to perform certain mass actions with the click of a mouse.
Let's say you want Editor roles to only be allowed to edit the texts of a page and you don't want them changing the styles of elements or move them around.
You can simply select "Enforce Text Only" the click Apply.


Now you'll see that the checkboxes that involve anything other than text editing are unchecked.


Note: Simply selecting an option will not automatically apply the configurations. You need to click the "Apply" Button.
Or let's say you feel that elements are too complicated for your clients that you prefer they stay with Classic Elements only. To do that, simply choose the "Disable Elements" Macro then click the "Apply" Button.

Now you'll see that all elements are disabled (with grayed out Power button).
Note: If a feature or Element is disabled altogether, then the power button next to its label will be grayed out

To enable that feature or Element, clicking the power button will turn it green to indicate that it is on. Once enabled, a "Configure" button will appear next to the label:

Take note that applying a macro doesn't mean you are in an either-or situation (e.g. either you have all Elements on or off). Using "Macros" is just a simple way of applying configurations with one click of a button without having to manually configure each option.
So let's say you want to disable all elements except for Buttons, you can apply the "Disable Elements" Macro and manually turn on the Button element.

General
Contains configuration groupings for different builders and tools amongst the products. You can allow or disallow access to a tool altogether, or configure individual features on and off as desired (i.e. you may want users to be able to apply presets but not save presets in a particular builder, et cetera).
Elements
Contains configuration groupings for all Elements. Similar to General, you can allow or disallow access to certain Elements altogether, or configure individual features on and off as desiredl
Classic Elements
Contains configuration groupings for all Classic Elements. Similar to General, you can allow or disallow access to certain Elements altogether, or configure individual features on and off as desired.
User Preferences
Contains options to configure how the preferences panel within the tools should operate for a particular role. For example, you can allow a particular role to specify for themselves if they want a certain feature on or off, or you can enforce something to be on all the time or off all the time. For example, you may want to always turn off Help Text for admins, while leaving it always on for authors.
Summary
In this article you've come to know where to find the Permission Settings in X and Pro. You've also come to know the difference between Advanced and Simple Modes. You learned the advantages of having permission settings in the builders and you also now know how to set the actual permissions.
See something inaccurate? Let us know