Cornerstone Forms Actions
The Actions Framework controls what happens after a Form is submitted and allows you to define how that data is processed, stored, and used.
When a form is submitted, Actions define what happens next. That could mean creating content, updating data, sending notifications, logging users in, or communicating with external services.
In other words, Actions are the automation engine behind Cornerstone Forms.
Actions can also contain Inner Actions, allowing you to build powerful workflows where one step feeds into another. Many Actions return data that can be used later in the chain. For example, when you create a post, the action returns the Post ID. That ID can then be used in a later action to update an ACF field, attach metadata, or include the new Post ID in an email notification.
Action Chains
Actions are not limited to running one task at a time. In Cornerstone Forms, you can chain multiple Actions together, allowing a single form submission to trigger an entire workflow.
Each action runs in sequence, and many Actions return data that can be used by the Actions that follow. For example, a single form submission might:
- Create a new post
- Attach metadata to that post
- Assign a taxonomy term
- Upload files to the Media Library
- Send a confirmation email
- Notify your team in Slack
- Redirect the user to a success page
Because Actions can pass data forward, you can build powerful automation pipelines where each step builds on the previous one. In many cases, what would normally require multiple plugins, custom code, or external automation tools can be accomplished directly inside your form.
Creating Posts and Using that new ID
As an example of Action chaining, let's take a look at creating a Post and using the newly created Posts ID. When you utilize the Post Create Action, it returns the new Post ID. When you create another action that is a child of the Post Create action you can utilize that Post ID with the Dynamic Content {{dc:form_action:response}}. We can use this ID for a multitude of other actions. Including ACF Post Field Update, Post Meta Update, or evening using a redirect to the new Posts page (using twig and the Dynamic Content {{ post.permalink({"post":form_action.response}) }}).
Registering a User and Building on Their ID
A registration form is a natural fit for Action chaining. When you use the User Create Action, it returns the new User ID. Inner Actions nested inside User Create can then use that ID immediately — no need to look it up or pass it through a hidden field.
A complete registration workflow might look like this:
- User Create — Creates the account using form data. Returns the User ID.
- User Meta Update (inner) — Uses
{{dc:form_action:response}}as the User ID to immediately attach profile data to the new account. - ACF User Field Update (inner) — Updates any ACF fields on the new user using the same returned ID.
- Login (inner) — Logs the user in using the credentials they just submitted. Now also returns the User ID, which can be used by any Inner Actions nested inside Login.
- Redirect — Sends the user to a personalized welcome page, optionally using the User ID to build the destination URL.
Login returns the logged-in User ID, just like User Create does. This means you can build login-only forms — not just registration flows — and still chain user-scoped actions afterward using {{dc:form_action:response}} without knowing the ID in advance.
Collecting a File and Forwarding It
A common need is accepting a file from a user — a résumé, a signed document, a photo — and immediately forwarding it somewhere. The File Upload action handles this well because it returns the file location after processing, which can be passed directly into a subsequent action.
How the file is stored depends on whether Create Media is enabled:
- With
Create Mediaenabled — the file is saved to the WordPress Media Library and the attachment ID is returned. Use this when you want the file to be permanently accessible on your site. - With
Create Mediadisabled — the file is stored at a path you specify on the server (or the system temp directory) and the absolute file path is returned. Use this for private files that should not appear in the Media Library.
A job application or document submission workflow might look like this:
- File Upload — Processes the uploaded file. Returns the attachment ID (Media Library) or the server file path (private storage).
- Email (inner) — Uses
{{dc:form_action:response}}in theAttachmentsfield to attach the just-uploaded file and send it to your team. - Slack Message (inner) — Notifies your team channel that a new submission arrived.
- Redirect — Sends the user to a confirmation page.
Because the Email action accepts both attachment IDs and file paths in its Attachments field, the same chain works regardless of whether Create Media is on or off — the return value from File Upload feeds directly in either way.
Enriching Data with an External API
External services can feed data into your WordPress content. When you use the External API action, the parsed response body is returned and can be used by Inner Actions that follow. This makes it possible to call a third-party service and immediately store whatever comes back — no custom code required.
For example, a form that verifies a coupon code or looks up customer data might work like this:
- External API — Sends a request to a third-party service (a CRM, a payment processor, a verification endpoint) using form data. Returns the parsed response body.
- User Meta Update (inner) — Uses
{{dc:form_action:response}}to store the full response, or Twig to extract a specific field:{{ form_action.response.customer_tier }}. - ACF Post Field Update (inner) — Saves a specific field from the API response directly onto a post record using the same Twig syntax.
- Email (inner) — Includes data from the API response in the notification sent to your team.
- Redirect — Sends the user to a page personalized with the returned data, for example
{{ post.permalink({"post": form_action.response.redirect_post_id}) }}.
The data driving later Actions in this chain comes entirely from the external service, not from the form itself — which means you can build forms that pull in and act on live third-party data as part of the same submission flow.
Using PHP to Transform Data Mid-Chain
The PHP action is not just for running side effects — because it returns whatever your script returns, it can act as a mid-chain data transformer that shapes or generates values for the actions that follow.
Consider a referral code form where you need to generate a unique code, store it, and email it to the user:
- PHP — Generates a unique referral code and returns it:
$code = strtoupper(substr(md5($formData['email'] . time()), 0, 8)); return $code; - User Meta Update (inner) — Uses
{{dc:form_action:response}}as theMeta Valueto store the generated code on the current user. - Email (inner) — Includes
{{dc:form_action:response}}in the message body so the user receives their code.
The same pattern works for any mid-chain computation — calculating a price from quantity and rate fields, normalizing user input before storing it, building a formatted string from multiple fields, or generating a slug. In each case, the PHP action does the work and hands the result forward so the rest of the chain can use it without any further logic.
Post Actions
Post Actions allow your forms to create, update, or delete WordPress posts and their associated metadata. This makes it possible to turn form submissions into real content on your site, whether you're creating new posts, updating existing records, or managing post metadata.
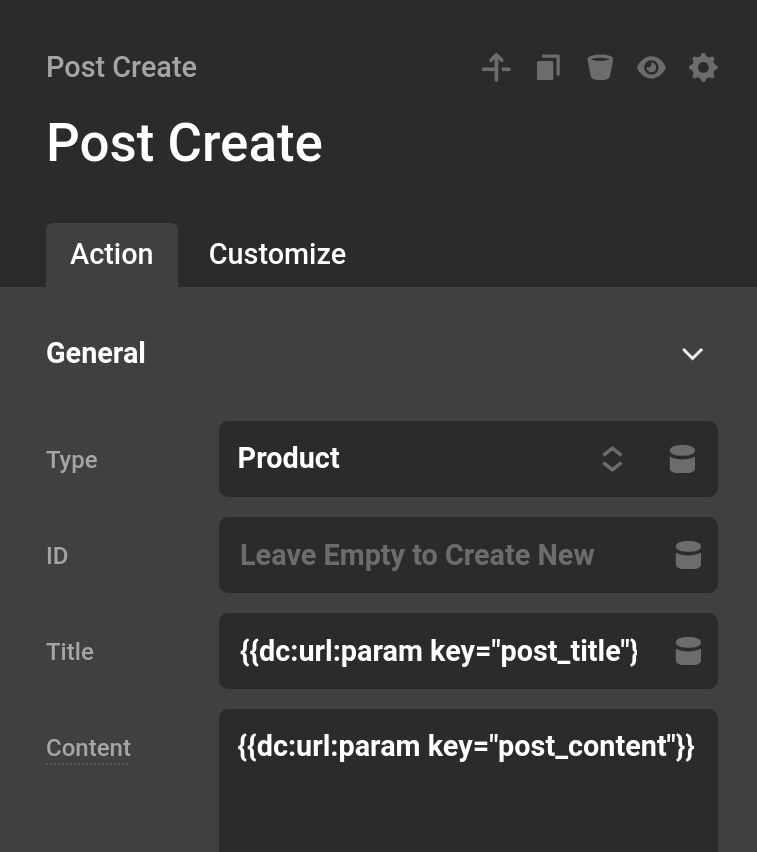
Post Create / Update
This action creates a new post or updates an existing one. If you provide an ID, the specified post will be updated. If no ID is provided, a new post will be created. After the action runs, the Post ID is returned so it can be referenced in later Actions.
Type— The post type to create or update, such aspost,page, or any custom post type registered on your site.Status— The post status to assign. Common values arepublish,draft, andpending. The dropdown is populated from all statuses registered on your site. Defaults topublish.ID— The ID of the post to update. Leave empty to create a new post.Title— The post title.Content— The post content. If left blank, the content of an existing post will not be changed.Meta— Optional key/value pairs to store as post meta on the created or updated post.
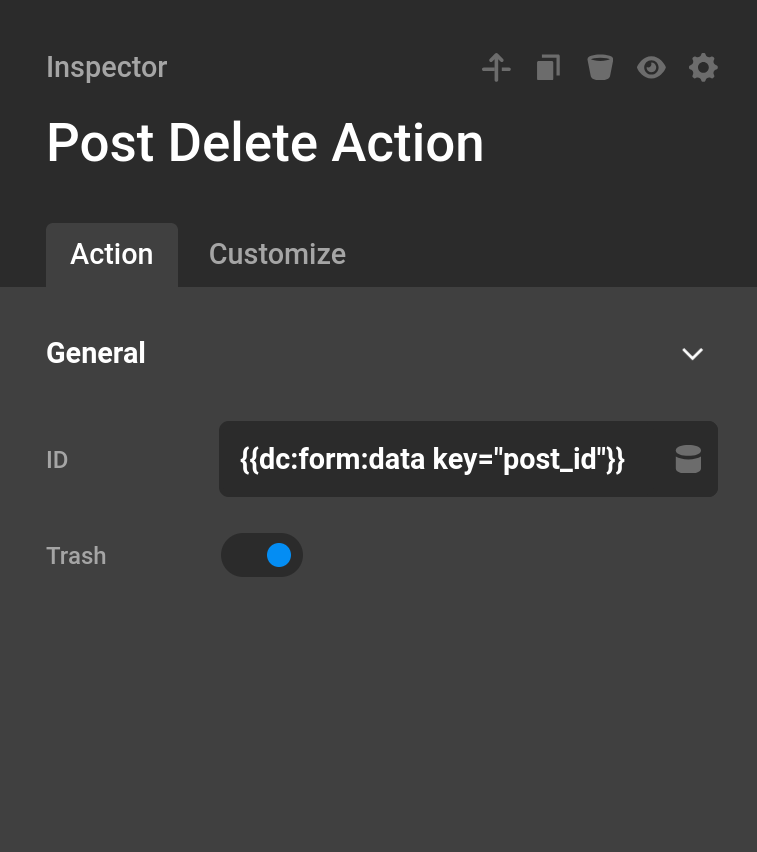
Post Delete
This action deletes a post using the ID you provide. An ID is required — the action will produce an error if none is provided.
ID— The ID of the post to delete.Trash— When enabled, the post is moved to the trash instead of being permanently deleted.
Returns the deleted post object on success, or false if the post could not be found.
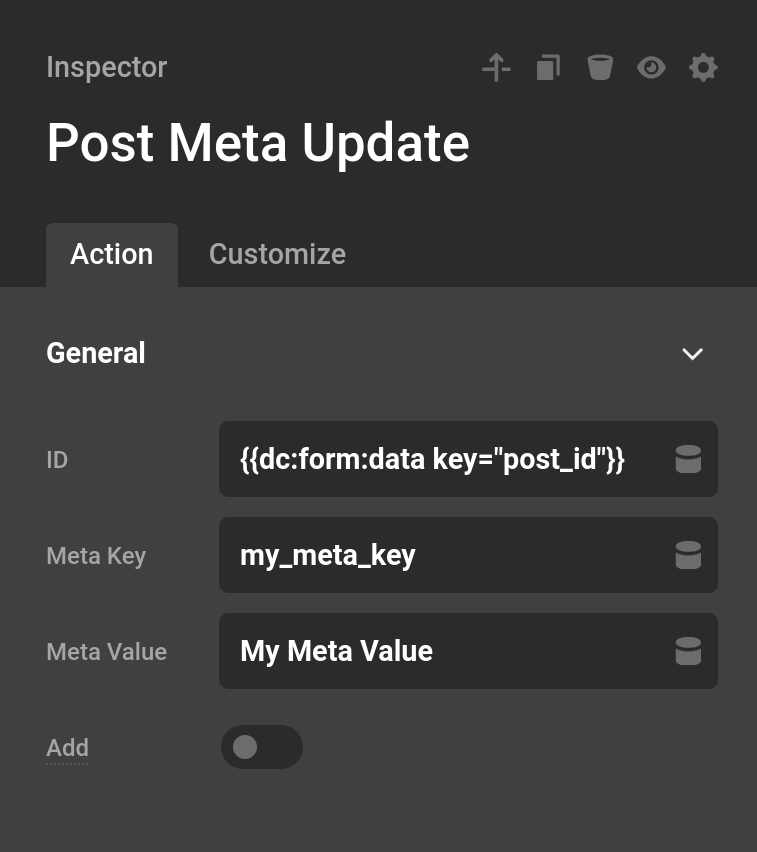
Post Meta Update
This action updates a post meta key, or creates it if none exists.
ID— The ID of the post to update meta on.Meta Key— The meta key to update or create.Meta Value— The value to store.Add— When enabled, if a value already exists for this key, a second value is added alongside it rather than overwriting it. This allows a single meta key to hold multiple values. If the key does not exist yet, it will be created regardless.
The meta ID is returned when a new entry is created; true is returned when an existing entry is updated.
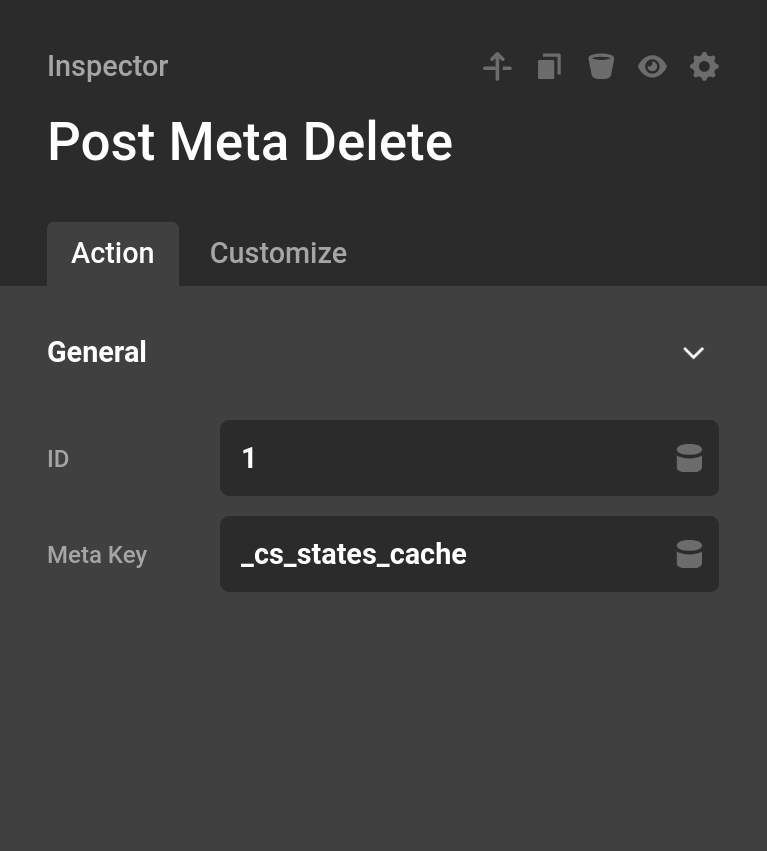
Post Meta Delete
This action deletes all meta values for a given key on a post.
ID— The ID of the post to delete meta from.Meta Key— The meta key to delete.
This action does not return data useful for later Actions.
Attachment Actions
Attachment Actions let you manage files from a form — whether they live in the WordPress Media Library or on the server filesystem. You can delete an existing attachment, serve a Media Library file as a download, or serve a locally stored file as a download.
Attachment Delete
This action deletes a Media Library attachment using the ID you provide. If the attachment does not exist, the action will produce an error. You can optionally bypass the trash to permanently delete the file.
ID— The attachment ID to delete.Bypass Trash— When enabled, the attachment is permanently deleted rather than moved to the trash.
Returns true after the attachment is deleted.
Attachment Download
This action serves a Media Library file as a download directly to the user's browser. Once the download is triggered, the page exits and no further Actions will run. For this reason, the Attachment Download action should always be placed last in your action chain.
ID— The attachment ID of the file to download.
Download File
This action serves a locally stored file as a download directly to the user's browser. Unlike Attachment Download, this action works with files stored on the server filesystem — not the WordPress Media Library. Once the download is triggered, the page exits and no further Actions will run. This action should always be placed last in your action chain.
File Path— The absolute server path to the file to download. This is typically the path returned by a File Upload action withCreate Mediadisabled.
A common workflow is to chain a File Upload action (with Create Media off) directly into a Download File action: the upload stores the file, returns its path, and the Download File action uses that path to immediately serve it back to the user.
User Actions
User Actions allow your forms to create, update, and manage WordPress users and their associated metadata. This makes it possible to build workflows for user registration, account updates, authentication, and profile management directly from a form.
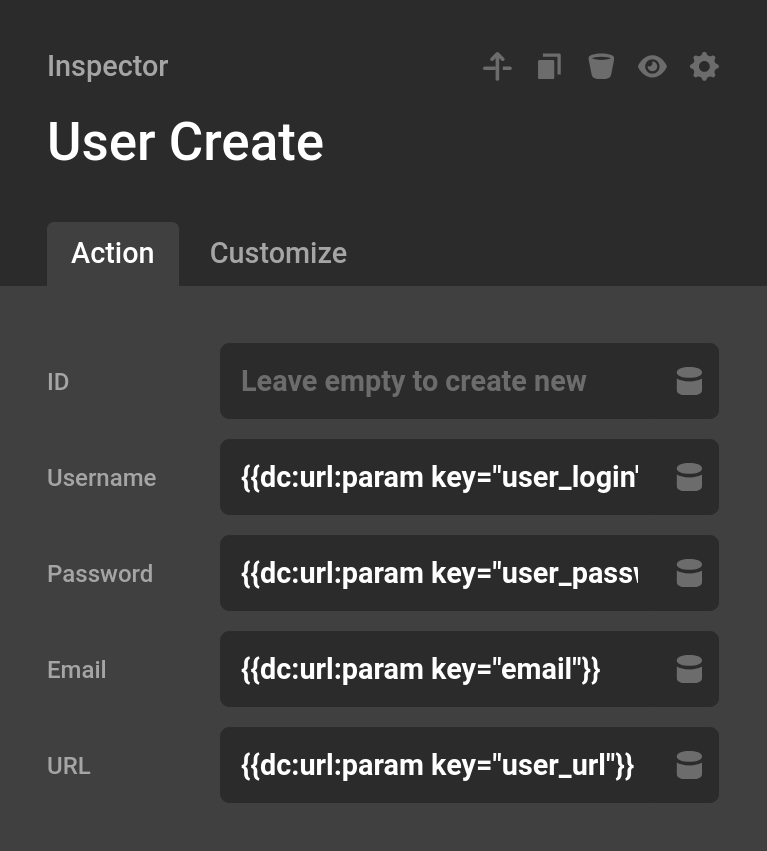
User Create / Update
This action creates a new user or updates an existing one. If you provide an ID, the specified user will be updated. If no ID is provided, a new user will be created. After the action runs, the User ID is returned so it can be referenced in later Actions. When creating a new user, both Username and Password are required.
ID— The ID of the user to update. Leave empty to create a new user.Username— The login name for the user. Required when creating a new user.Password— The user's password. Required when creating a new user.Email— The user's email address.URL— An optional website URL associated with the user's profile.Add Roles— One or more roles to assign to the user.Remove Roles— One or more roles to remove from the user.
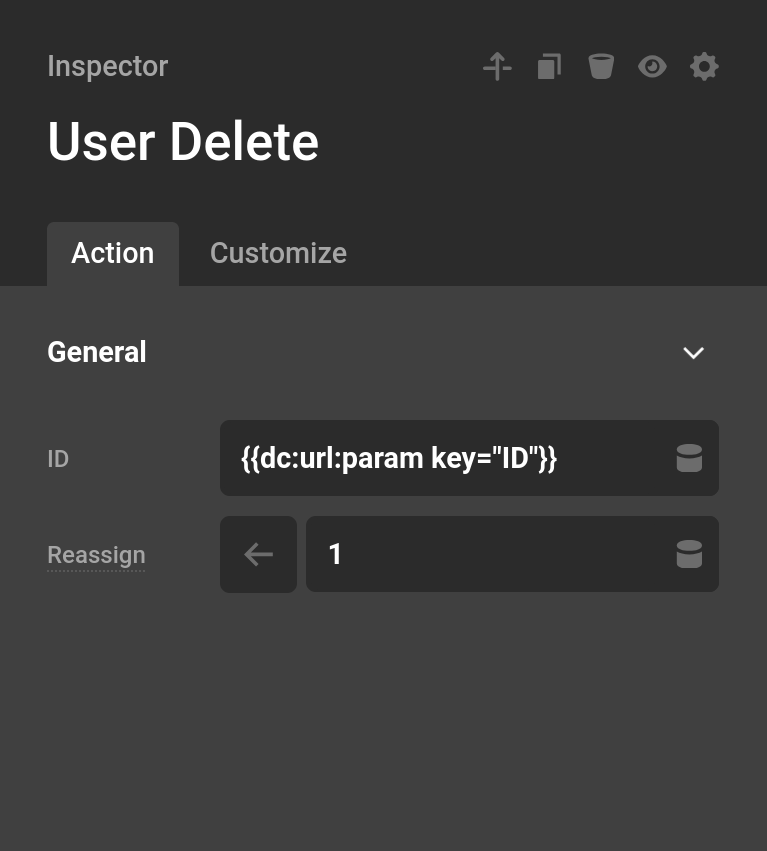
User Delete
This action permanently deletes a user by ID. If no ID is provided, the action will produce an error. You can optionally reassign the deleted user's posts to another user before deletion.
ID— The ID of the user to delete.Reassign— A user to reassign the deleted user's posts to. If left empty, their posts will not be reassigned.
Returns true if the user was deleted, false otherwise.
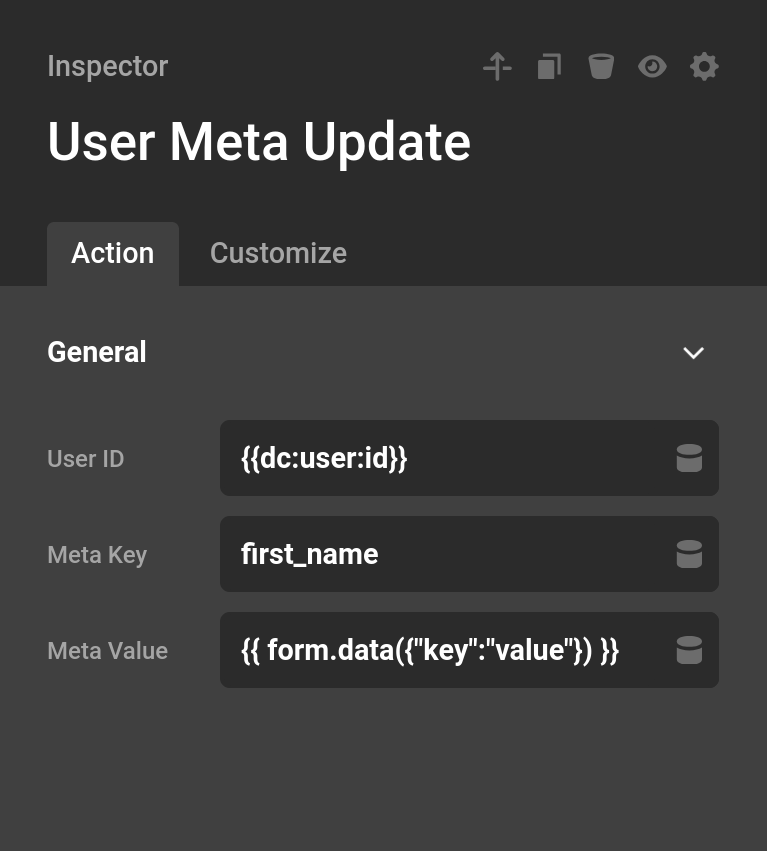
User Meta Update
This action updates a user meta key, or creates it if none exists. A User ID is required.
User ID— The ID of the user to update meta on.Meta Key— The meta key to update or create.Meta Value— The value to store.
Returns true on success.
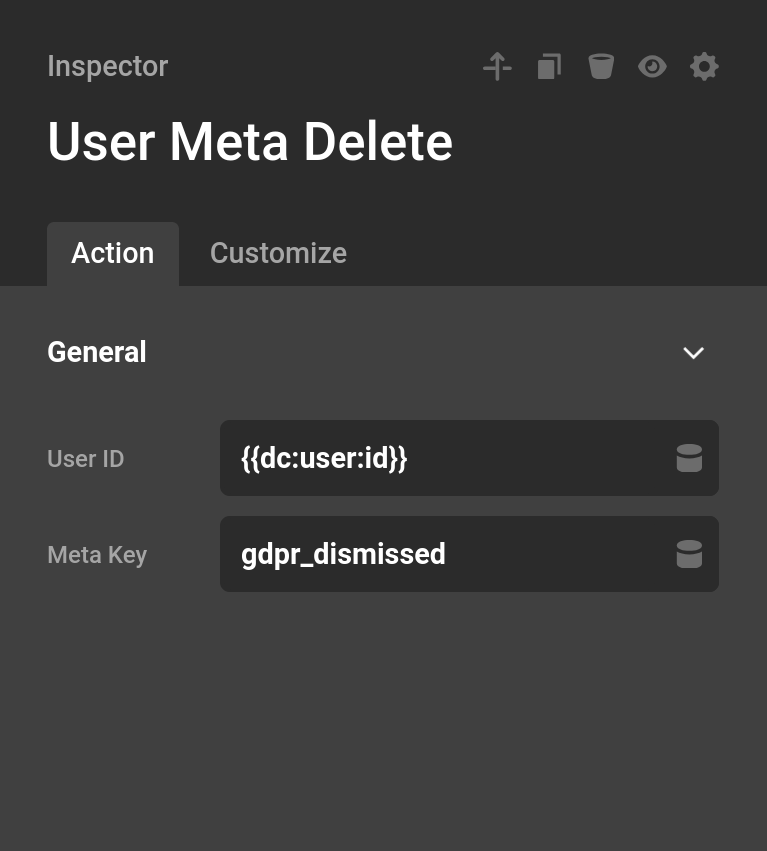
User Meta Delete
This action deletes a user meta entry by key. A User ID is required.
User ID— The ID of the user to delete meta from.Meta Key— The meta key to delete.
Returns true on success.
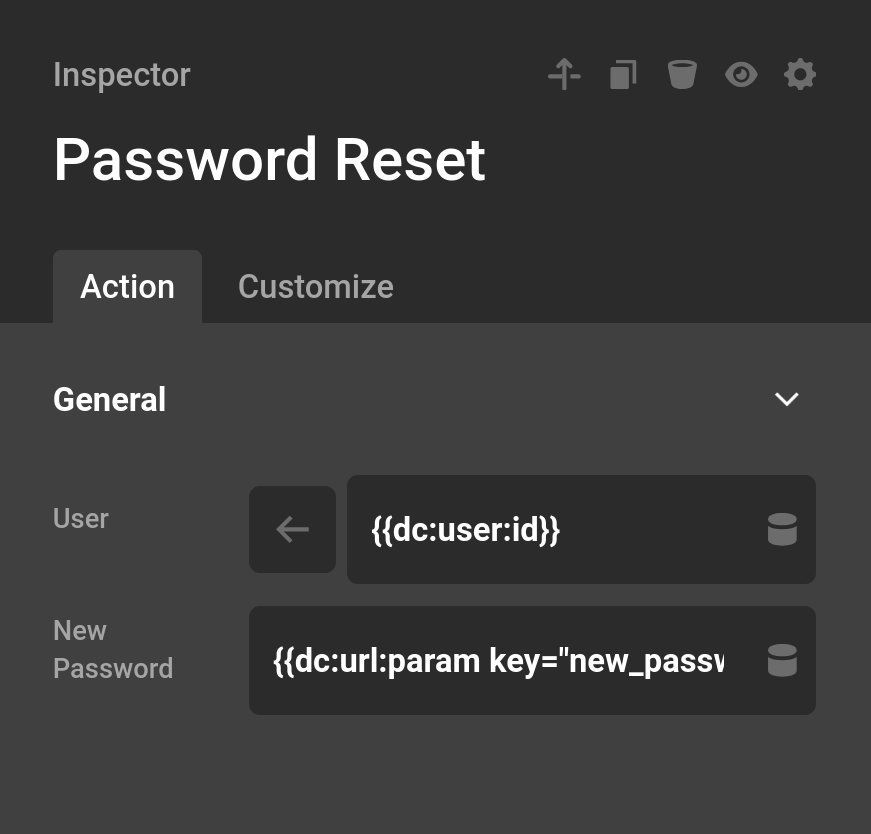
User Password Reset
This action resets a user's password to the value you provide and immediately signs them back in with the new password.
User— The user whose password will be reset. Defaults to the currently logged-in user.New Password— The new password to set.
Returns true on success. If the user cannot be found, a form error is displayed and false is returned.
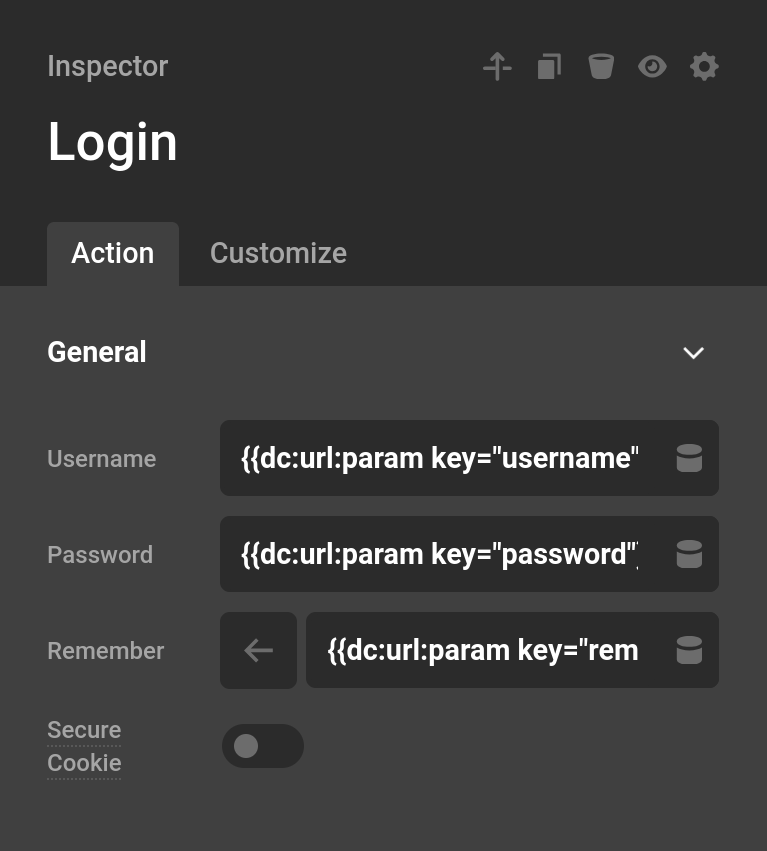
Login
This action logs a user into your site using a username and password. If the credentials are invalid, a form error is displayed.
Username— The user's login name or email address.Password— The user's password.Remember— When enabled, the session cookie persists beyond the current browser session so the user stays logged in.Secure Cookie— When enabled, the session cookie is only sent over HTTPS. Defaults to enabled when your site is running HTTPS.
On success, the logged-in User ID is returned and can be referenced in later Actions. This makes it easy to chain a Login directly into a User Meta Update or other user-scoped action without needing to look up the ID separately.
Term Actions
Terms (taxonomies) are one of the core organizational systems in WordPress. They power everything from blog categories and tags to product attributes and brand groupings. Terms allow posts to be connected through shared attributes, making them useful for filtering, relationships, and structured content.
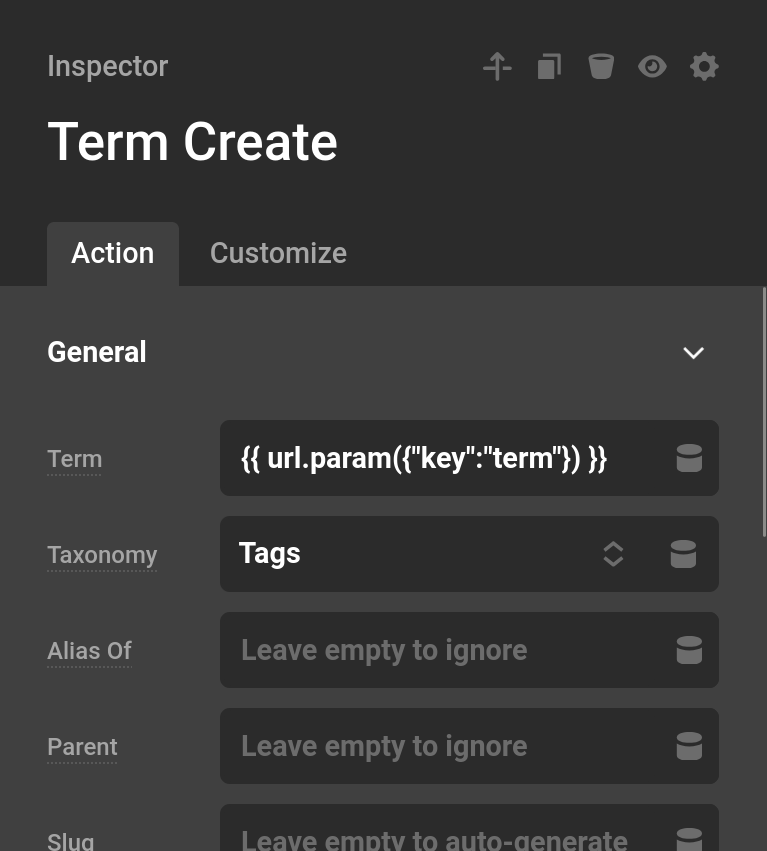
Term Create / Update
This action creates a new term or updates an existing one within a specific taxonomy. If a term with the given name already exists in the taxonomy it will be updated; otherwise a new term is created. The Term ID is returned after the action runs so it can be referenced in later Actions. Both Term and Taxonomy are required.
Term— The name of the term to create or update.Taxonomy— The taxonomy the term belongs to, such ascategory,post_tag, or any custom taxonomy registered on your site.Alias Of— The slug of another term to make this term an alias of. Leave empty to ignore.Parent— The ID of a parent term, for hierarchical taxonomies like categories. Leave empty to create a top-level term.Slug— A custom URL slug for the term. If left empty, a slug is auto-generated from the term name.Description— An optional description for the term.
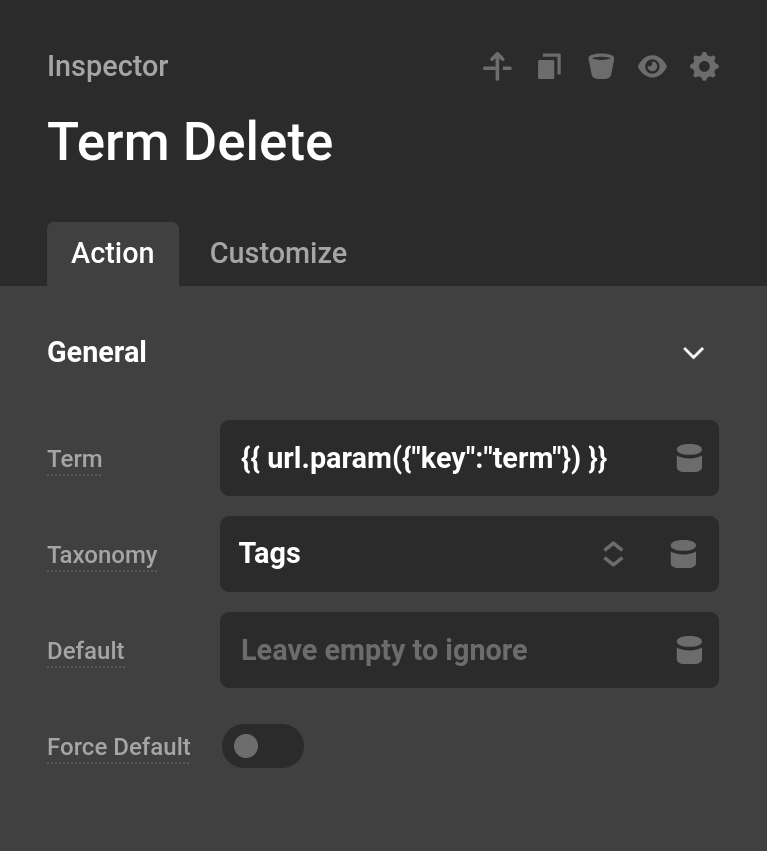
Term Delete
This action deletes a term from a taxonomy by its name or ID. Both Term and Taxonomy are required — the action will produce an error if either is missing or if the term cannot be found.
Term— The name or ID of the term to delete.Taxonomy— The taxonomy the term belongs to.Default— The ID of a term to assign to any posts that were using the deleted term. Only applies when a single matching term is found.Force Default— When enabled, the default term is assigned to affected posts even if they would have otherwise kept another term.
Returns true on success.
Comment Actions
Comment Actions allow your forms to create WordPress comments programmatically. This is useful for building custom comment forms, feedback tools, or any workflow that needs to attach a comment to a post on form submission.
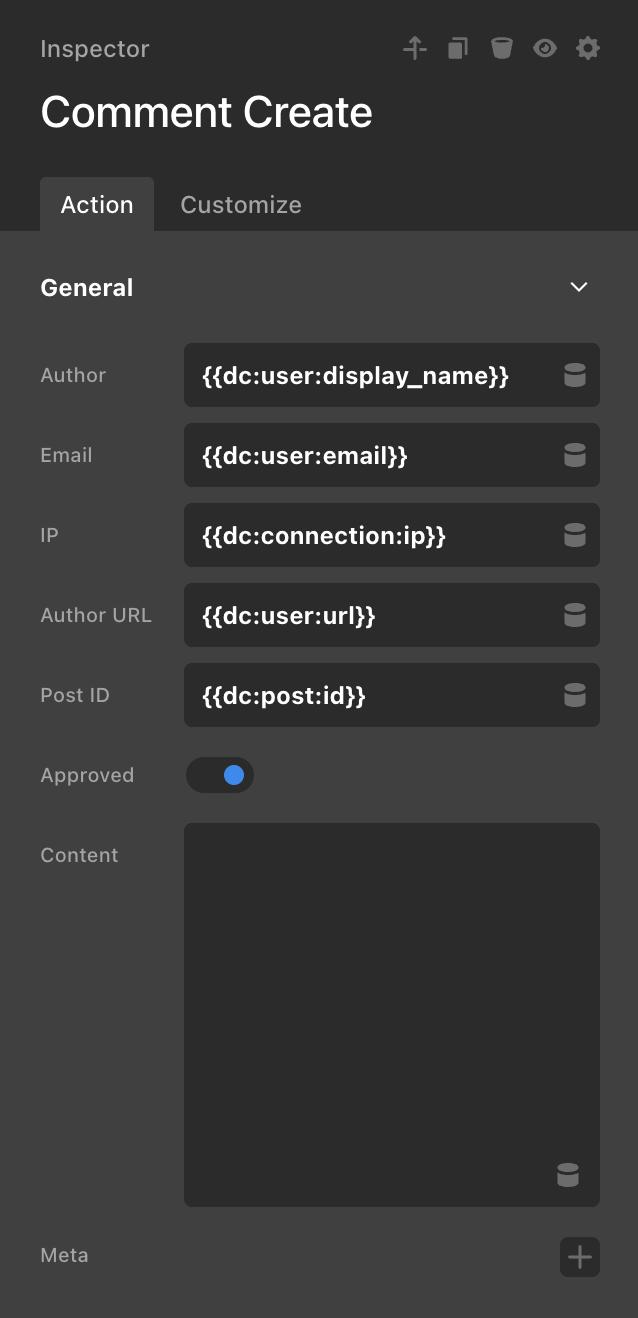
Comment Create
This action creates a new comment on a post. All fields are pre-populated with sensible defaults using dynamic values from the current user and post context, but each can be overridden with form data or a custom value.
Author— The display name of the comment author. Defaults to the current user's display name.Email— The email address of the comment author. Defaults to the current user's email.IP— The IP address of the commenter. Defaults to the current visitor's IP address.Author URL— A URL associated with the comment author.Post ID— The ID of the post the comment will be attached to. Defaults to the current post.Approved— Whether the comment is immediately visible. When disabled, the comment is held for moderation.Content— The body text of the comment.Meta— Optional key/value pairs to store as comment meta.
After the action runs, the Comment ID of the newly created comment is returned, allowing you to reference it in later Actions.
Option Actions
Option Actions allow forms to read and write values in the WordPress options table — the same database table that stores settings for plugins and themes. These Actions are useful when you need to persist a value site-wide, such as saving a configuration setting or storing a reference that other parts of your site can access.
Option Update
This action creates or updates a WordPress option by key. If the option already exists its value is overwritten. If it does not exist, a new option is created.
Key— The option key to update. The dropdown is populated from existing options in your database.Value— The new value to store for that key.Autoload— When enabled, this option is loaded into memory on every page load. Only enable this if the option is used globally across your site, as autoloading rarely-used options adds unnecessary overhead.
Returns true on success.
Option Delete
This action permanently deletes a WordPress option by its key.
Key— The option key to delete. The dropdown is populated from existing options in your database.
Returns true if the option was found and deleted, false if it did not exist.
Other Actions
Other Actions provide additional functionality that supports common form workflows. These Actions handle tasks such as sending emails, redirecting users after submission, processing file uploads, triggering custom validation errors, and communicating with external APIs.
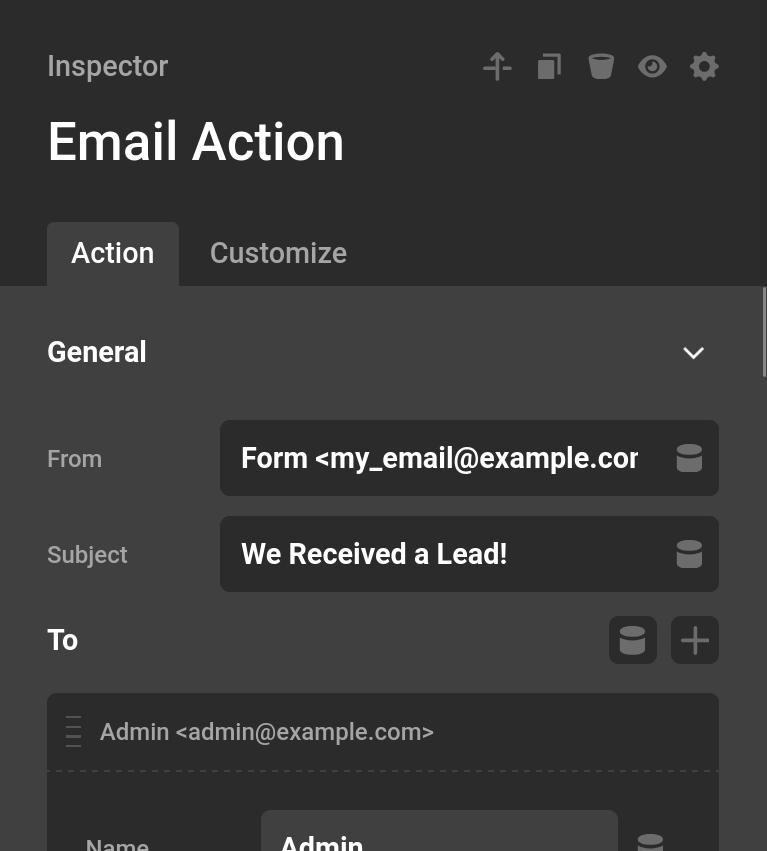
This action sends an email when a form is submitted. For reliable delivery, connect your WordPress site to a trusted email provider using a plugin like WP Mail SMTP. This allows WordPress to send through services such as SendGrid, Gmail, or Amazon SES, which helps prevent messages from being flagged as spam.
From— The sender address that will appear in the email's From field.Subject— The subject line of the email. This field is required — the action will produce an error if left empty.To— A list of recipients. Each entry accepts a name and an email address.CC— Optional list of addresses to copy on the email.BCC— Optional list of addresses to blind copy.Headers— Custom email headers as key/value pairs, for advanced use cases.Attachments— Optional list of files to attach to the email. Each attachment entry has aTypethat determines the source:- Media File — Attaches a file from the WordPress Media Library. Select the file using the media picker.
- Server Path — Attaches a file using an absolute path on the server (e.g.
/path/to/file.pdf). - Form Data — Attaches a file submitted through a form field. Select the field name from the dropdown, which is populated with the current form's inputs. If the field contains an uploaded file it is attached directly; otherwise the stored field value is used as a file path.
Message— The body of the email. Supports HTML and can include dynamic form data.
Returns true if the email was accepted for delivery, or false if sending failed.
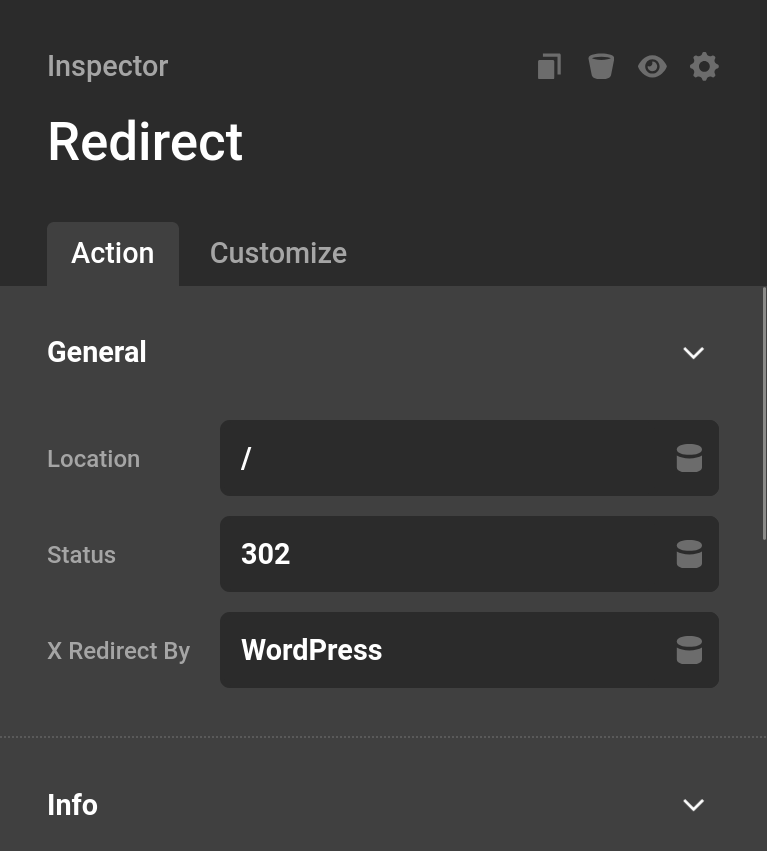
Redirect
This action redirects the user to another page. Once a redirect occurs, any Actions that follow it will not run since the user has already been sent to a new page. For that reason, this action should almost always be placed at the end of your action chain.
Location— The URL to redirect the user to.Status— The HTTP status code for the redirect. Defaults to302(temporary redirect). Use301for a permanent redirect that browsers and search engines will cache.X Redirect By— Sets theX-Redirect-ByHTTP header, which identifies what initiated the redirect. Defaults toWordPressand rarely needs to be changed.
Set Cookie
This action sets a browser cookie when a form is submitted. It runs server-side, so the cookie is sent as part of the HTTP response headers — not via JavaScript.
General
Name— The cookie name. This field is required — the action will produce an error if left empty.Value— The value to store in the cookie. Supports dynamic content from form fields.Expires— How long the cookie should last. Leave empty to set a long-lived cookie (10 years). Use a negative number of seconds to delete an existing cookie by that name.
Advanced
Path— The URL path the cookie applies to. Defaults to/, which makes the cookie available site-wide. Use a more specific path (e.g./shop) to limit cookie scope.Domain— The domain the cookie is scoped to. Leave empty to use the current domain. Set to a parent domain (e.g..example.com) to share the cookie across subdomains.Same Site— Controls when the browser sends the cookie on cross-site requests.Lax(recommended) allows the cookie on top-level navigations.Strictblocks it on all cross-site requests.Noneallows it everywhere but forcesSecureto be enabled.Secure— When enabled, the cookie is only sent over HTTPS connections. Should be enabled on any production site running HTTPS.Http Only— When enabled, the cookie cannot be read by JavaScript. This reduces exposure to XSS attacks and is a good default for cookies that do not need to be accessed client-side.
Returns true when the cookie is set successfully. The action produces an error if headers have already been sent before the cookie can be written.
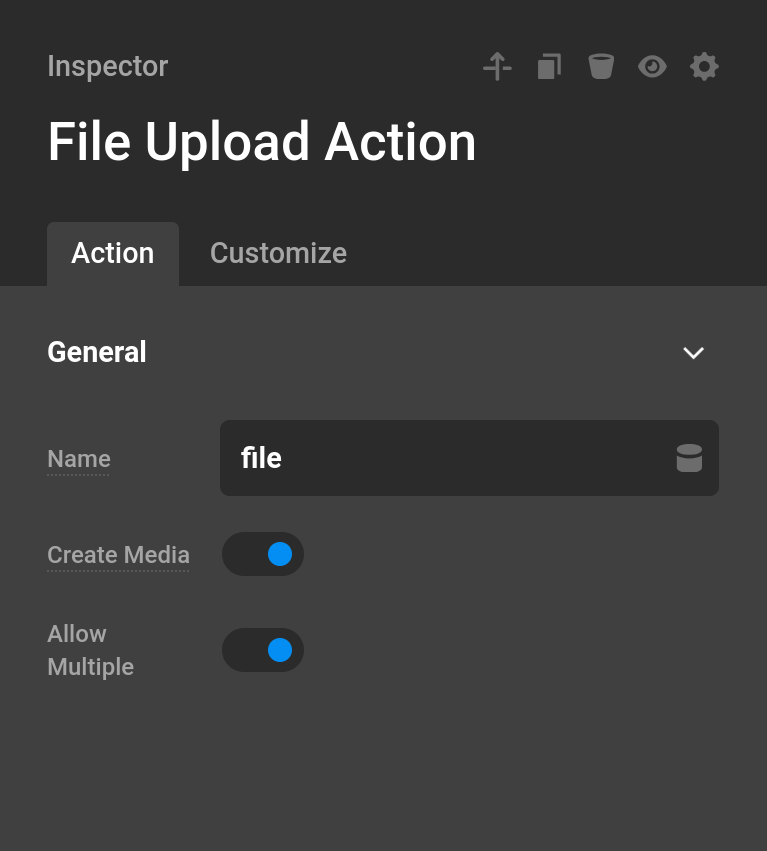
File Upload
This action processes a file input submitted with your form. It can store files either as WordPress Media Library entries or directly on the server filesystem, and supports single or multiple file uploads.
Name— The name used in the File input element on your form. This must match exactly.Create Media— When enabled, a Media Library entry is created for each uploaded file and the attachment ID is returned. When disabled, files are stored locally on the server and the absolute file path is returned instead.Upload Path— (Visible when Create Media is disabled) The absolute server path to the directory where uploaded files will be stored. The directory is created automatically if it does not exist. Defaults to the system temp directory when left empty. A common pattern is to use the uploads directory (e.g./var/www/html/wp-content/uploads/my-uploads).Allow Multiple— When enabled, multiple files submitted under the same input name are all processed and stored. Returns an array of IDs or paths instead of a single value.
Return values: When Create Media is enabled, the attachment ID is returned (or an array of IDs for multiple files). When Create Media is disabled, the absolute server path to the stored file is returned (or an array of paths), which can be passed directly to the Download File action.
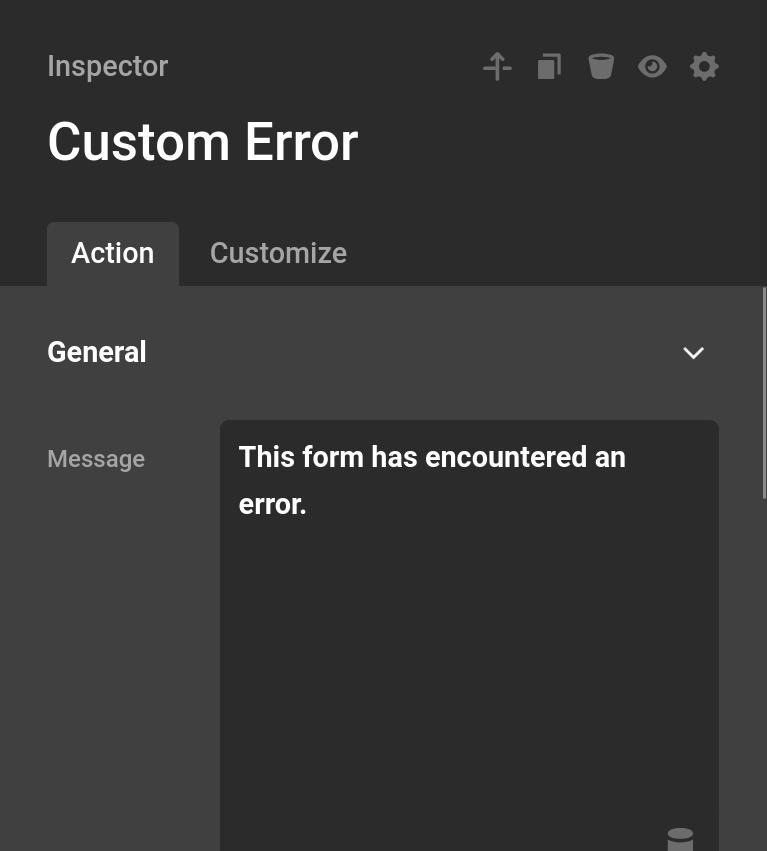
Custom Error
This action generates a validation error based on custom logic. It is particularly useful when you need validation rules that are not covered by the built-in validation system. By combining this action with Conditions, you can display an error whenever a specific condition is met.
Message— The error message displayed to the user when this action runs.
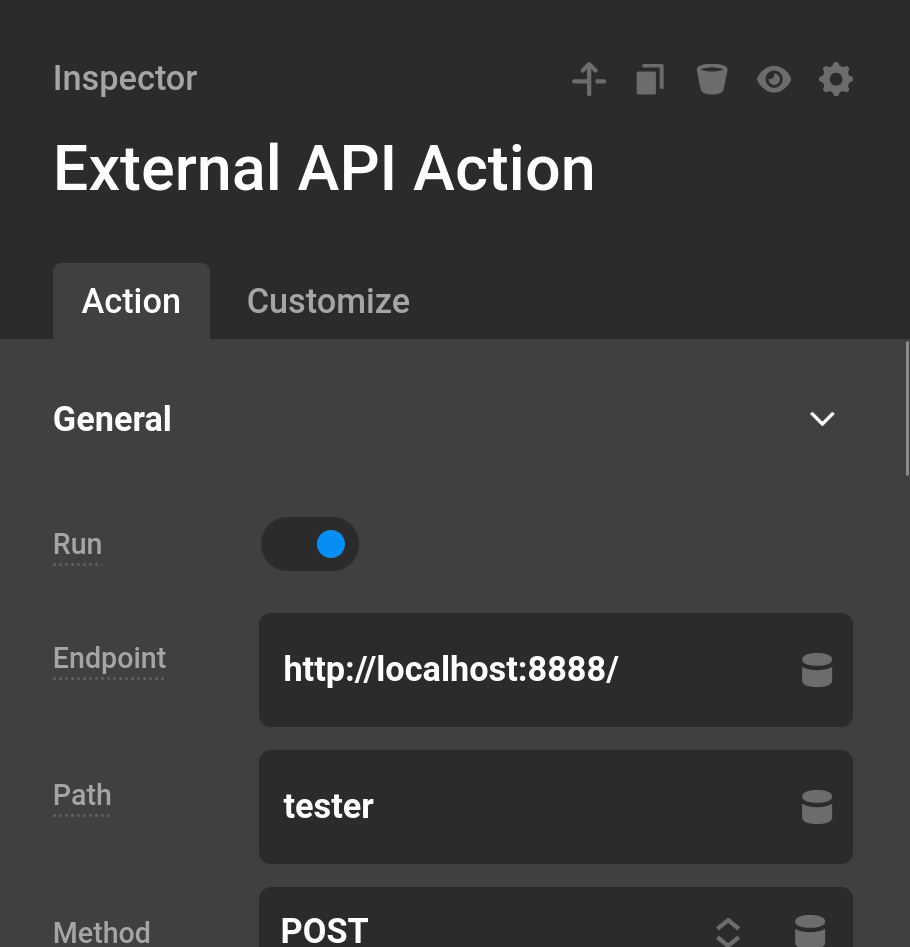
External API
This action sends a request to an external service using a configured API connection. It requires the External API feature to be enabled and is commonly used for webhooks and third-party integrations. The available controls mirror those found in the External API configuration.
The parsed API response body is returned and can be referenced in later Actions via {{dc:form_action:response}}.
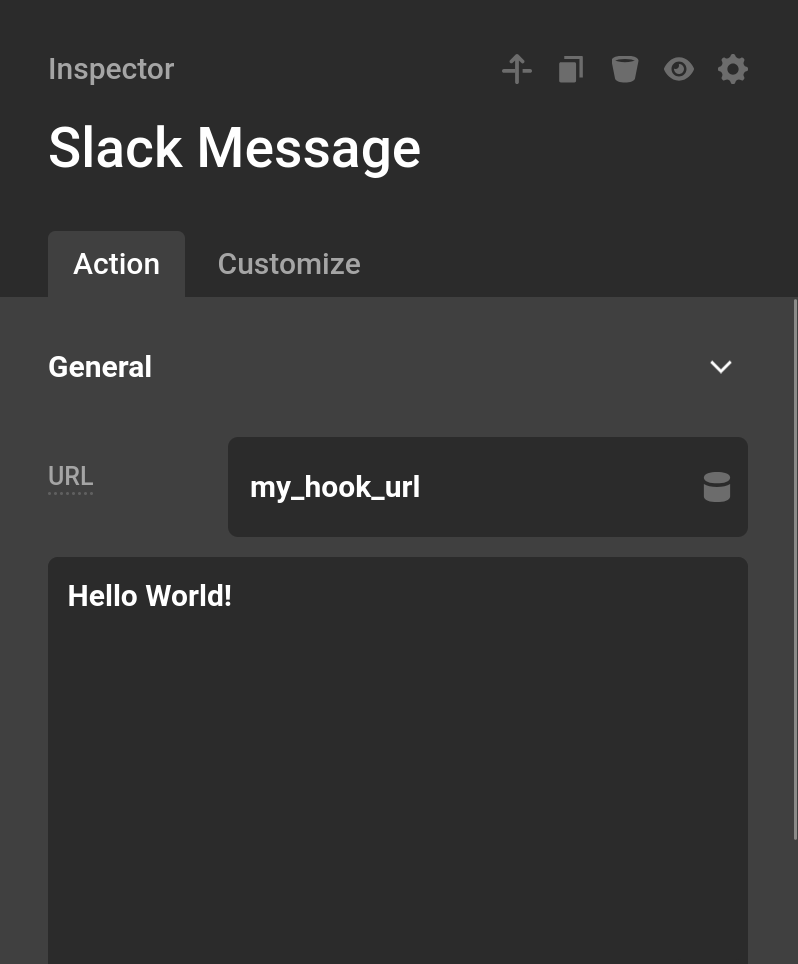
Slack Message
This action posts a message to a Slack channel using a webhook.
URL— The webhook URL generated in Slack.Message— The message that will appear in the Slack channel. This field can include form data so your team receives useful context when a form is submitted.
This action does not return data useful for later Actions.
To generate a webhook URL, visit the Slack App Page and click Create New App. If you do not have a manifest, select From Scratch.
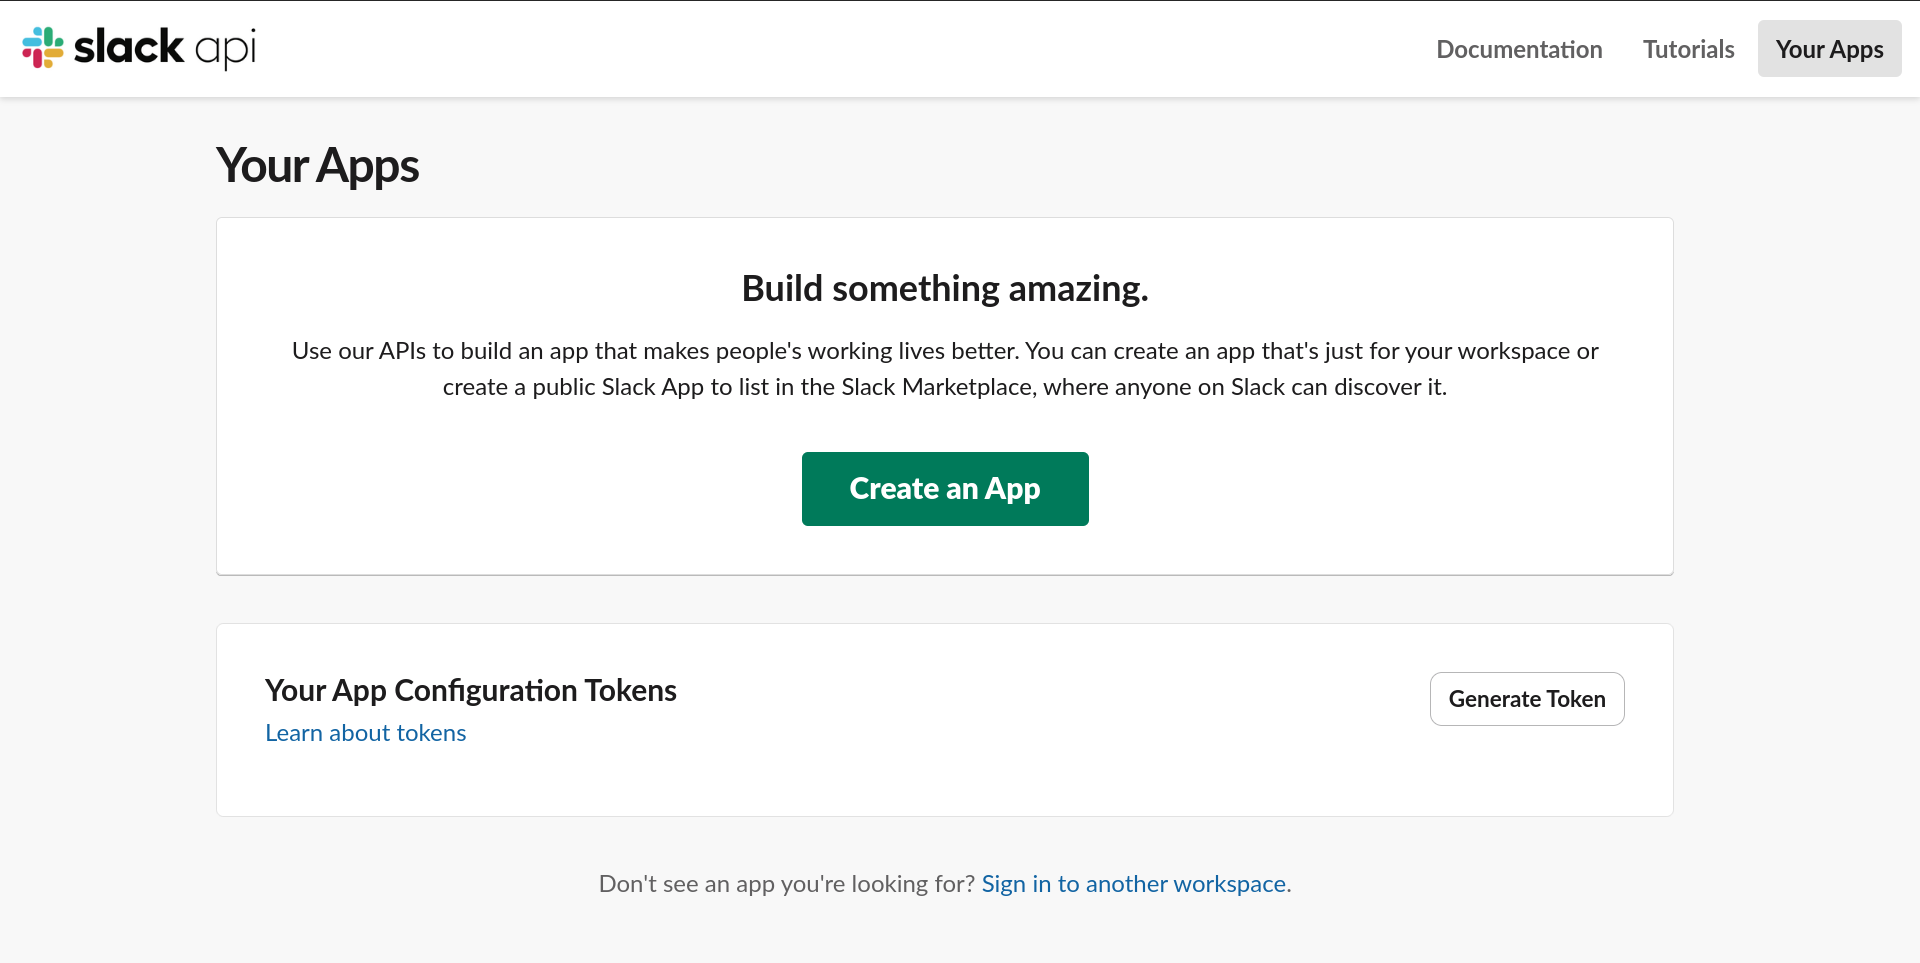
After creating the app, navigate to Incoming Webhooks and enable the feature. At the bottom of the page you can create a new webhook and choose which channel it should post to. Slack will then provide the webhook URL to use in the URL field.
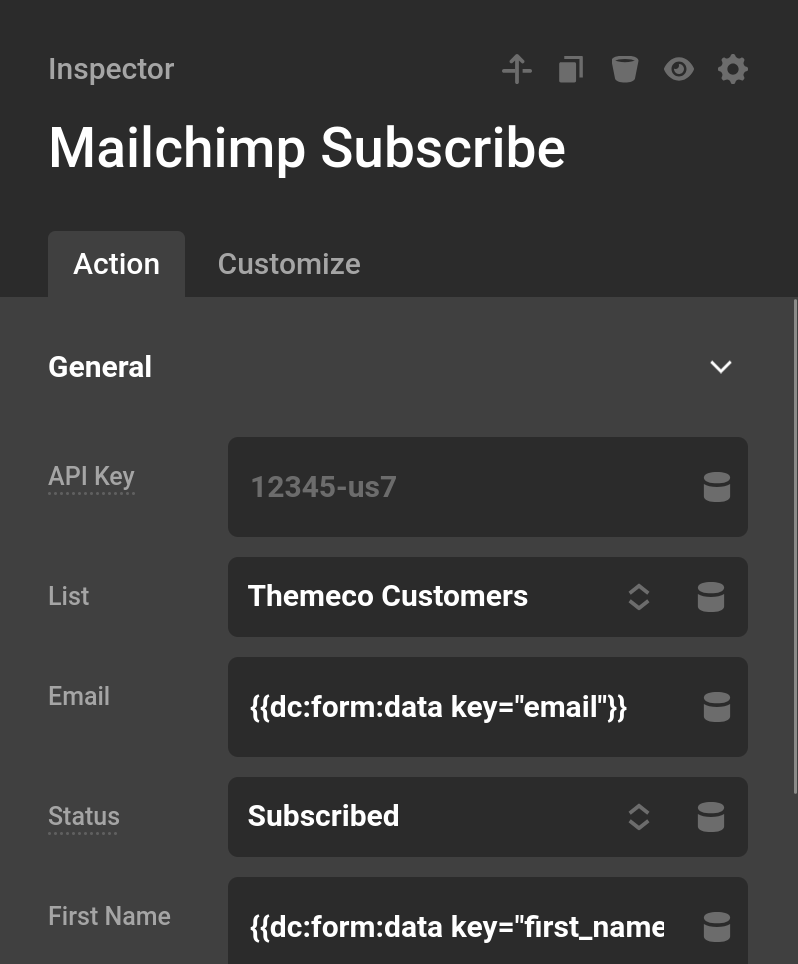
Mailchimp
Mailchimp is a popular platform for managing email marketing and subscriber lists. Cornerstone Forms can add or remove subscribers using the Mailchimp Subscribe action.
API Key— Your Mailchimp API key. Leave this blank to use the key saved in Cornerstone Settings, which allows it to be shared across all forms on your site.List— The audience list to modify. This dropdown auto-populates once your API key is saved in Cornerstone Settings.Email— The email address to subscribe or unsubscribe.Status— The action to perform:Subscribedadds the address to your list,Unsubscribedremoves them, andPendingsends a confirmation email that the user must accept before being added (double opt-in).First NameandLast Name— Optional fields that attach additional information to the subscriber record.Tags— One or more tags to apply to the subscriber. The dropdown is dynamically populated from the tags in the selected list. ACustom...option is also available if you need to enter a tag name that does not yet exist in the list. Tags are applied after the subscriber record is created or updated, so they work alongside any status change in the same action.Remove Unspecified Tags— (Inside the Tags group) When enabled, any tags currently on the subscriber that are not listed above will be removed on submit. When disabled, existing tags are left untouched and only the selected tags are added.
On success, the Mailchimp member record is returned as an associative array and can be referenced in later Actions via {{dc:form_action:response}}.
To obtain your Mailchimp API key, open the Mailchimp dashboard and generate a key under Account > Extras > API Keys. Saving this key in Cornerstone Settings allows the List dropdown to auto-populate across all your forms.

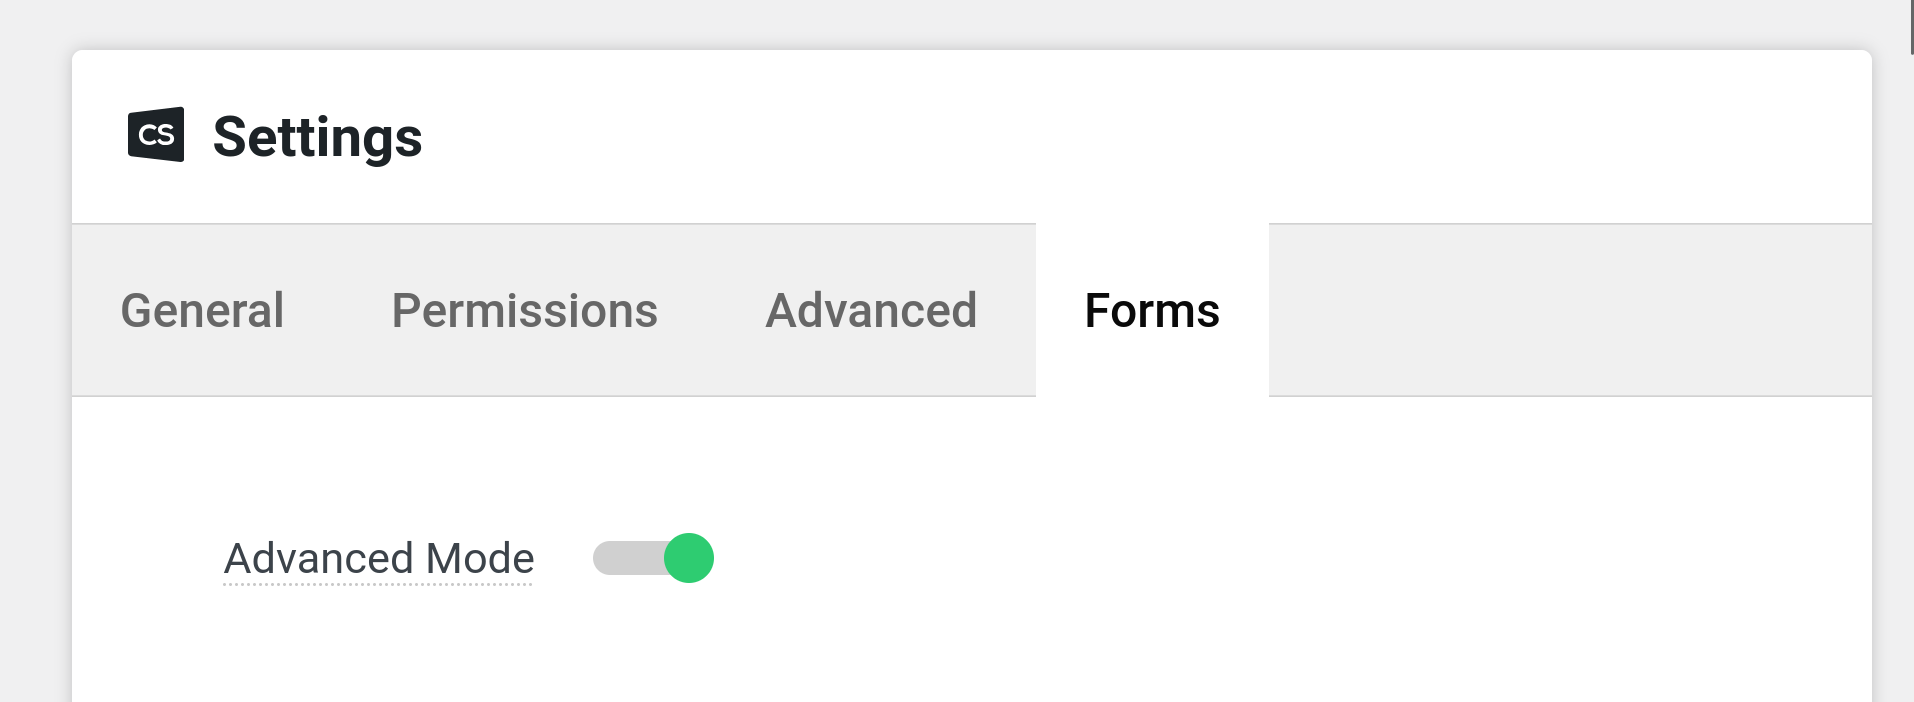
Advanced Actions
Advanced Actions unlock some of the most powerful capabilities in Cornerstone Forms, allowing you to interact directly with your database or run custom PHP logic. Because of their power, they should be used carefully and tested in a staging environment before being deployed to a live site. To enable them, open Cornerstone Settings, navigate to the Forms tab, enable Advanced Mode, and save.
SQL
This action executes a custom SQL query directly against your WordPress database. The result of the query is returned and can be used in later Actions. For INSERT, UPDATE, and DELETE statements this is the number of rows affected as an integer. For SELECT statements it is likewise the row count — not the actual row data.
Variables— A list of values to inject into your query. Each variable is referenced positionally in the SQL using a typed placeholder:%sfor strings,%dfor integers,%ffor floats, and%ifor identifiers such as table or column names. Variables are automatically escaped to protect against SQL injection.SQL— The query to execute. Reference your variables in the order they appear in the Variables list.
For example, to update an option using two variables:
UPDATE wp_options
SET option_value = %s
WHERE option_name = %s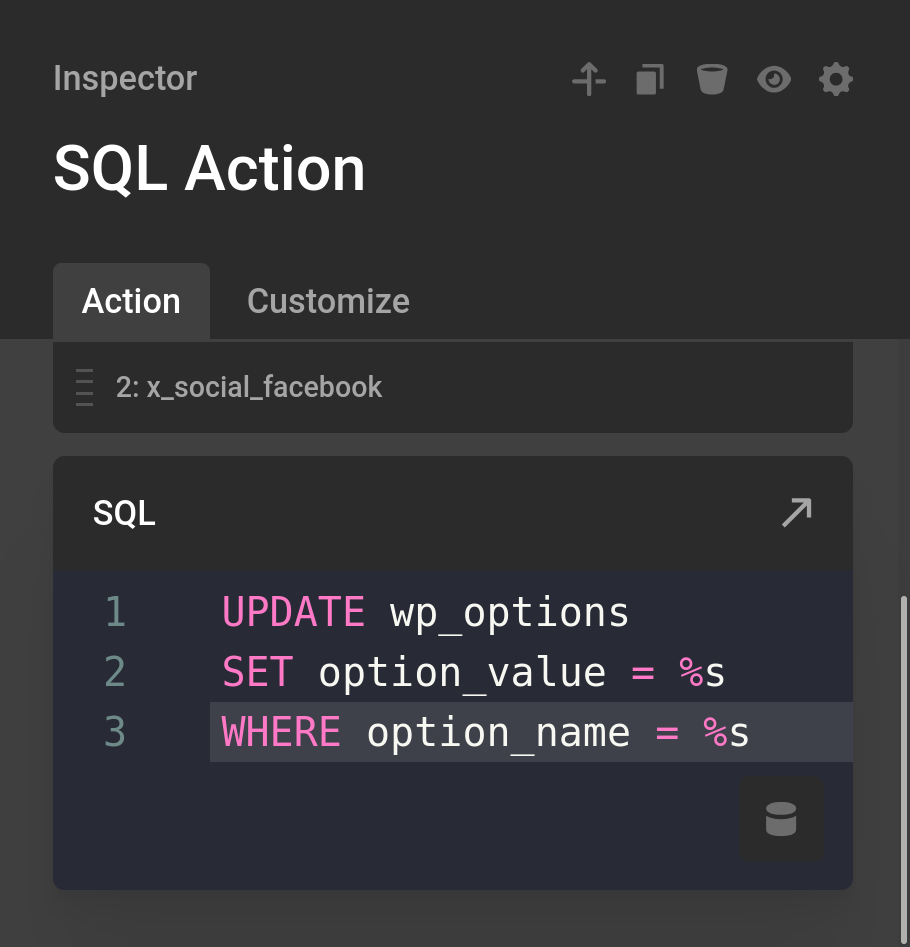
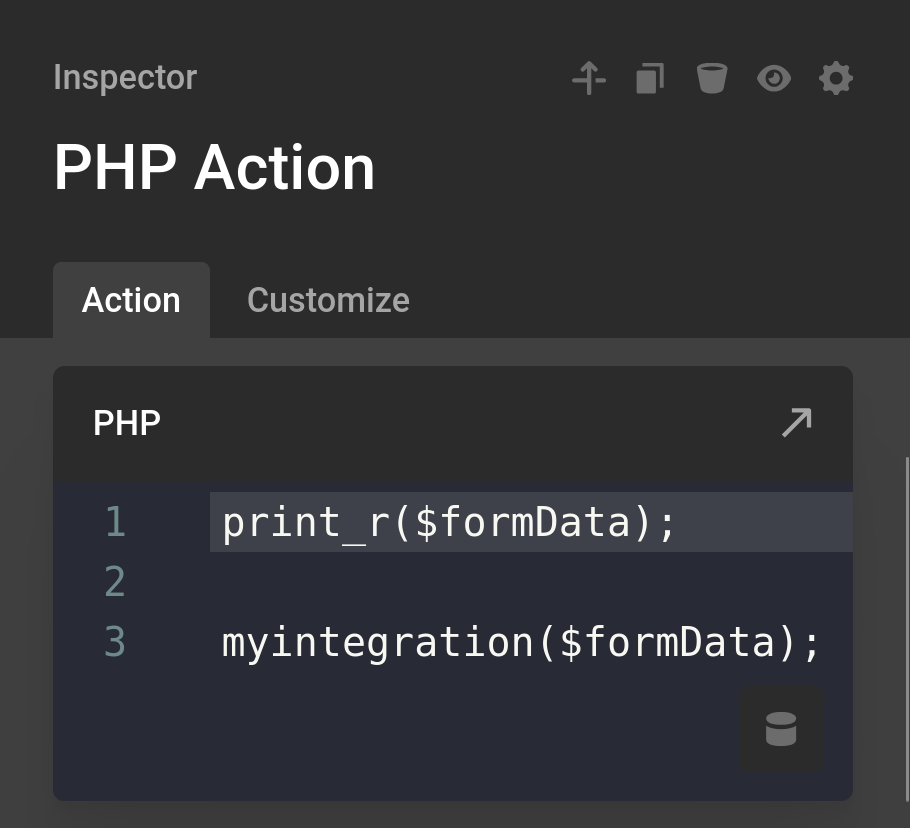
PHP
This action runs custom PHP code when a form is submitted. You do not need to include the <?php opening tag. All form data is accessible through the $formData variable.
Whatever your PHP code returns is passed forward as this action's response. Use a return statement to pass any value — a string, integer, or array — to later Actions via {{dc:form_action:response}}.
Summary
Actions transform Cornerstone Forms from simple input collection into a powerful automation system. By chaining Actions together and passing data between them, a single form submission can create content, update records, trigger integrations, and power entire application workflows — including ACF Actions — all directly inside Cornerstone.
See something inaccurate? Let us know