This article was last updated on the October 12, 2017.
The Text element is available across all three builders. The Content Builder, the Header Builder and the Footer Builder. The purpose of the element is to output text that you enter directly in the editor window provided by the text element. Allowing you to configure a range of different text options using the in-built available controls.
While you can use Presets mentioned below, the text element is one that you wouldn't usually use a preset on as you'd control it more on an independent level or a global level depending on exactly where the text is being placed.
Presets
First of all you'll see the Apply Preset option, but just what is a preset? A preset is a pre-configured option pack of sorts. When you apply the preset all the controls are automatically changed to the specified value in the presets. Right now the presets represent each different stack. Providing quick starting points for getting your elements styled perfectly to match your stack. Apply a preset and then tinker to your hearts content.
Controls
All elements come with a range of different controls and the Text element is no different. While many of the controls are self explanatory in what they effect, we'll cover the basics and any major points you need to be aware about in each article. Every article will also cover the basics such as Flexbox, Interactions and more!
Flexbox
Just what is Flexbox and what makes it so flexible? Flexbox is a layout mode intended to accomodate multiple elements on a page in different configuration layouts for a variety of screen sizes. It's generally easy to work with once you get to grips with it and provides an array of configuration elements for start positions, end position and everything in between.
While Flexbox may seem daunting at first. Don't worry! There are a range of multiple tutorials online and in all our builders we have multiple configuration options that means you never have to touch a line of code! So you properly understand Flex options, we'd recommend having a ready up over here: https://css-tricks.com/snippets/css/a-guide-to-flexbox/ on how exactly Flexbox works. While you don't need to worry about the code side. It's important to have a basic grasp of how Flexbox works to make the most of the builders. Or of course there's always the trial and error approach.
Interactions
Throughout the elements you'll see options for interactions, but just what are interactions? Interactions generally means when an element is being interacted with. Such as on hover. For example on a Background Color option you'll have the Base option which is the main background color of the element. Then you'll have the Interaction option, setting this to a different color from base will display a different color on hover.
You'll also see interactions for icons where you can swap out icons on hover. Allowing you to configure different options for on hover. Making for some great effects with swapping out icons on hover.
Margins and paddings. EMs, REMs, Pixels and more!
With all the margins, paddings and other height and width based options, along with some sizing options. You'll see the option to change the actual unit value. This means you might set one control to be 2.5 EMs such as the width. But then on your margin you might set it to be 50px. The available unit options are:
Keep in mind wherever you see an option for unit values just click the current unit value like this:
Linking Sides
One thing you'll see in common across multiple controls is the ability to link sides. This means that if you link sides on the padding controls, all the padding controls will be the same value. However if you unlink the padding controls, you can then control each side independently allowing for greater control.
If you have link sides on for the respective set of controls you will not see the individual options.
Particles And Partials
Many of the elements use what's known as the "Particles Partials". But just what are Particles and how can use them? Check out our great mini video series over on this KB article.
Integrity Preset
The Integrity Preset when applied to the social element will change the values for the element within the controls for it to closely the match the baseline style of the integrity stack. which once applied looks like this:

Renew Preset
The Renew Preset when applied to the social element will change the values for the element within the controls for it to closely the match the baseline style of the Renew stack. which once applied looks like this:

Icon Preset
The Icon Preset when applied to the social element will change the values for the element within the controls for it to closely the match the baseline style of the Icon stack. which once applied looks like this:

Ethos Preset
The Ethos Preset when applied to the social element will change the values for the element within the controls for it to closely the match the baseline style of the Ethos stack. which once applied looks like this:

Controls
All elements come with a range of different controls and the social element is no different. While many of the controls are self explanatory in what they effect, we'll cover the basics and any major points you need to be aware about in each article. Every article will also cover the basics such as Flexbox, Interactions and more!
Flexbox
Just what is Flexbox and what makes it so flexible? Flexbox is a layout mode intended to accomodate multiple elements on a page in different configuration layouts for a variety of screen sizes. It's generally easy to work with once you get to grips with it and provides an array of configuration elements for start positions, end position and everything in between.
While Flexbox may seem daunting at first. Don't worry! There are a range of multiple tutorials online and in all our builders we have multiple configuration options that means you never have to touch a line of code! So you properly understand Flex options, we'd recommend having a ready up over here: https://css-tricks.com/snippets/css/a-guide-to-flexbox/ on how exactly Flexbox works. While you don't need to worry about the code side. It's important to have a basic grasp of how Flexbox works to make the most of the builders. Or of course there's always the trial and error approach.
Interactions
Throughout the elements you'll see options for interactions, but just what are interactions? Interactions generally means when an element is being interacted with. Such as on hover. For example on a Background Color option you'll have the Base option which is the main background color of the element. Then you'll have the Interaction option, setting this to a different color from base will display a different color on hover.
You'll also see interactions for icons where you can swap out icons on hover. Allowing you to configure different options for on hover. Making for some great effects with swapping out icons on hover.
Margins and paddings. EMs, REMs, Pixels and more!
With all the margins, paddings and other height and width based options, along with some sizing options. You'll see the option to change the actual unit value. This means you might set one control to be 2.5 EMs such as the width. But then on your margin you might set it to be 50px. The available unit options are:
Linking Sides
One thing you'll see in common across multiple controls is the ability to link sides. This means that if you link sides on the padding controls, all the padding controls will be the same value. However if you unlink the padding controls, you can then control each side independently allowing for greater control.
If you have link sides on for the respective set of controls you will not see the individual options.
Particles
Many of the elements use what's known as the "Particles Partials". But just what are Particles and how can use them? Check out our great mini video series over on this KB article.
Available Controls
Like other Elements, controls are split up into multiple sections for the TextElement those sections are:
Clicking on a specific link will take you to those controls. First of all you'll be on the Text section. The controls available within the Text section are:
Setup
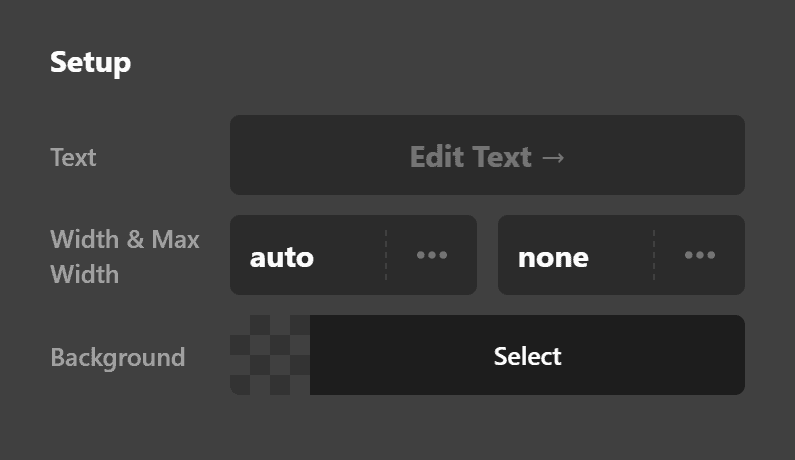
The Setup controls consist of:
- Text - The text you want to output in your header (plain text)
- Tag & Text Overflow - The tag you want the text to be, i.e, a P (paragraph), h1 etc and wether to enable the text to overflow.
- Width and Max Width - The width the text should be along with the maximum width the text should take up.
- Background - The Background color of the text.
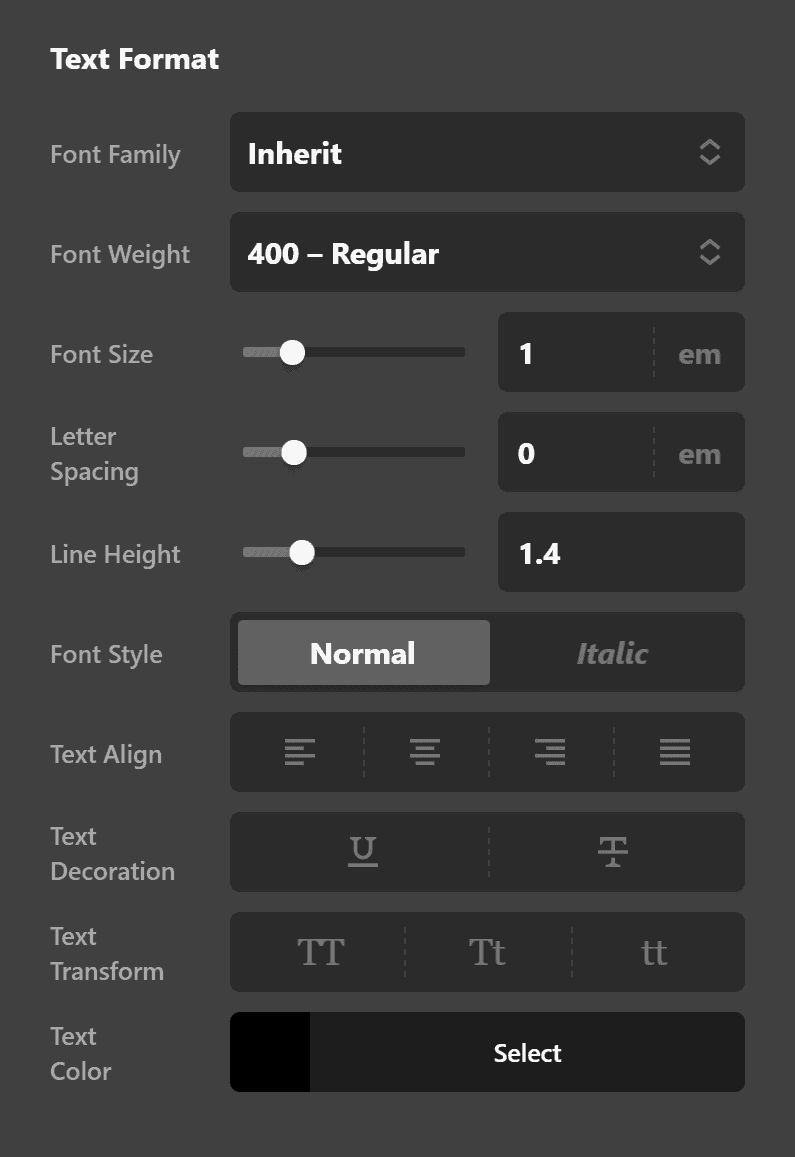
Text Format
The Text Format controls consist of:
- Font Family - A font selector for the primary text. Default is inherit or you can select a font that's setup within the Font Manager.
- Font Weight - The font weight for the primary font selected. Available weights depend on the font family selected.
- Font Size
- Letter Spacing
- Line Height
Text Style
The Text Style controls consist of:
- Font Style - Normal or Italic
- Text Align - Left, Center, Right, Justify.
- Text Decoration - Underlined or Strikethrough.
- Text Transform - Uppercase (force all text to be uppercase), Capitalize (forces the first letter in each word to be a capital), Lowecase (forces all text to be lowercase).
- Text Color - offers two options. 1: Base, sets the base color of the text. 2: Interaction. Sets the text color when interacted with (on hover) etc.
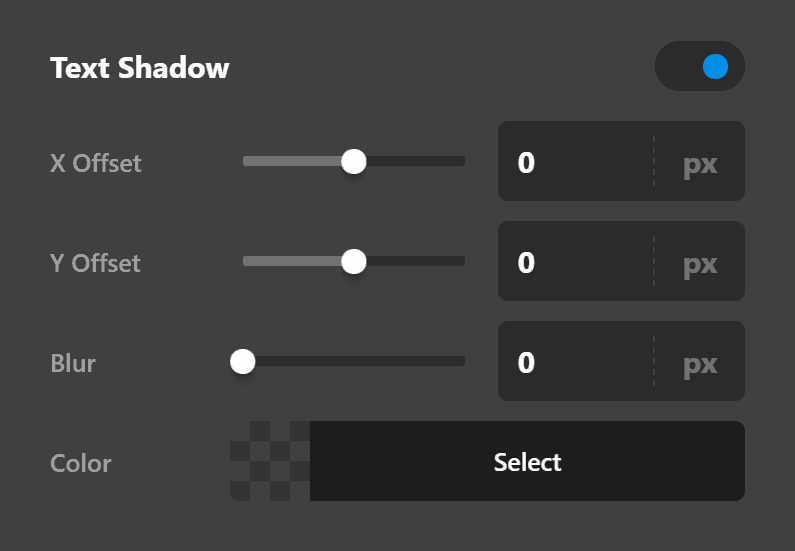
Text Shadow
The Primary Text Shadow controls consist of:
- X-Offset - Set the offset of the text shadow for the X axis.
- Y-Offset - Set the offset of the text shadow for the Y axis.
- Blur - Set the blur of the text shadow.
- Spread & Position - Set the spread and position of the text shadow.
- Color - Sets the color of the text shadow.
Margin
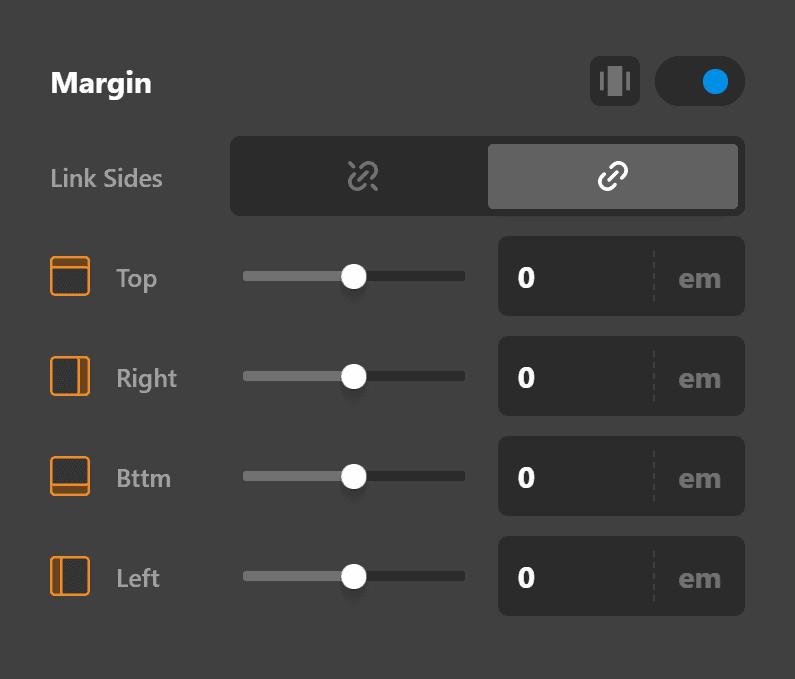
The Margin layout controls consist of:
- Link Sides - Link sides allows you to link up every option within the margin controls so when you change one value all values change. Or you can unlink sides and set each margin option individually.
- Top - Sets the top margin.
- Right - Sets the right hand side margin.
- Bttm - Sets the bottom margin
- Left - Sets the left hand side margin.
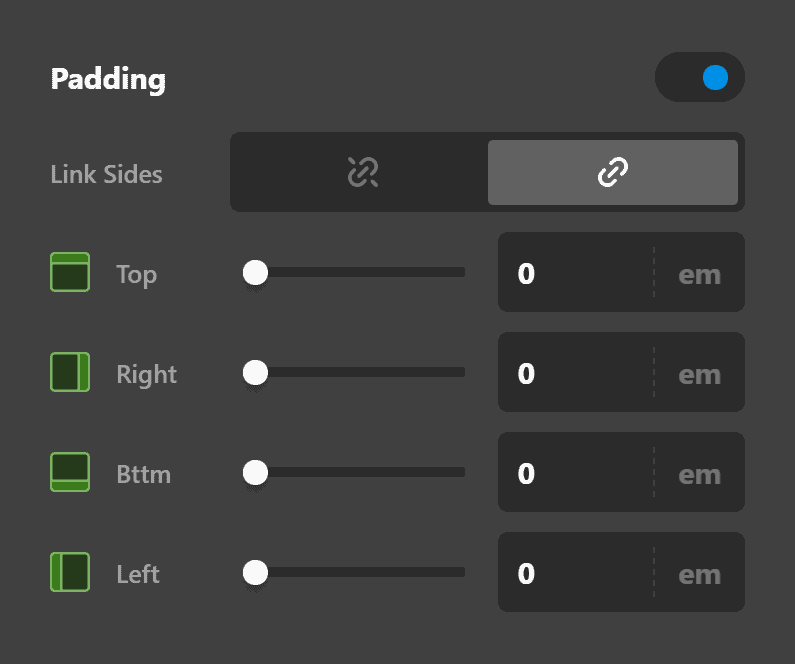
Padding
The Padding controls consist of:
- Link Sides - Link sides allows you to link up every option within the padding controls so when you change one value all values change. Or you can unlink sides and set each padding option individually.
- Top - Sets the top margin.
- Right - Sets the right margin.
- Bttm - Sets the bottom margin.
- Left - Sets the Left margin.
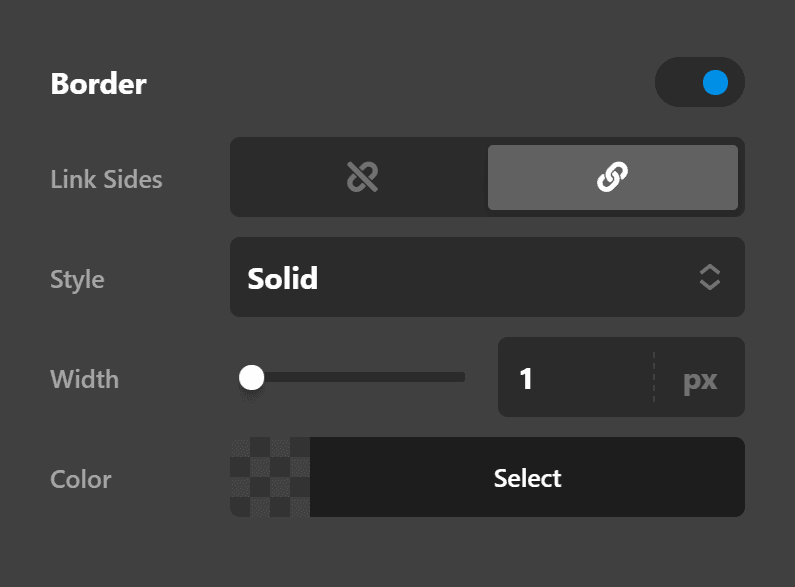
Border
The Border controls consist of:
- Link Sides - Allows you to link up the border control for all sides or unlink sides to control each border side individually.
- Style - Sets the style of the border such as dashed, dotted etc.
- Width - Sets the width of the border in pixels by default. Or click on PX to change the value to the units you'd like to use (EM, REM)
- Color - Sets the color of the border.
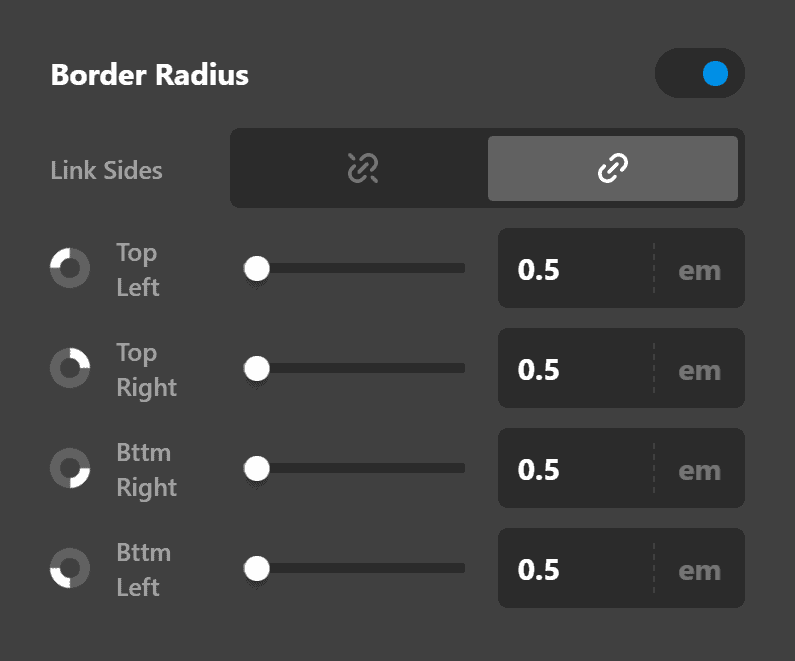
Border Radius
The Border Radius controls consist of:
- Link Sides - Link all sides of the border to control all border radius options at the same time, rather than configuring each value individually. If you unlink sides. You can set the border radius controls individually.
- Top Left - Set the top left radius of the border.
- Top Right - Set the top right radius of the border.
- Bttm Right - Set the bottom right radius of the border.
- Bttm Left - Set the bottom left radius of the border.
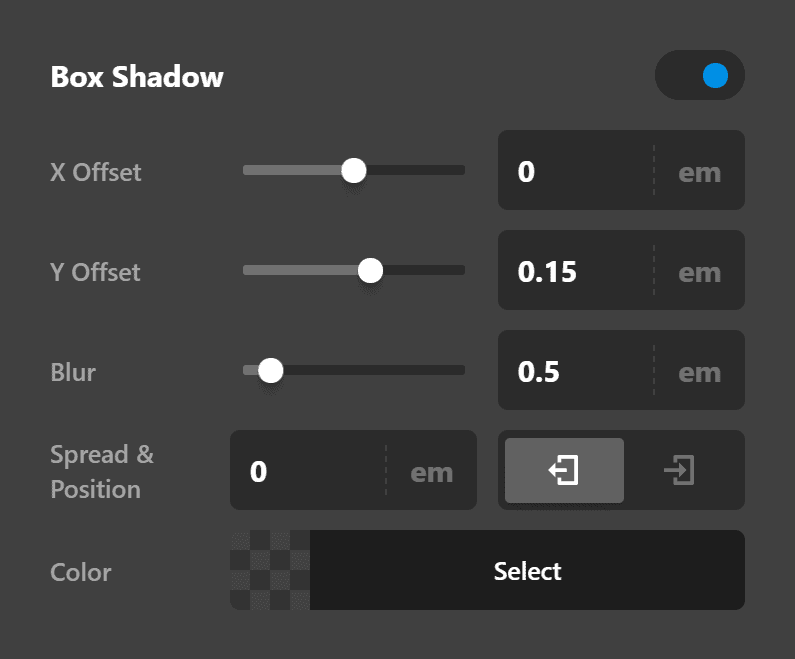
Box Shadow
The Box Shadow controls consist of:
- X-Offset - Set the offset of the border shadow for the X axis.
- Y-Offset - Set the offset of the border shadow for the Y axis.
- Blur - Set the blur of the box shadow.
- Spread & Position - Set the spread and position of the box shadow.
- Color - Sets the color of the box shadow.
Lastly are the available controls within the Customize section. If you click on Customize You should see the available controls like this:

The available controls within the Customize section are:
Setup
The Setup controls consist of:
- ID - A custom ID you want to assign for use with custom CSS.
- Class - A custom class you want to assign for use with custom CSS.
- Hide During Breakpoints - Select different screen sizes you want to disable the output of the specific element on. Perfect for creating custom responsive headers.