Loopers
In this article, we're going to discuss how to leverage Loopers to create powerful, data-driven layouts.
- Looper Consumers
- Looper Providers
- Recent Posts
- Query Builder
- Query String
- Current Post Terms
- All Terms
- Current Page Children
- JSON
- Custom
- Array
- Dynamic Content
- CSV Looper
- External API Looper
- Linked Product Loopers (Upsells and Cross Sells)
- Working with Looper Data
- Thinking Big with Loopers
- Out of the Box
- Looper Video Tutorials
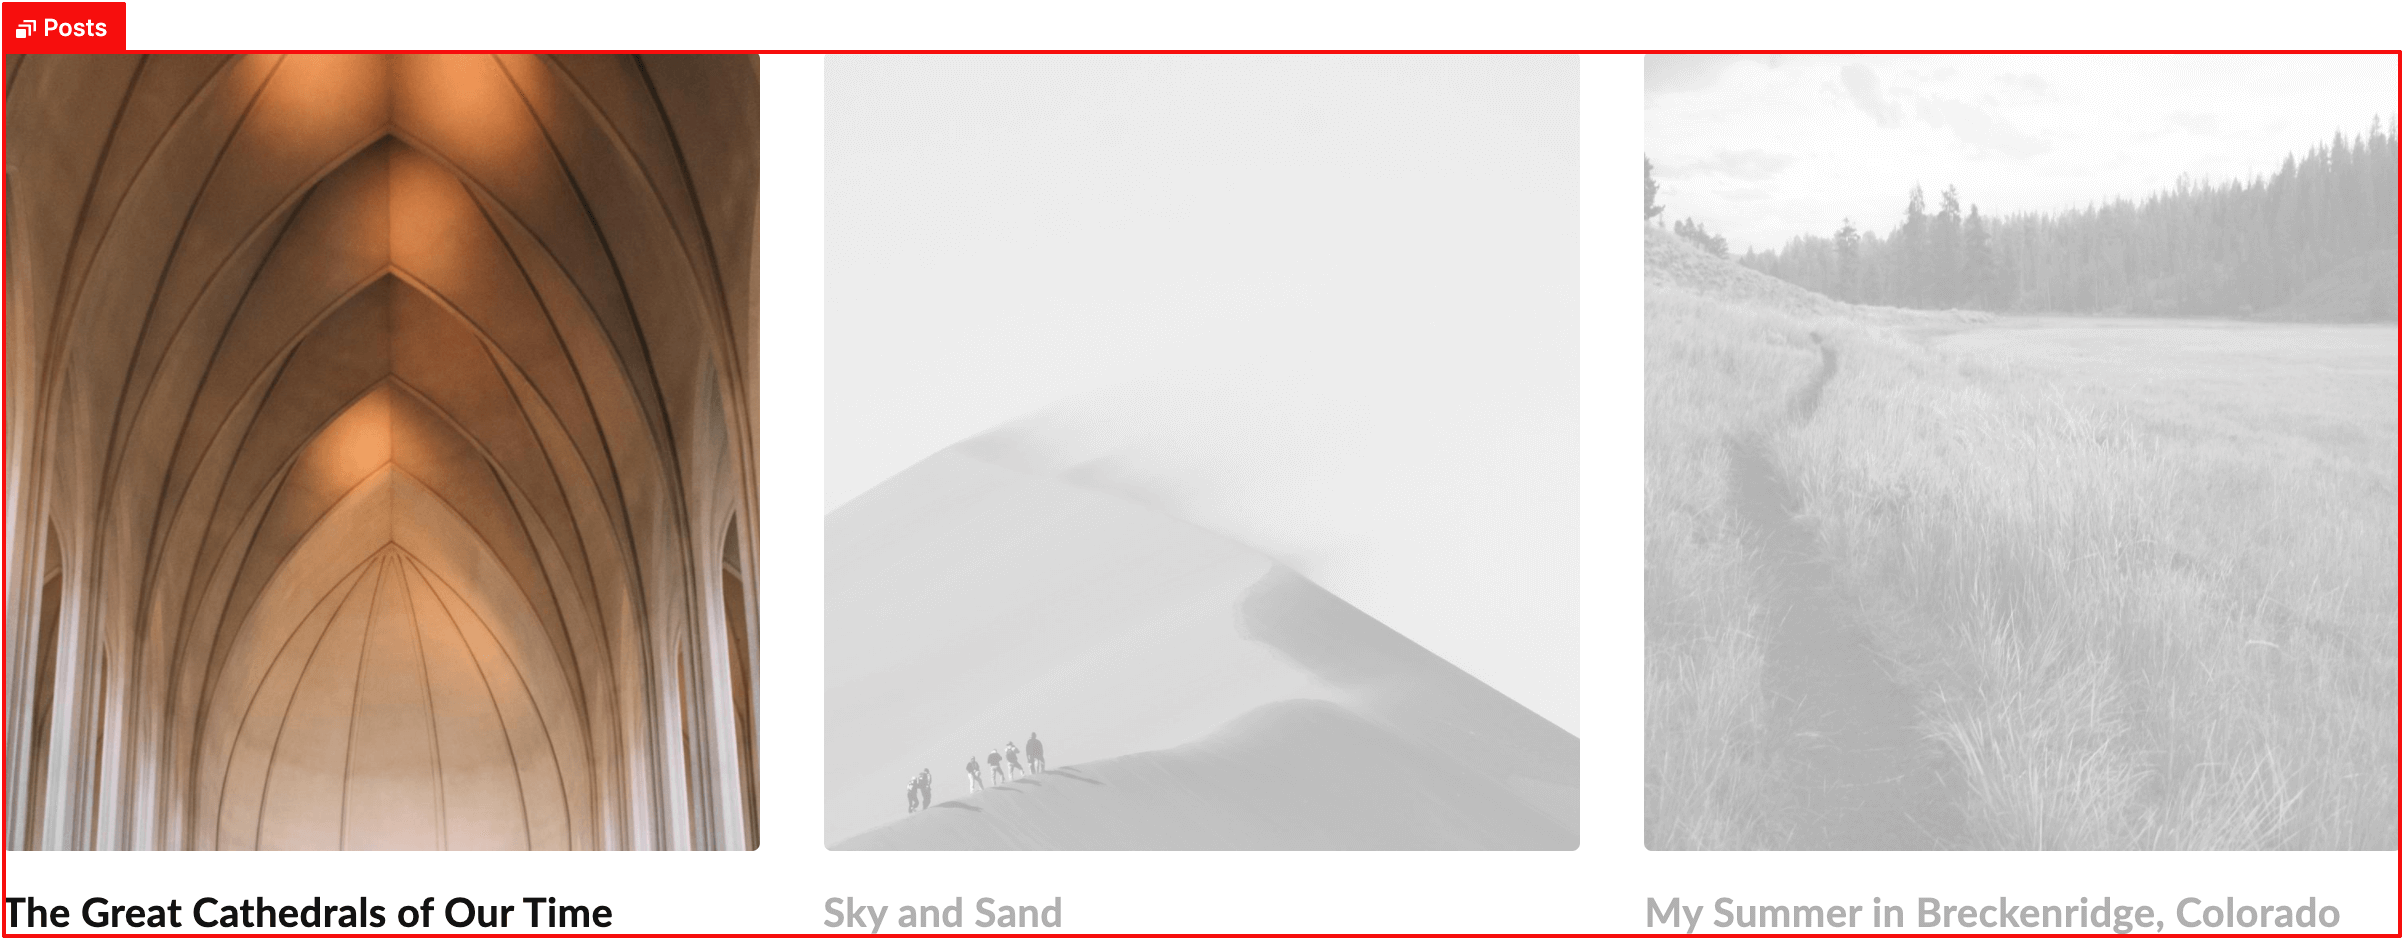
A powerful feature in Cornerstone is the addition of Loopers. "What is a looper?" I hear you asking…great question. 🙂 There are many times in web development where we need to output and style things as a group or in a specific order. The most common instance of this that might come to mind would be a recent posts module or a blog index:

To achieve this pattern you could setup a three column layout and include three different Image Elements and pull through the featured images on your posts using dynamic content. Then, you would need to setup three Headline Elements and pull through the titles dynamically there as well. There are quite a few problems with all of this:
- You would have to define the IDs for the posts you want manually and update it every time you add a new post.
- You would have to repeat yourself 3 separate times for all content (i.e. input
{{dc:post:title}}for the content of every Headline Element individually and specify the IDs you need). - For these types of patterns, you will often want the styling of all like Elements to be similar. For example, if the featured image has a slight border radius and the title has the font size bumped and some top margin to push it away from the image, you would have to copy and paste those exact same styles across all Elements every time you wish to make a change.
Basically, none of that is ideal for achieveing that type of laying and making it consistent from a design / data standpoint. Instead, what would be (way) easier is to setup one “instance” of how each post should look and what data it needs, and then repeat that as many times as you need. We will talk more about this below in the Looper Consumer section.
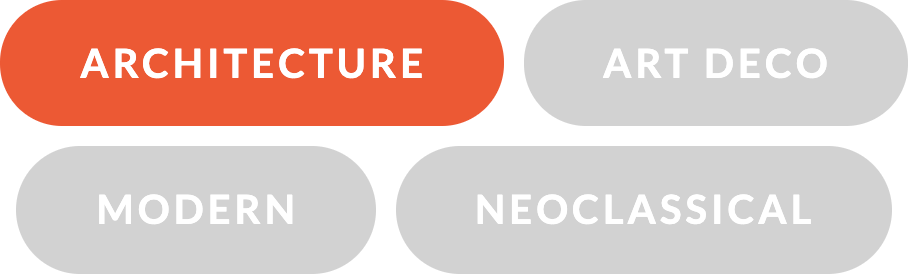
Alternately, there are plenty of other instances in web development where you want to repeat something multiple times and all that is really changing is the content for each piece, but you'd like the styling to remain consistent. Take the following feature list as an example:
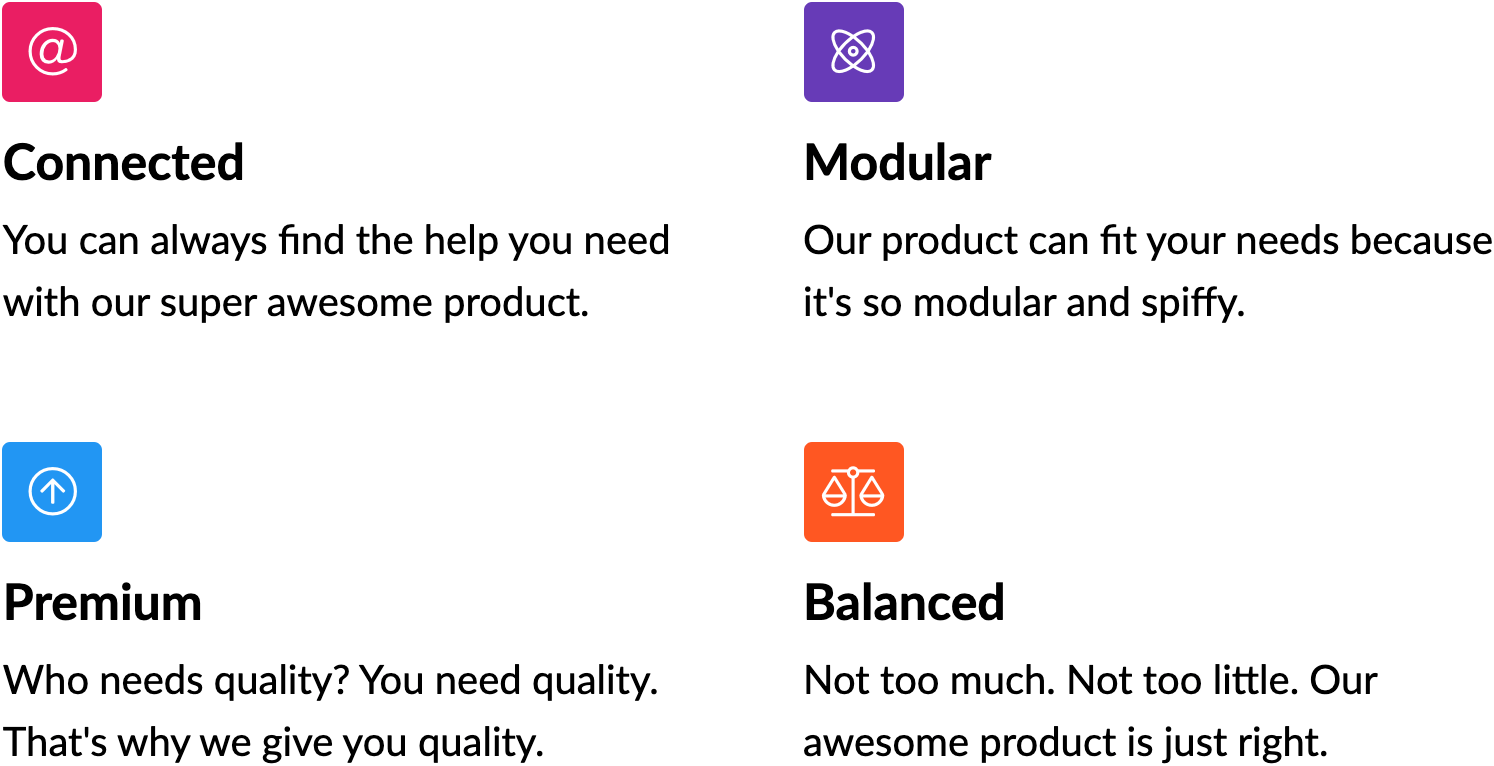
What we've got here are four styled features boxes for a faux product that includes an image at the top, primary headline, and a subheadline. Wouldn't it be great if instead of having to apply your styles four times over or copy and paste changes constantly, you could instead model one “instance” of each feature box and then merely pipe in custom data and repeat as necessary? One off situations like this are also possible using our Looper Providers, which we will cover later in this article as well.
Looper Consumers
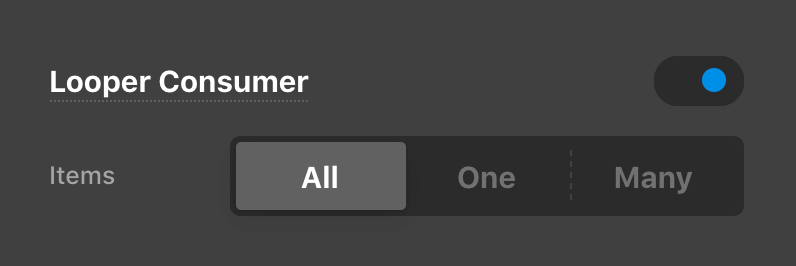
To create looped content in the builders, you can go to any Layout Element (i.e. Sections, Rows / Columns, Grids / Cells, and Divs) and turn on the Looper Consumer control within the Customize control group:
This is all you need to do to enable a new Looper. By default, a Consumer will output data from the current WordPress query. This means that unless otherwise specified, you will likely be accessing the global WordPress query and be able to loop through your current posts. If you want to access alternate or filtered data, you will need to setup a Looper Provider, which we will cover later in this article.
Take note that you can also specify if your Looper Consumer should output One, Many, or All data points available in the current query. If “Many” is selected, an input will appear, allowing you to specify your count.
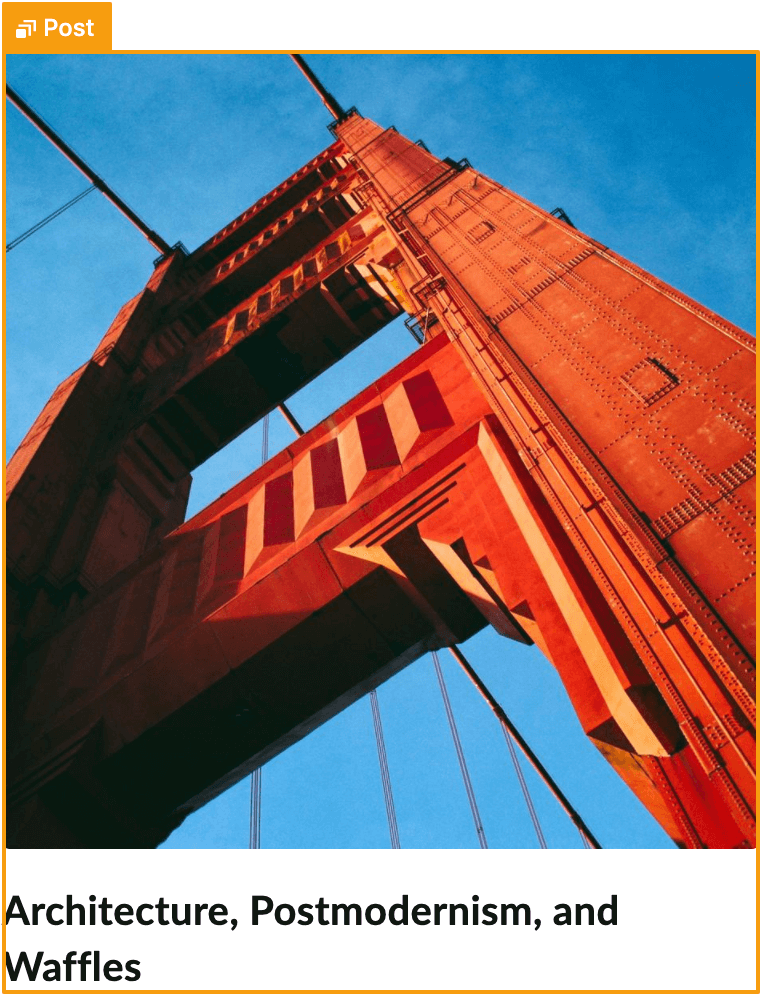
Whatever Element the Looper Consumer is enabled on is the Element—along with all of its contents—that will be repeated. Building off of our post example from before, the most appropriate Element to enable the Consumer on would be the Column within our Row.
Once a Looper Consumer is enabled on an Element, that Element's observer will highlight yellow (similar to Dynamic Content as mentioned earlier) and the Looper icon will be prepended to the label, helping to indicate that this is looped content (in the following screenshot we have renamed our Column Element to “Post” to help in identifying it in the preview):
Now that the Consumer is enabled on our Column, anything we place inside that Consumer will be repeated in every looped item. Looking at our example above, we will need the following items to complete our design:
- A linked Element to allow users to click through to the post. In this case we will turn on the Link control of the Column and input
{{dc:post:permalink}}as the value. This wraps the entire content of the Column in a link, allowing users to click anywhere to access the post; however, you could place this link around individual Elements if desired. - An Image Element pulling through the featured image using
{{dc:post:featured_image_id}}for thesrcand “Featured image for{{dc:post:title}}” for thealttext. - A Headline Element pulling through the title of the post using
{{dc:post:title}}.
Remember that the Dynamic Content strings mentioned above to not have to be hand-typed or remembered. You can use the Dynamic Content buttons to help you populate the appropriate values where necessary. Once all of these Elements are setup and designed how you want, you would see something like the following in the live preview:
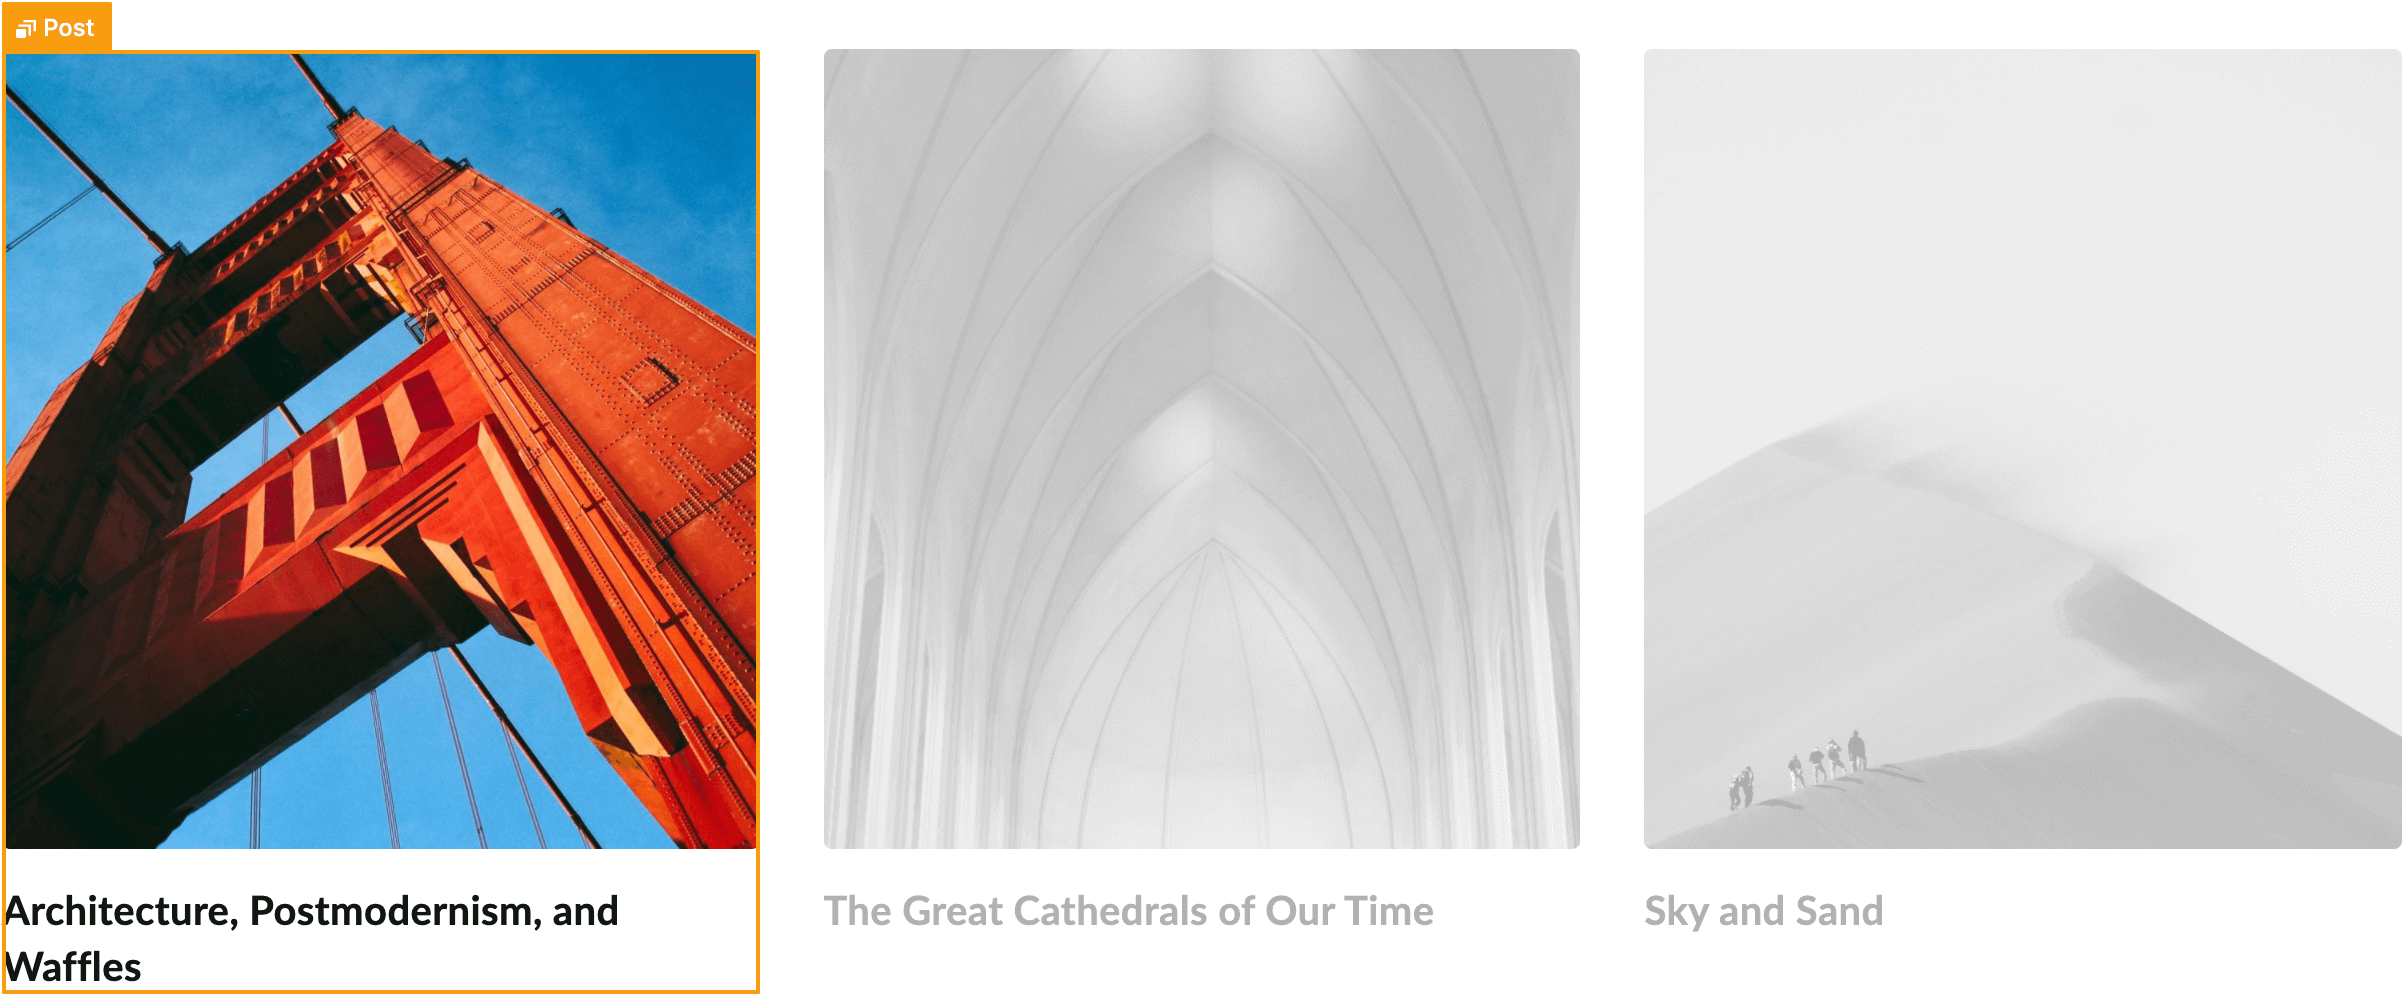
Take note that the first post and all of its child Elements are inspectable like normal, but each following item is grayed out and slightly transparent. This is because the design and data used for each looped item is modeled off of the first item in your loop, so any changes to how looped content should appear can only be made to the first item. The “disabled” feel of the following items helps to visually reinforce this idea.
Looper Providers
Whenever you want to output a filtered set data, you will need to enable a Looper Provider somewhere up the chain from where you want to consume that data. You can also enable a Provider on the same level as a Consumer if you wish. Whenever a Provider is enabled on an Element, that Element's observer will appear red in the live preview in addition to having the Looper icon prepended to its label:
This is to help you identify which Elements (if any) are leveraging or overwriting the current query via a new Provider. Now, let's discuss the different Types of Providers you can use across the Builders.
Recent Posts
By default, enabled Proviers are set to a Recent Posts query:
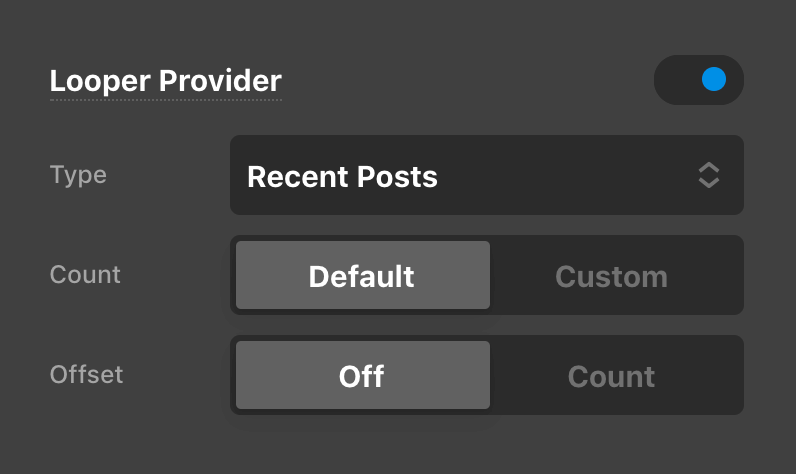
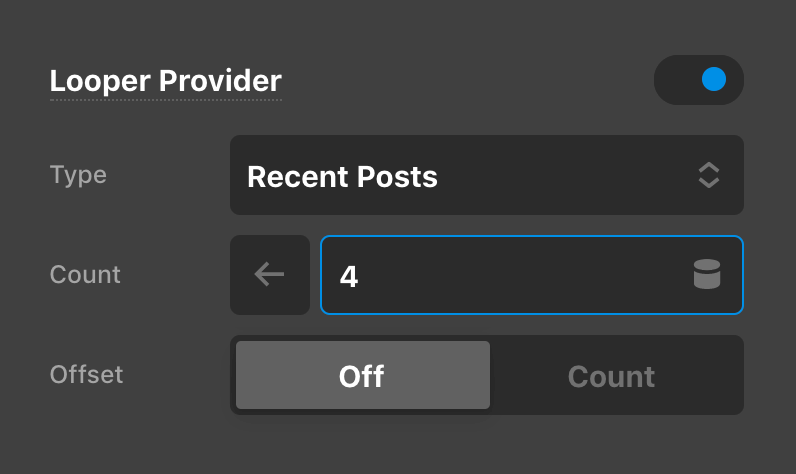
We provide this as simplified option due to the fact that it is probably the most common use for a Looper—but there is so much more you can do with them (more on that later). The one other option available is to adjust the Count. When set to Default it will pull in the query count set in your WordPress admin, but it can be altered by selecting Custom, which will swap out to an input for you to adjust:
All of our Posts Elements are built using this preset on the parent Element and a Consumer at some point within the layout tree.
Finally, the Offset control allows you to specify a particular number of Posts that you would like to skip before outputting your content. By default this control is Off, but selecting Count will reveal an input similar to what was shown above for the “Count” control where you can input your desired offset (this control is present on certain other Provider Types as well).
Query Builder
If you want to get into any sort of serious filtering with your Providers, you will want to select the Query Builder option for the Type control. Doing so will reveal the following set of controls:

The Count control remains at the end of the list, but a new set of options will appear in between for you to work with. You can see that switching to the Query Builder, we are selecting only Post entries and that they are ordered by Date in Descending order. This will yield the same results as the Recent Posts option for the Type control mentioned previously. Additionally, take note that as you update these filters, the labels on their associated controls will update as well to help provide you with the most contextually relevant information.
Lets start by clicking on the Posts filter:
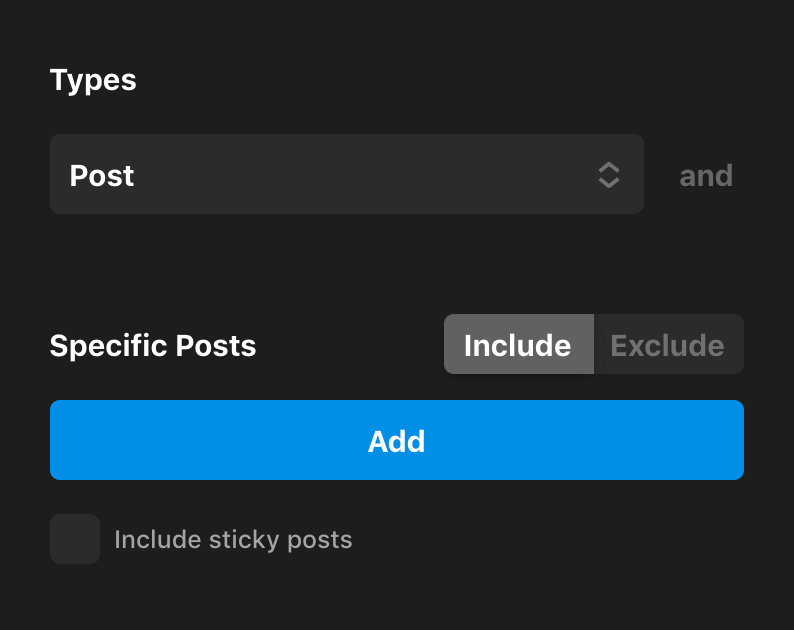
By default, WP Query requires you to have at least one post type specified to pull from, so you must always have at least one value present in the Types control. If you wish to pull from multiple post types, click the and button next to the first item to reveal an additional select menu (this pattern is used throughout the other popups as well). So if you wanted to include all Page post types in your query as well, you could do the following:
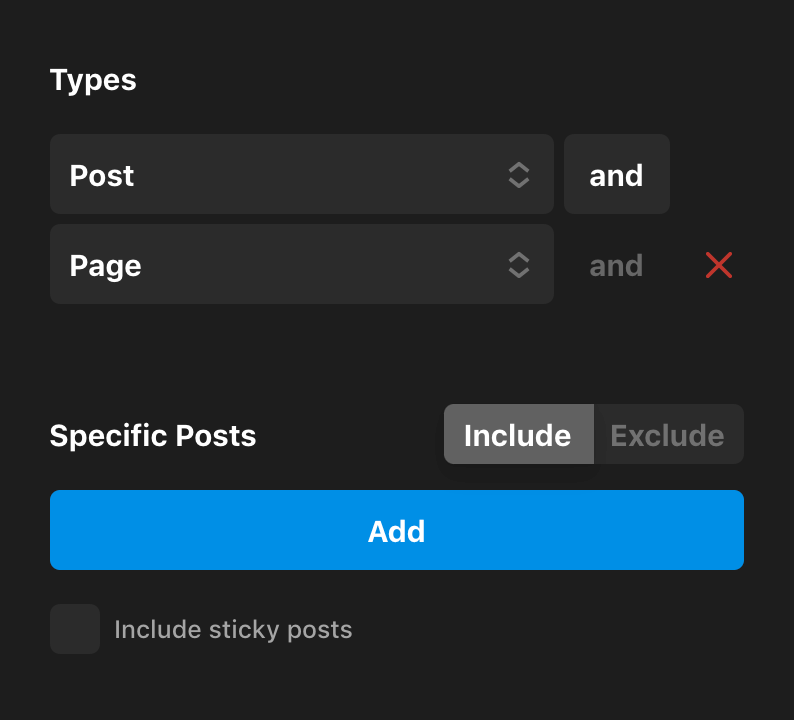
Beyond that, you can further refine your WP Query to only Include or Exclude specific IDs from the previously specified post types in addition to including sticky posts as well (which are ignored by default).
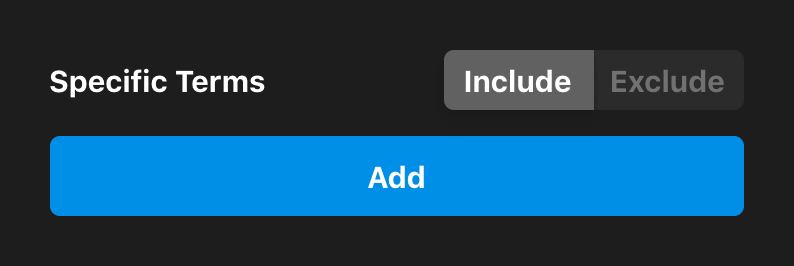
Moving on, we have the Taxonomies control, which will allow you to filter your selected post types by any of their available taxonomies. This means for Posts you would see Categories and Tags show up, if you had WooCommerce installed and were filtering by Products you would see Product Cateogries and Product Tags show up, et cetera. If nothing is selected in this popup, the following will be seen:
Notice that you can choose to filter by including or excluding results with the chosen taxonomies. Additionally, if more than one taxonomy is selected, the following checkbox will appear:
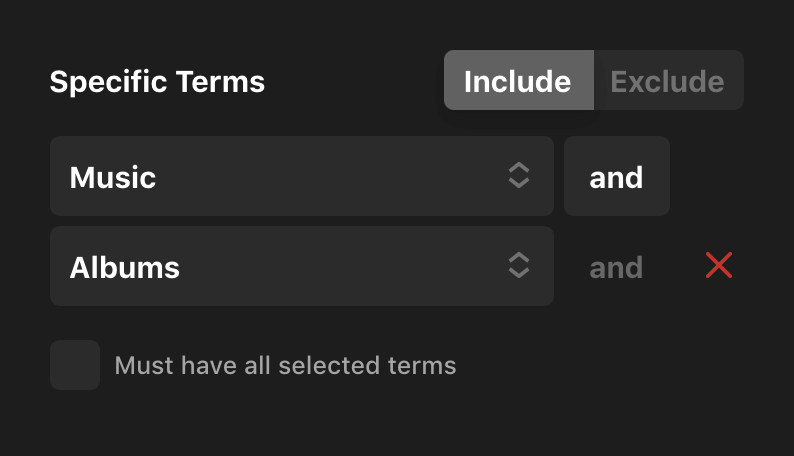
If the Must have all selected items checkbox is selected along with Included in the toggle above, this means that a post type entry must have all chosen taxonomies to be included in the query. If this checkbox and Excluded are selected, it means that a post type entry must not contain any of the chosen taxonomies to be included in the query.
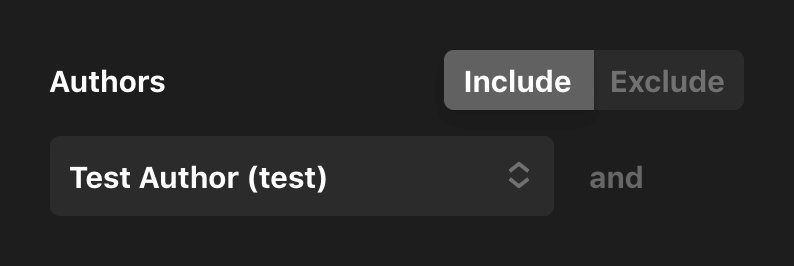
Moving on we have the Authors filter, which looks very much like the previous controls, allowing you to include or exclude entries based on the authors chosen:
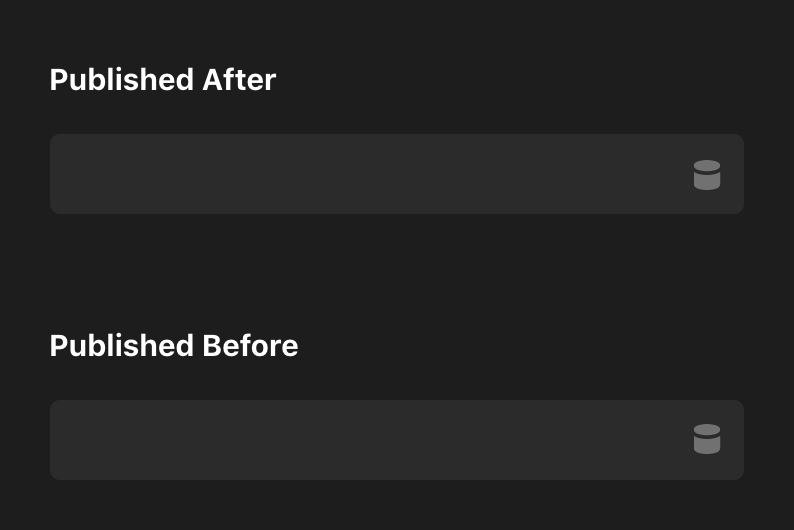
Just beyond that is the Date filter, where you can specify certain ranges of time that your entries must fall in to be included in the query:
Finally, we have the Order By control, which will allow you to specify what meta value your content should use to order its output and what direction that should move in (i.e. ascending or descending):
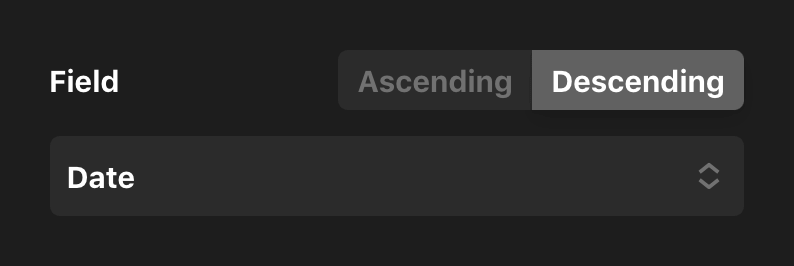
The fields available here include:
- Date
- Modified Date
- Title
- Slug
- Post Type
- ID
- Parent ID
- Random
- Comment Count
- Page Order (Menu)
@since CS 7.4.0- Relevance
- Author
- Meta Value
- Meta Value Number
As you can see, there are plenty of options available here to help tailor the output of your queried entries!
Query String
The Query String option is an advanced technique and provides an escape hatch to work directly with the WP Query API. Selecting this Type will reveal the following input:

You can use this input to manually construct a query string that leverages any of the parameters available in the WP Query WordPress class. For example, if you wanted to get all of your Posts with a Category that had a slug of travel, you could do the following:
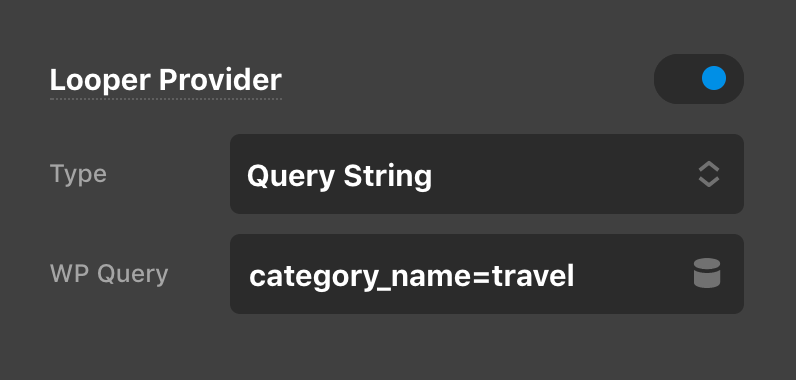
When constructing these queries, keep in mind it must be a valid "query string" which is another way of saying you organize the parameters just like you would in a URL. WordPress doesn't have specific documentation for this technique because they recommend passing an array in custom PHP code. To assist in query string generation, it is helpful to use a PHP snippet in a development environment. For example:
echo http_build_query([
  'meta_query' => [
    'relation' => 'OR',
    [
      'key'     => 'meta-1',
      'value'   => 'value-1'
    ],
    [
      'key'     => 'meta-2',
      'value'   => 'value-2'
    ]
  ]
]);
This PHP will yield the following string:
meta_query%5Brelation%5D=OR&meta_query%5B0%5D%5Bkey%5D=meta-1&meta_query%5B0%5D%5Bvalue%5D=value-1&meta_query%5B1%5D%5Bkey%5D=meta-2&meta_query%5B1%5D%5Bvalue%5D=value-2The string will work as an input for the looper provider.
Current Post Terms
"Yeah, but can we nest Loopers?" I hear you asking. Excellent question, intrepid Internet inquirer…the answer to which is, "Yes, you can!" One of the more common situations where you might need to loop through nested data is with taxonomies.
Imagine for a moment that you have a group of posts you've looped through already and inside each of those items you'd like to display a list of categories applied to that post. You would need a second internal loop that can get that post's taxonomies and output them accordingly. To do this, select the Current Post Terms option from the Type control:
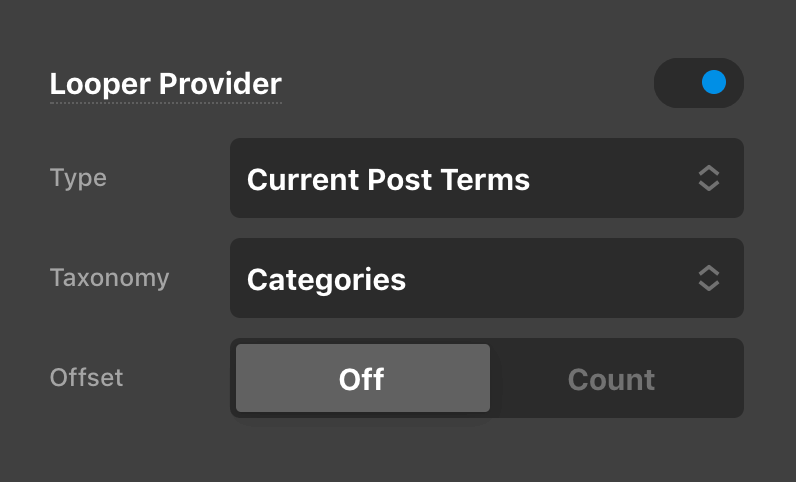
Once you've applied that Provider on your desired parent, enable a Consumer on any available Element to start repeating it. For this particular situation, you would most likely want to repeat something like the Button Element directly, which we have done for the following screenshot:
To get the output that you're seeing above, you would style your button how you want it to look and then apply the appropriate Dynamic Content strings. In this case, we're using {{dc:term:title}} for the text and {{dc:term:url}} to output the permalink leading to that Category's archive page. Again, remember that the subsequent buttons after the first one are grayed out as they are "virtual" Elements created by the Looper, so to adjust anything all you would need to do is tweak those settings on the first Element.
All Terms
Operates similar to “Current Post Terms” in that you can specify a taxonomy with which to pull through all its associated terms. The main difference here is that All Terms will give you every term belonging to a taxonomy from a global perspective rather than just the terms assigned to a post type entry:
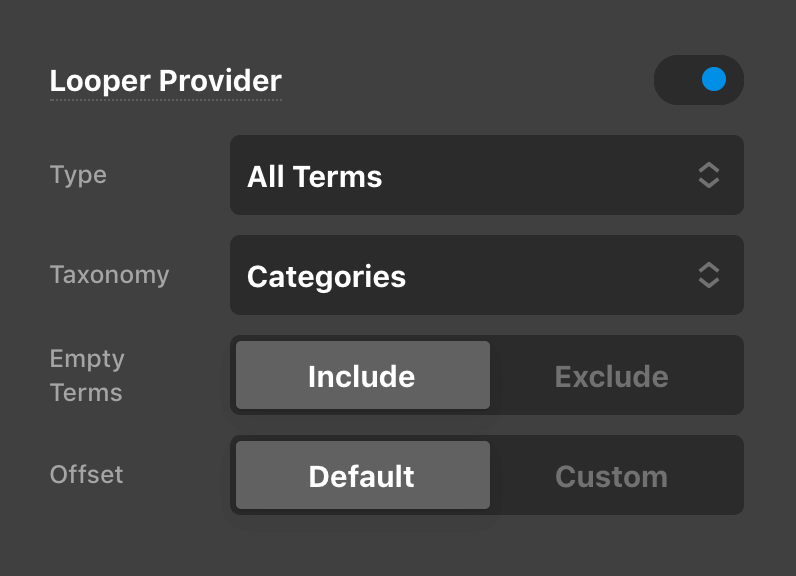
Notice from the screenshot above that we also have the additional control of Empty Terms, which allows us to include or exclude terms from getting added if they are empty or not. For example, you may have created a category on your site but not yet assigned a post to it, which would make it “empty” from a count standpoint. Depending on the use-case that you are applying your terms to, you may or may not wish to utilize this control differently.
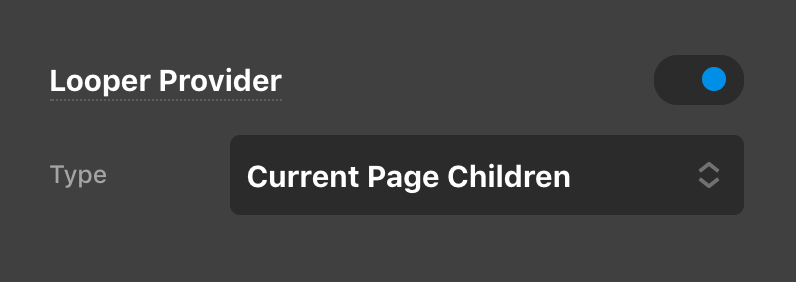
Current Page Children
If you are on a Page, the Current Page Children Looper Provider Type will loop over any child Pages if they are present. The order of these pages is determined by the Order setting found under Page Attributes while editing the page in the WordPress dashboard. This looper can be particularly useful for outputting ancestory navigation in a sidebar or other similar patterns:
JSON
And now, for the pièce de résistance of the Looper Providers (okay, maybe not quite…but kinda…). One of our favorite pieces of the Looper system we've included is the JSON selection from the Type control:
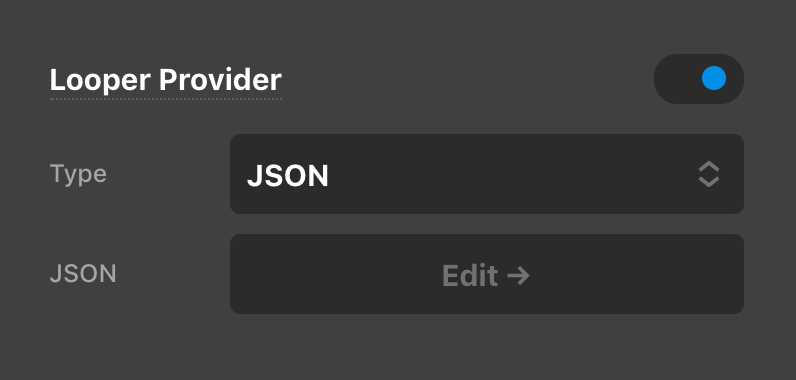
There are a couple reasons why we're so excited about this feature:
- As mentioned previously in the article, there are plenty of situations in your designs where you might want to "loop" through something and keep the same design and layout for every Element, but simply swap out the content.
- You can almost think of this option as a lightweight alternative to having to add custom post types to manage data. For example, maybe you're working on a band website and you want to manage their discography easily to output on a single page. Instead of setting up a custom post type and dealing with the hassle and weight that can bring to your site, you can build out your own data structure exactly how you want and output it as needed.
In building off of the example shown earlier in this article:
That output was output using the following JSON:
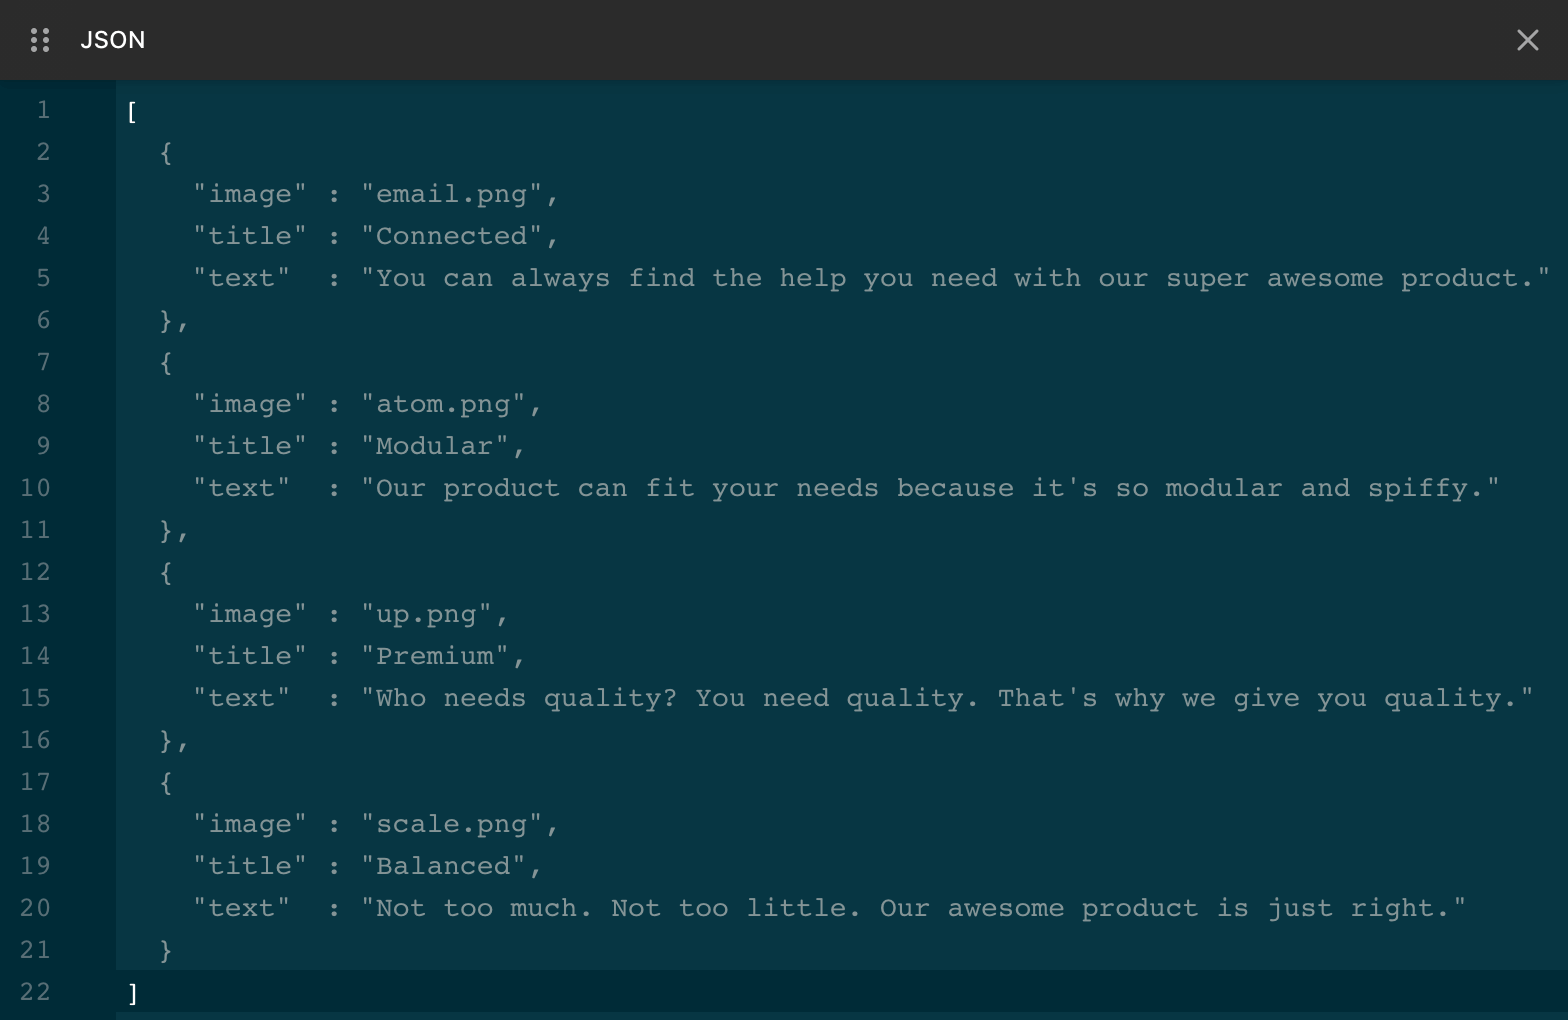
The input here must be valid JSON, which is a fairly straightforward way to structure our data. In the image above we have an array ([...]) containing multiple comma-separated objects ({...}) that possess a set of comma-separated key / value pairs to label each data point. You can see that we have the following keys in each object:
image: a string referencing the asset used.title: a string to be output as the item's title.text: a string to be output as the item's main copy.
To output all of this, we turned on our Looper Provider and Consumer on the same Element (a Column in this case). This allows us to specify our data and manage its output all in one place (but you could break this up across multiple Elements if desired). Then, you can access each item's keys by using the {{dc:looper:field key="title"}} Dynamic Content string. All you would need to do is swap out the value of key to the appropriate value that you're wanting to access (so if you wanted the main copy in this example, you would use {{dc:looper:field key="text"}} instead).
Custom
The Custom Looper Provider Type allows you to utilize a WordPress filter to return a custom array, which can then be looped over:
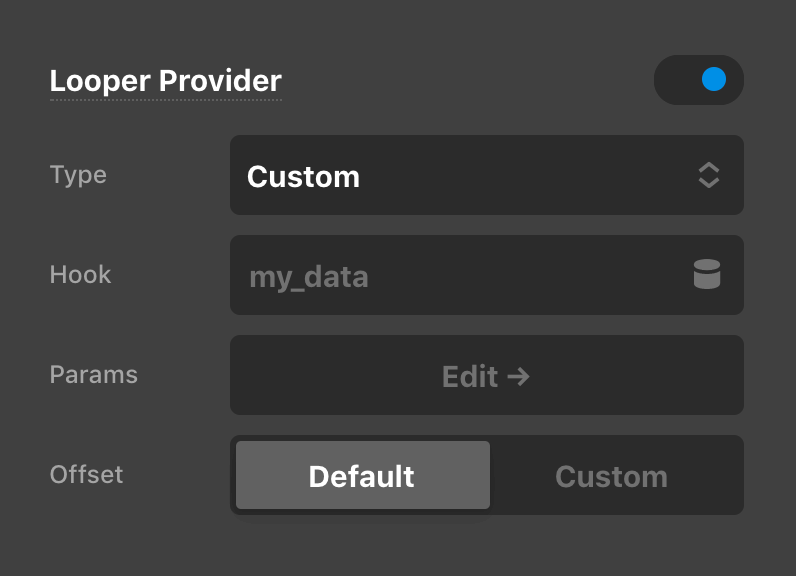
The filter will be cs_looper_custom_{{your_hook}}, where {{your_hook}} is the replaced with the hook you enter. For example, let's say you entered the following code into your child theme's functions.php file:
add_filter( 'cs_looper_custom_my_data', function( $result ) {
  return [
    [ 'text' => 'This is some text for the first item.' ],
    [ 'text' => 'This is some text for the second item.' ]
  ]
});
You would then set the Hook input seen above to my_data because of how the filter was named. Next, within your Looper Consumer you will want to use the Looper → Field Dynamic Content string with the key set to text (e.g. {{dc:looper:field key="text"}}) to reference the text data seen in each item above.
The Params control input opens up a JSON text editor, which serves as a way to introduce unique, one-off pieces of contextual data into your filter's primary data. For instance, maybe you are wanting to reference a different API endpoint each time you access this particular filter, you could introduce the unique API call into the Params control like so:
{
  "url" : "https://your-api"
}
Then $params would be available to reference in your filter by including it as a second parameter and adding the proper priority and accepted args values to add_filter(), like so:
add_filter( 'cs_looper_custom_my_data', function( $result, $params ) {
// Use $params['url'] to access "https://your-api"
return $result;
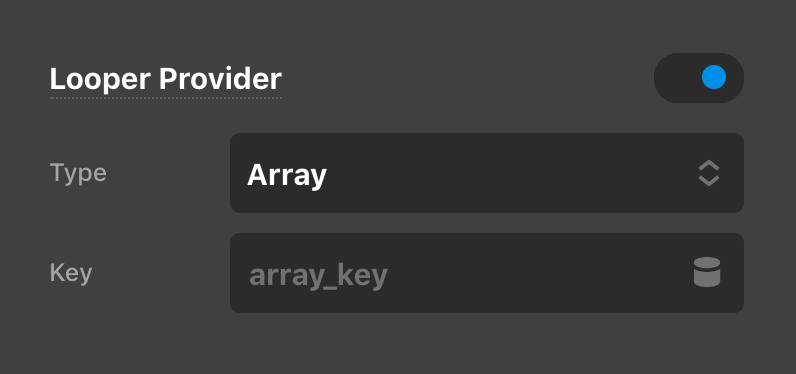
}, 10, 2);Array
If you've just consumed an item from the JSON or Custom Provider Types, the Array Looper Provider Type will let you iterate over a key in that data that returns an array, which can be used to create deeply nested trees:
Dynamic Content
The Dynamic Content Looper Provider Type can be used to supply any Dynamic Content string that returns an array or object of information to be looped over. The primary use-case for implementing this Looper Provider was ACF Pro, which has become somewhat of an industry standard at this point for easily adding custom meta fields to post types, user profiles, terms, and more. To learn more about setting up ACF Pro in general, check out this docs article. To learn more about specifically using ACF Pro with Loopers and Dynammic Content, check this docs article out.
CSV Looper
@since CS 7.4.0
The CSV looper can make looping over tabular data a breeze. Use the file input to select or upload your CSV. Most CSV use , as a delimiter, but if you have issues there double check. Some CSV files contain a header which lists the names of each column. Some don't though, so uncheck the header toggle if it does not have one so it will loop over the first row. Access properties when it doesn't has a header means using numbers to access each property like {{dc:looper:field key='0'}} (or 1, 2 etc...). You can also loop through each property while looping over the entire CSV.
External API Looper
@since CS 7.4.0
See External API for more info. This is not enabled by default, but can be enabled in the Cornerstone Settings.
Linked Product Loopers (Upsells and Cross Sells)
@since CS 7.4.0
Available when WooCommerce is installed. Loop the Upsells or Cross Sells of a specific product or the product specific to the page you are on. The order control is the same as in the Query Builder.
Working with Looper Data
Using the Dynamic Content window, you can access the Looper index and Looper field. Look for Loopers in the list. It will look similar to this screenshot.
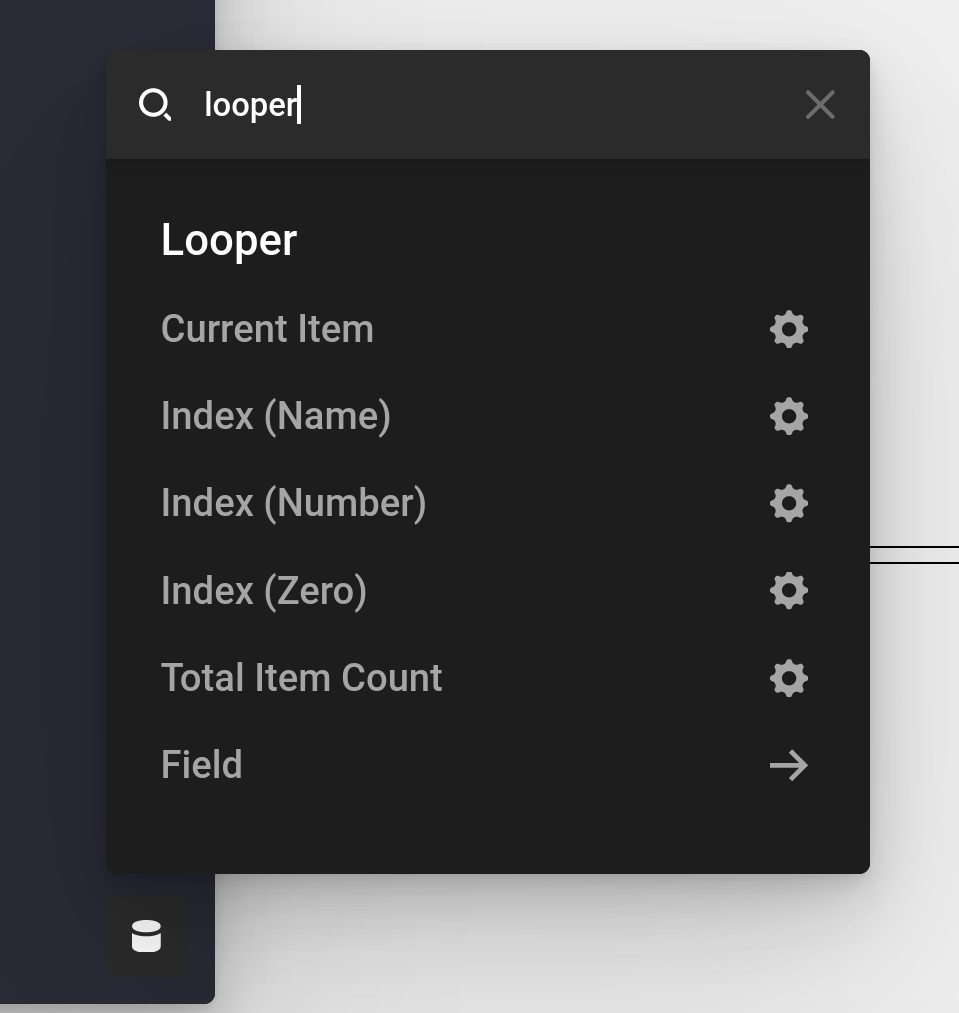
Looper Objects
You can access individual keys by using dot syntax. See more information here. The gist is that using a . between your field data will start accessing inner objects of the looper data.
{{dc:looper:field key="object.key"}}Looper Depth
@since Cornerstone 7.4.12
Passing in depth or using the depth controls in the Looper Dynamic Content UI you can access looper data of the parent looper when you are double looping. Using 0 as the depth is the default, and will access the current looper data. Passing in higher number like 1 will access the next looper in the depth. Using -1 will grab the top most looper data, which will be the default Archive loop on an Archive and will use the Post data when you use this on a Single layout. Example below.
// The current looper depth
// This is not needed as it defaults to the current looper
{{dc:looper:field key="ID" depth="0"}}

// One parent up in the depth
// Adding 2 or 3 would keep going up the looper chain
{{dc:looper:field key="ID" depth="1"}}

// Useable on other looper data
{{dc:looper:index depth="1"}}

// The top level looper
{{dc:looper:field key="ID" depth="-1"}}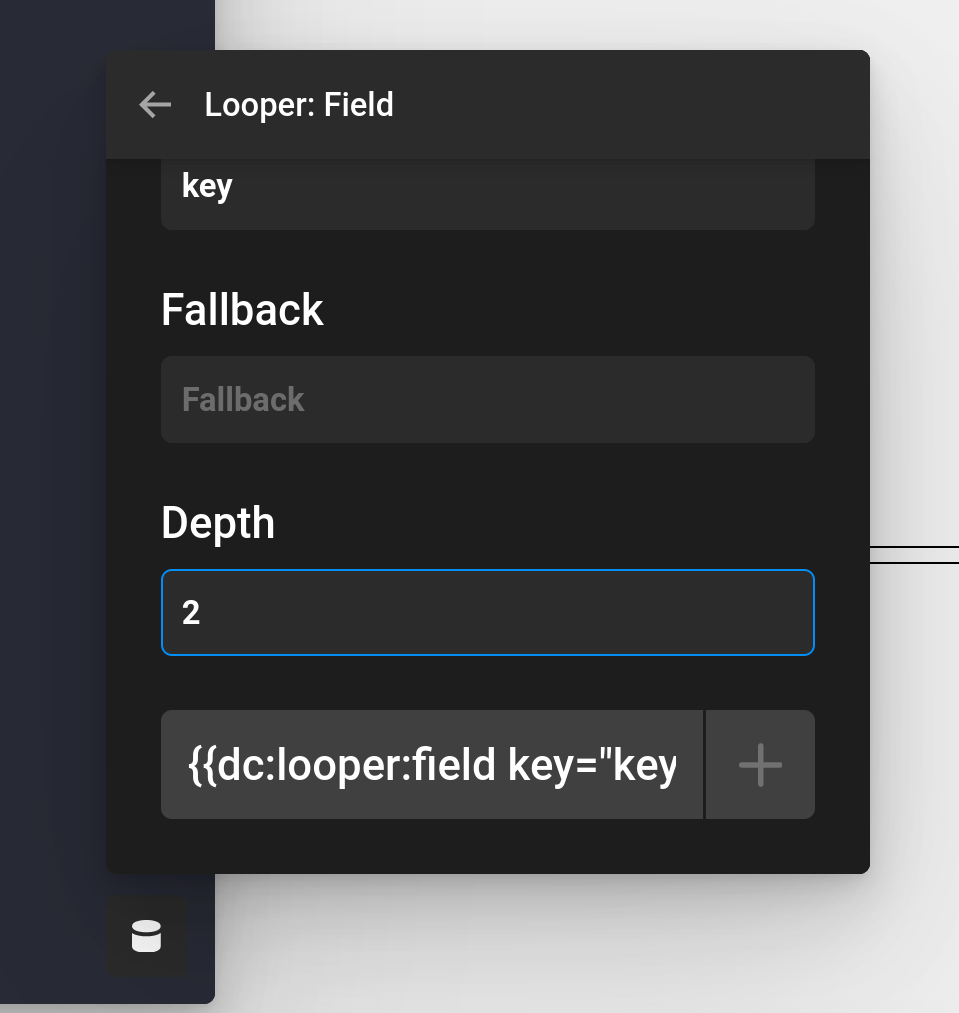
Thinking Big with Loopers
There are a few specific reasons why we chose to break out Loopers into Providers and Consumers:
- Provider Flexibility: forcing users to have to use both of these functions on the same Element simply doesn't work in every situation. While you can certainly use Loopers in this way, there might be other times where you wish to specify a Provider a parent Element and then access that same data in multiple spots on a page. Instead of having to define your query multiple times over, with this method you can break pieces out the way that best suits your build.
- Consumer Flexibility: from a design standpoint, we realized that consuming queries in a flexible way would be necessary as well. For instance, perhaps you want to have one query to work with, but wish to have the first post styled differently to really stand out. You could achieve this with one Provider on a parent, then using a Consumer that only outputs one item followed by another Consumer that outputs the rest of your desired query.
- Performance: piggy-backing off of our previous points, being able to break out Providers from Consumers helps us to reduce data overhead. Instead of defining multiple queries on a page to get into the same data, we can specify one and then access it at multiple points, keeping things very streamlined.
Out of the Box
Loopers paired with dynamic content are a powerful one, two punch in your layout building adventures! But for those who need it to just work we've got you covered.
There are several Dynamic Elements are available to you (directly from your Element pane when working on a layout) that you can drag in and use right away. No setup required! This allows you to quickly hit the ground running with beautifully designed, pre-configued Looper magic. Then as time allows or the design dictates you can get into some of the raw power described above. Either way, you have several new options to leverage these incredible features.
Looper Video Tutorials
We've put together an entire video series on Loopers to help you see much of this in action! Take a few minutes to watch them, especially this video on setting up your first loop.
Ready to jump into the deep end of the pool? Max members get access to Super Loopers. This Course & Expansion Pack will not just teach you how to do even more incredible things with Loopers, you'll also receive several new advanced Looper Templates.
See something inaccurate? Let us know